Men in Black MIB Pulsar project

Re: MIB Pulsar project

Finally found a good match for the cable clips and also the correct screws for them and also some properly sized steel cable housing. I figured I would go ahead and start the clean up of the top section. I started on the worse side. I cut out the tube and drum sander dremeled the old mess off , it went all the way through in some places so this morning I had to back it up with more glass. I'll make some small sanding blocks to try to straighten up as much as possible. Its a bit rough now but this is just after the drum sanding. Did a little check with the cable housing, clip and a screw and everything is coming out nicely. Its going to look much better cleaned up and with real parts then with all that mud. Now I can back up the other side with glass and clean that side too. Going to order the acrylic tube today or tomorrow. I have decided to buy a small to medium sized milling machine and a decent sized lathe too. Going to order the mill in the next weeks and then save pennies for the lathe. I have so many projects that I could use them on and I have wanted them forever so I may as well bite the bullet and go for it.

Also did some glassing on the barrel end piece. I needed to add a bunch of material to put the taper back on the end so I laid 10 or so layers of glass and poured the rest of the epoxy on top. Best to have too much than not enough. I have enough to work it now.
That's it for now.

J9D5ODe.jpg

DIdSlCZ.jpg

kPkW2qW.jpg

RY9QHvL.jpg

kDXeEG2.jpg

6Gcpo7f.jpg

QwJjBRy.jpg


Almost forgot, got these to go with my MIB stuff !!
OiUEsVn.jpg

AcbIgO9.jpg
 
Last edited:
Re: MIB Pulsar project

Can't wait to see how this turns out, all the knobs and extra details you've been fixing have it really coming together!
 
Dude what a nightmare. I think if I were you I'd have started from scratch and just measured off the casting you have. Lots of those pieces were screwed on later and most of it was made of many parts. The mold was urethane and sprayed with Zinc as a finish metal surface. The second film I had a CNC which was freaking way easier to create better parts, but the aluminum machining was costly. Anyway looks good buddy.
 
Thanks a bunch Rick! Means a lot to me. I could have just tried to copy it, but it would not have had any connection to a real one. Although it is a ton of work I think it deserves it. It is such a cool piece. I do enjoy working on it as much as I bitch about the fiberglass dust! I am not sure how to get the zinc finish like the ones you built but I will experiment and see what I can come up with. They do sell zinc paint/primer for welding . I may give that a try to see how it looks.

Again thanks for the compliments Rick.

Glen
 
Last edited:
Here you go Rusty, just a little more done. Got the barrel end started, ignore the center hole and roughness. Its got some pits and I need to add some glass to the inside as the center taper needs to go deeper. I just gave it a priming to see what I have. Also evened out the upper hole as it was mashed in on one side. Was able to clean up the one side section near the clear tube area too. Still needs some love but its pretty much straightened out. Now I can move to the other side. That's it for now. hope to get more done this weekend.

DnYhYaY.jpg

XrGhK8a.jpg

5p35OjE.jpg

lRNfhLI.jpg

KM9Puhq.jpg

T7ENnFl.jpg
 
Last edited:
I'm blown away with what you've done with it so far, the front looks 10x better now. Are you going to just chrome a few select pieces and try and duplicate the metal spray look for the rest?
 
Yes , I would prefer that it look just like the originals. Not sure if its possible seeing how Rick used specialty equipment to spray the zinc layer. If not then ill see about chroming the whole thing. Probably pretty expensive though. Thanks for he comps once again. I am happy so far with how its coming along. Lots of big work done but a lot of tweeking and cleanup to go. I am soo happy the tribarrel is smaller and cleaner. It has a lot more parts that have to be remade though. 6 of one, half dozen of the other.....
 
...I confess, reading this through, looking at the original [insert Chinese curse here] you were working with to where it is... *PHEW* You guys are amazing. Very shiny! I always loved MIB's guns. Much I might like propwork, I ask myself if I really have that kind of patience. I might be that stubborn, but the steady hands, perhaps not so much. I am gawking like the amateur I am.
 
Yes , I would prefer that it look just like the originals. Not sure if its possible seeing how Rick used specialty equipment to spray the zinc layer. If not then ill see about chroming the whole thing. Probably pretty expensive though. Thanks for he comps once again. I am happy so far with how its coming along. Lots of big work done but a lot of tweeking and cleanup to go. I am soo happy the tribarrel is smaller and cleaner. It has a lot more parts that have to be remade though. 6 of one, half dozen of the other.....

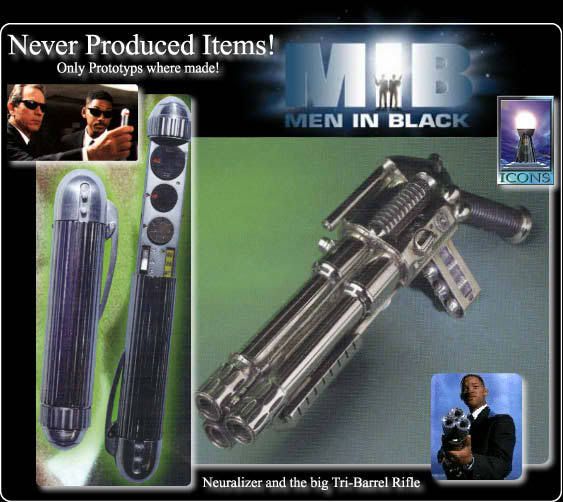
Yeah the Tri-Barrel is in 10x better starting shape for sure. I can't believe you were able to find that one thing on the side, and to think the other part of it was another piece is a stroke of luck! I know that Rick said that the front pieces were parts of a bicycle brake cable without the plastic tubing around it. I thought that the ICONS Prototype looked awesome, even if it wasn't originally how it looked in the movies. I wish we could find some more pictures of it, this is the only one I've ever seen of it.
tri-barrel.jpg
 
Thank you LadySLupe13 !!!

Rusty, yes it looks like that cable. I thought it was a bit thin to be from a bicycle though. The stuff on the Pulsar is closer to that size. The greeblies at the ends of the tri's cable is from a remote shutter release cable and thought it came from one of them. I have some here but they are a tad too thin.

The barrel end is very close now. It sure has come along way ! I need to fill a small chip near the upper hole and add some glass to the inside where it slides into the barrel because its a bit too big for the barrel. Tomorrow ill tackle that. Might try to machine the missing greeblies that go in the holes too.

6oudpj4.jpg


5FnSS7i.jpg


L6HKUAJ.jpg


4tAU2U9.jpg


Wr8pqhx.jpg


CwVYZNt.jpg


pdPtnbS.jpg
 
Last edited:
I am totally amazed at your attention to detail and YOUR LIMITLESS PATIENCE. I think a lot of people wouldn't have been able to have this kind of commitment to do so much restoration and cleanup. This is going to be so incredible when it's done. Keep the updates coming
 
I want to thank everyone for the kind comments. I sure motivates a guy to keep on it. This weekend I mainly did glassing. Some on the inside of the barrel end, some on one side of the magwell to straighten it out and some on the side of the acrylic tube opposite the side I fixed so I can clean it up too.. Also machined a piece for the top hole on the barrel end. There is also a machined piece that goes into the barrel but not sure how I will do that. In the movie there is some sort of light there. To be honest it looks like a torch with a blue flame. I am guessing that it was added in CGI. Never heard anyone mention there being a torch in it. I will probably just add a blue diffused LED in there. That's it for now. The barrel end is pretty much done at this point. Ill probably do some final cleaning and may even open the barrel end up a tad but for now I am moving to other areas.

uWdJ3bc.jpg


sLGKsXD.jpg


bhLjrLh.jpg


drkemua.jpg


Li6K3Sa.jpg


r3kwTUo.jpg
 
Last edited:
I remember that in the behind the scenes of the special features that those guns actually shot some sort of blue flame out of the ends just like what's seen on screen. The guns had some hoses connected to the bottom of the grips that ran to some equipment. In those shots its most likely exactly what you said, just the ends of a torch or some type of device that created the flame.
 
Man you are the king of salvage and repair!!!!!
What an incredible fiberglassing job!
Good score on this piece , I would of not know what to do with it looking at your first pics, but now it looks amazing.
Well done bud
Mars
 
Thanks man !!!

Did a whole lot of cleaning today. Also cleaned out the side slots on one side. Tomorrow more filling and sanding. Got some pinholes from the original casting job to take care of too that I have been putting off. Also need to do the glassing on the mag well and also refill a few holes on the bottom of the barrel. Now that I have mostly straightened the bottom seam (with still some work to go) the holes are not even near the barrel end. No biggie. Also need to clean out the slots on the other side.

9oVQR3W.jpg


wZsI8sG.jpg


oDZMsnM.jpg


osmNc52.jpg


HFXO9fP.jpg


5jPm2tF.jpg
 
Last edited:
Nice work! I see you filled in that one slot and removed the texture, how are you going to put it back there after you've cleaned it up? The guns looking really clean, I noticed some sort of small part in a picture I have of it that sits on the top of the barrel midway down but I can't seem to see it in any of the other pics I have from the movie.
 
What slot do you mean Pat? I have not filled anything in. Do you mean that rectangle spot above the magwell just above the aluminum hammer looking thing ?

On the top barrel, do you mean the front sight tower?
 

Your message may be considered spam for the following reasons:

If you wish to reply despite these issues, check the box below before replying.
Be aware that malicious compliance may result in more severe penalties.
Back
Top