"Bombs Away" techinque for resin or just silicone?

Woodlake

Well-Known Member
Can someone tell me if I should be using the "Bombs Away" techinque when I am pouring PU resin, or is it just applicable to RTV silicone?.
I have done lots of reading, and seen it mentioned both ways (close to the mold and also from a great height)??
The resin I am using has a 3-4 min pot life (if that is relevant).
 
Hi Woodlake,

I use the bombsaway methode for all my silicone moulds and have never had an issue with bubbles, but I would not recommend using this for Resin. resin is more "watery" and can have micro-bubbles in it. Furthermore, if you pour it from high up, first of all you probably won't get a stream thin enough for the bubbles to burst, and if you do your 3 min Resin will likely cure before you get it all in the mould. Secondly pouring from high up will likely create a splatter effect when it landes (even after a pool has formed) and therefore you may very well create even more air pockets by pouring it this way.

I also favor 3 min Resin, it has a very high Viscosity and you dont have to wait a day to demould your casts. I do on occasion use a wooden stick (like those used for cocktails) to "precoat" potential problem areas before I make another batch and fill the mould, and I very rarely have had problems with air pockets, not to say it does not happen but I am very happy with the ratio.

Just a note, depending on the climate control where you are doing your casting, be aware that now during the summer months it is generally warmer and your 3 min resin could very likely turn into a 1 min resin due to the temperature. If that is the case you can step up to a 10 min resin and it will usually start to cure in 5 to 10 min and (once again depending on the temperature) you can usually demould it within an hour or sometimes much less.
 
Hi Opal,

You have pretty much confirmed what I thought :thumbsup

I'm just starting out with molding and casting and have had a few issues with minor bubbles on a horizontal surface. I thought it was the resin, but it turns out that despite the RTV mold looking good, when I pushed on it, it highlighted tiny flaws in that particular surface (which I'm guessing were magnified when the resin heated up). This was on a two part mold that was poured in one go (with the master then cut out of it). This was the advise I got from the store I got the supplies from :rolleyes
Since discovering these "flaws", I have now opted for a more traditional two part mold, meaning that any bubbles formed are now rising away from this problematic surface. Just waiting for the second half to dry before I can test it out with some resin.

There is no chance of decreased pot time here in Perth at the moment - it is currently cold and miserable! :lol
 
yeah, I try to do a singlesided mould when ever I can but I do end up doing alot of two part moulds. Doing them at once and then cutting down the middle does save time, but first of all I dont like cutting and not knowing exactly where the dividing line will be, I like to place the dividing line statigically and not always in a straight line, meaning for one mould might take 2, 3, 4, 5, or even more passes before I get the silicone where I want it.
If your project allows you to do it in one pass, definatly go for it. If you still got bubbles trapped then you are probably pouring too fast / too thick or the form is just too complicated (lots of pockets to catch air). If the second is true, make a very small batch (around 10g or less) and use a tooth pick to get silicone in all the dangerous nooks and crannies, repeating as necessary (depending on how horizontal the area is, when you are sure that all the problem zones in a small area are covered you can drop a little more on it for good measure), Let that dry and then make your mould as you normally would. By doing a precoat, even if you do get bubbles hanging on it, they will still be behind a layer of silicone so they should not effect the casting.

Whatever you do, DO NOT combine different silicones in one mould, i.e. do the hard to get to spots with low viscosity silicone and then pour the rest of the mould with high viscosity silicone... been there, done it and it does not work. the two silicones do not bond properly with another and peel apart... you end up with a big mess and alot of wasted time and silicone.

I love casting in winter, takes forever for everything to cure properly but it just works better. I am having a heck of a time at the moment. I am doing some big moulds up in the attic/hobby room and let me tell you when the sun is out and the roof heats up... well lets just say it is not a pretty sight. :) For times like these I like to keep my resin/silicone in the fridge to help me out.
 
Last edited:
Ohh, just in case you have not noticed for yourself... if you plan on doing alot of moulding/casting, make sure you have a really nice scale, that will be your new best friend. Make sure it can at the very least pick up 1 gramm changes. Alot of the cheaper kitchen scales say they can but they are generally "uncertain" and inaccurate until you have at least a couple grams on them. absolutly a digital scale. Mine has a timer function on it as well, but to be honest I have never used the function (don't really want to waste precious seconds to go from scale to timer function). What I LOVE about mine is that it is a glass plate with touch areas for things like on /off etc. the good thing about that is that any spilt silicon or even resin is reasonably easy to remove... a real beauty and was worth every cent. The only thing that is not perfect is that sometimes I need a little bit longer until I have the right amount in the pot, sometimes longer as he is willing to wait before turning off the scale function and going back to clock, which is ok unless I do not remember how much was in it at the time. If this happens to you, don't try to "thumb" it, you will never get the measurment correct, It may come close but you will have a tacky silicone mould or resin later... as long as you only have one part poured better to just pour it into a new container and start all over again.
 
one last tip before I sign off...

you know how all the tutorials say pour part A into one container, pour part B into another container... Pour A into B and mix... Pour A and B into third container and continue mixing?

I am not saying dont do this, doing it this way you will get a perfect mix every time. What I am saying is that once you get the hang of it, it does work on a 99% hit ratio just mixing it in two or even one container. Why two? well depending on how much time you have... the components react in the second they come into contact with each other... so if you need 30 seconds to measure part B resin while you are pouring it into the part A container, it is 30 seconds less for you to get it in your mould. With 3 minute resin it would be better to measure both parts first and then pour them together (note: the one being poured into the other will be less as some will remain in its container, so you will need to compensate for that in your measurements).

the most important part to make sure of is to make sure you get the sides and the bottom of the container into the mix as well.

As I said, once you get a hang of it and are feeling daring. :)

Another thing that I do quite often is recycle old silicone and resin. Resin bonds wonderfully to itself so there is not a lot you can do wrong there. Silicone also bonds very good to itself with a couple very important exceptions, don't mix different viscosity silicones, chop big silicone pieces up, make sure the silicone is clean... here is a link to another thread going into that.
 
Last edited:
I have re-done the problematic mould in 2 parts now and have had a much better result. It takes twice as long to create, but I'm in no rush.
I did use translucent silicon when I attempted the first (one piece) mould, which made it easier to see where I was cutting. I don't think I'd even attempt it with the opaque stuff though - it took ages to get the master all smooth, not really worth risking the damage IMO.

I like the idea of pre-coating problem areas though. Sounds like a great way to get around the issue - I'll remeber that for next time ;)

Casting in Winter is good, I'm just concerned with the moisture in the air wreaking havock on the resin. Seems to be OK so far. I make sure I put a gas blanket (spray) in the resin after each use.

A digital scale was my first purchase :love. Sounds like it is similar to yours - full glass top and measures to the gram - all for $25!
I do have exactly the issue you mentioned though - the self timer is too short and has on occasion switched off mid pour! I just make sure I turn it on right before starting a pour and I'm pretty sure using the tare feature resets the timer too.

I have been mixing the resin in a single container and have only had one batch fail where it didn't cure. I'm guessing it just wasn't mixed right. I did use a used (previous batch of resin) pop stick to mix it though - don't know if that would cause any issues? I have been using fresh ones each time since to be safe. I didn't think about the time implications of using a single container. Considering the 3 min pot life, I think I'll be using the two cup method in summer! :lol

I'll make sure I keep all the failed/used silicon - good tip for re-using!
Not sure how you would recycle used resin though? Being that it would generally be poured in one go, how would you stop the old resin touching the mould?

Thanks for all the great advise Opal! It's very much appreciated.

one last tip before I sign off...

you know how all the tutorials say pour part A into one container, pour part B into another container... Pour A into B and mix... Pour A and B into third container and continue mixing?

I am not saying dont do this, doing it this way you will get a perfect mix every time. What I am saying is that once you get the hang of it, it does work on a 99% hit ratio just mixing it in two or even one container. Why two? well depending on how much time you have... the components react in the second they come into contact with each other... so if you need 30 seconds to measure part B resin while you are pouring it into the part A container, it is 30 seconds less for you to get it in your mould. With 3 minute resin it would be better to measure both parts first and then pour them together (note: the one being poured into the other will be less as some will remain in its container, so you will need to compensate for that in your measurements).

the most important part to make sure of is to make sure you get the sides and the bottom of the container into the mix as well.

As I said, once you get a hang of it and are feeling daring. :)

Another thing that I do quite often is recycle old silicone and resin. Resin bonds wonderfully to itself so there is not a lot you can do wrong there. Silicone also bonds very good to itself with a couple very important exceptions, don't mix different viscosity silicones, chop big silicone pieces up, make sure the silicone is clean... here is a link to another thread going into that.
 
you know how all the tutorials say pour part A into one container, pour part B into another container... Pour A into B and mix... Pour A and B into third container and continue mixing?
I use three for silicone and two for resin. I do the A into B, mix, then pour that back into the container for A and mix some more. Silicone then goes into the third container because you will never scrape the sides well enough. The reason I pour back into A is something I was told at a seminar: these unmixed chemicals are hazardous waste but after they are mixed and cure they are stable and regular trash.


Sent from my Apple Newton
 
I am using two for the silicone, purely to do the "bombs away" thing twice. Once into the second cup, then into the mould. I do this because I mix the silicone fairly thoroughly and I want to minimize the resulting bubbles.
It seems to work fairly well so far, and with a 1hr pot life it's not an issue time wise.
I also reuse the silicone containers, and so far I haven't been left with any uncured.
 
I generally mix both resin and silicone in one container (although resin time constraints as mentioned can force me to use the two cup method). To be honest I do not really put too much effort into not creating bubbles while mixing... Resin allows itself to be mixed vigerously without causing bubble problems, Silicone on the other hand gets alot of bubbles in it, nevertheless, I have never had problems, the Bombsaway method kills pretty much all of them.

As for recycling Resin, I do try to make 1 sided moulds whenever I can and then all you do is put your splatters, flash, ruined casts, etc inside and start pouring. If a guy had a tool to grind the old resin up like sawdust (which I don'T), you could use it as "filler".

Another thing that is really cool... and by "really", I mean REALLY cool. just using a two part mould which on the later model will have a side that is outside and the other side will be the inner part of a hollow model and not be seen. 90% my casts I spray one side of the silicone mould that is to be the outside with plastic primer. If the model is to be lighted, I even go so far as to spray the other side of the silicone mould (which is to be the inside of the model) with a light blocking Aluminium spray paint... on the down side:
  • it is very messy even once you get the hang of it
  • If the paint pools or is too thick it can make edges "pitted"
  • If you get paint anywhere other than where the resin goes (and you will) especially where the two silicone pieces come together and are supposed water-tight to keep the resin in... well the paint reduces this and resin leaks much easier.

Ok, so why do I do this you may ask? First of all because I think it is cool so I do it partially when it really isn't necessary. But why is it cool? Well Resin adhers to the paint many times better as paint would meld with the cured resin. In fact, the curing resin swallows the layer of paint and it literally becomes the outer (or inner) layer of resin. That means it will not scratch off (unless of course you sand it or it is a deep scratch hard enough to scratch resin) and your detail is as crystal clear as the casted resin can be... sometimes even more so because the paint can get into corners that the resin does not quite get. One other down point is that CA does not meld very well with primed surfaces, so if you plan on glueing Greebles etc to your casted parts it you will either have to not have primer there, sand the primer away, or use another glue.

regardless of all drawbacks, I absolutly love this procedure.
 
Last edited:
Another thing that is really cool... and by "really", I mean REALLY cool. just using a two part mould which on the later model will have a side that is outside and the other side will be the inner part of a hollow model and not be seen. 90% my casts I spray one side of the silicone mould that is to be the outside with plastic primer. If the model is to be lighted, I even go so far as to spray the other side of the silicone mould (which is to be the inside of the model) with a light blocking Aluminium spray paint... on the down side:
  • it is very messy even once you get the hang of it
  • If the paint pools or is too thick it can make edges "pitted"
  • If you get paint anywhere other than where the resin goes (and you will) especially where the two silicone pieces come together and are supposed water-tight to keep the resin in... well the paint reduces this and resin leaks much easier.

Ok, so why do I do this you may ask? First of all because I think it is cool so I do it partially when it really isn't necessary. But why is it cool? Well Resin adhers to the paint many times better as paint would meld with the cured resin. In fact, the curing resin swallows the layer of paint and it literally becomes the outer (or inner) layer of resin. That means it will not scratch off (unless of course you sand it or it is a deep scratch hard enough to scratch resin) and your detail is as crystal clear as the casted resin can be... sometimes even more so because the paint can get into corners that the resin does not quite get. One other down point is that CA does not meld very well with primed surfaces, so if you plan on glueing Greebles etc to your casted parts it you will either have to not have primer there, sand the primer away, or use another glue.

regardless of all drawbacks, I absolutly love this procedure.

Great idea Opal! I saw something along the same lines on one of the Brick In The Yard youtube videos. The only concern I have is that both sides of the part are visible in my finished piece. This being the case, removing any flash would reveal the resin beneath the paint I'm guessing? I might have to try it and see. I had planned on adding pigment to the resin, but for something that needs to be black, I have a feeling that I will only end up with dark grey at best...
When spraying the paint in the mould, would it help to add a release agent or vaseline to the mating surfaces to allow it to be removed prior to putting the two halves of the mould together?

Mmmm...thinking about this some more, it wouldn't work because you would have the pour spout and venting holes to remove too :(.
I guess you could always touch up what needs to be painted afterwards - it would still be more durable that adding paint after the fact as you mentioned.
 
Last edited:
If you wanted to go the whole 100 yards, you could mask the mating surfaces with tape or with gel or with a stencil or something, can't say I have ever taken the time to do that. the pouring and vent holes shouldn't matter if there is paint in them, the paint is not thick enough to block them.

The only concern I have is that both sides of the part are visible in my finished piece.
Basically you all you have to do is paint both sides with primer and you are good to go


If you want good results, one thing you have to be careful of though, is not to bend the silicone after the paint has dried. once the paint dries it does not stick to the silicone very good so twisiting and turning the silicone will flake your paint, coming in contact with another surface i.e. the other side of the mould will also pull areas of paint off. It will not hurt your cast but you will end up with some areas deeper underneath the resin and generally a dry desert floor optic. (which might actually be cool if you are looking for that sort of optic when it is lit up, I am thinking of the organic ships' pattern in Babylon 5)

I have noticed that Primer adhers slightly better to silicone as normal spraypaint, but that also may be just the type of normal paint I use, the Aluminium paint works also quite well.

As far as the flash goes, can't say that it was a problem on my casts, at least not as far as I noticed. The way I see it is that the whole point is having the primer firmly attached to the surface, if there are bits and pieces that did not get 100% covered any paint applied will have enough grip on the areas around it. even with this method you are still going to have to paint your models, I do not recommend using spraycan paint for this, they generally go on thicker and soften any sharp detail that you may have. Get yourself an airbrush for this, that way you can thin the paint as much as you want and add as many coats as you want. This way you will not lose any detail.

This works perfect for one-sided moulds, usually the sides inside the mould are the sides you will see and the flat side at the top of your mould is either the base or the side that will get glued to something else. Which is great because that is the only side without any primer on it.
 
Last edited:
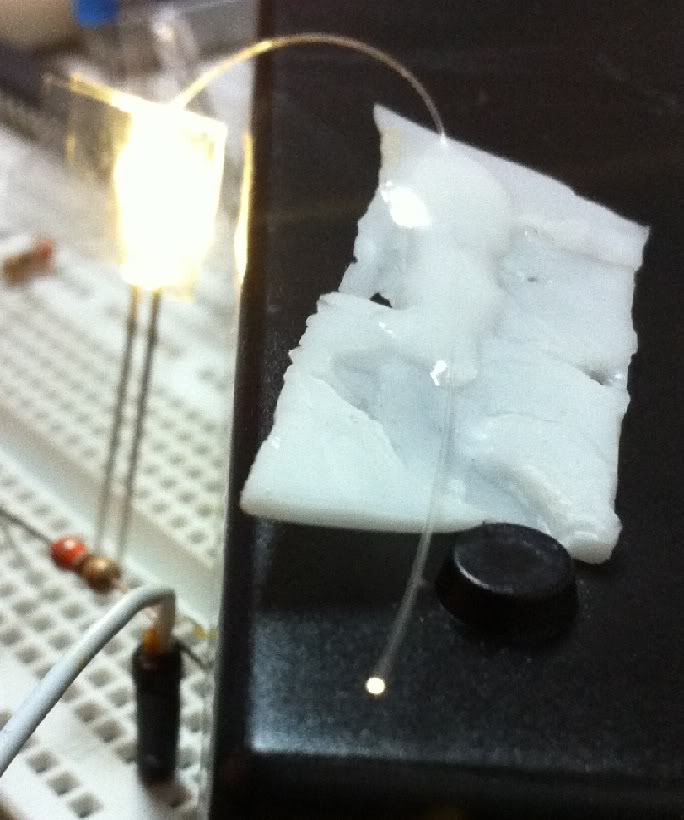
Oh, one other cool little trick that I learned... and I really did not think it would work until I tried it and surprised myself. If you are ever planing on lighting a model, you can cover fiberoptic cables with resin. It will cure and not hurt the FO at all. As opposed to CA (aka superglue) which will all but destroy them, resin does not hurt the light carrying capacity at all and they will not become brittle and break as it is with CA.
This is a good way to get FO into hard to reach or very thin long parts by just molding the pieces with FO already in the cast. or to just tack them down. FO will also pick up light around it so this is also a good way to bury your cables to make sure the color at the end is the same as the LED at the source.

Here is a picture I made of my test...

Fiberoptic-Resin.jpg
 
Yeah, I guess I was maybe hoping to go straight to the colour coat, but I think that may be asking for trouble. Going with the primer sounds like the way to go.
I guess this also gives you the opportunity to fix any slight blemishes in the cast rather than trying to get perfection from every pull (I'll have to remember to be careful with moulds after I spray them too!) :thumbsup
I did actually plan to use an airbrush for doing the finishing coat (I'll have to get used to using it again - it's been quite a few years!). Any tips on what is a good paint to use?

Cool tip on the fibre optics. I think I need to learn to walk before I can start running though!! :lol
 
Woodlake,

If you are going to be doing many pieces, you might want to look into a Pressure Chamber for your castings. I wish I had built one instead of the Vacuum Chamber when I was making those prisms out of resin.
 
Hey Mark,
Yeah, its probably a good idea, but if you use a pressure chamber you really have to have the vacuum chamber as well because the moulds need to be degassed, otherwise they will likely deform under pressure if there are any bubbles present.
I think for casting clear resin (like your prisms), it's pretty much a must. At this stage I'm only working with opaque though.
I'm hoping I can get away without it - we'll see how we go!

(Nice work on the vacuum table so far too :thumbsup)
 
Hi Woodlake,

Thanks. I am looking forward to making stuff out of vac formed plastic :) I just wish I had found sites like this back in 2006. I could have saved a lot of $$$ on resin fails.

Good point you made. How long does the RTV take to cure? Can you not make the mold and let it cure under pressure? If so, that would solve your bubble issue. Then cast in that.

There was an image posted where I guy made his pressure chamber dual purpose by simply adding a large rubber seal and a square Perspex lid [fitted with a Vac gauge, release valve and output fitting] and attaching a vacuum pump. I though it was neat because he could degas, then compress all in the same chamber.

I'd like to get back into casting, but would certainly be investing in a pressure pot if I did. For now I will play around with what I have.
 
What's better all around for casting? Pressure or vacuum? Would like to make one, any guides out there? :)

And at what pressure/vac do they usually work?
 
Last edited:
What's better all around for casting? Pressure or vacuum? Would like to make one, any guides out there? :)

And at what pressure/vac do they usually work?

I am no expert here and as far as I know the required vacuum in a chamber should be at or close to 29Hg (Hg stands for units of mercury and where 1 negative atmosphere is 27Hg). A vacuum cleaner pulls about 1.5Hg, so will not do for this.

The pressure in a pressure pot should be at least 100PSI.

The pressure post must be constructed properly or you risk having a lid blast off the unit as it will do damage. The lid of a vacuum chamber is held on by suction, but you do want at least 20mm thickness so it does not implode.
 
This thread is more than 11 years old.

Your message may be considered spam for the following reasons:

  1. This thread hasn't been active in some time. A new post in this thread might not contribute constructively to this discussion after so long.
If you wish to reply despite these issues, check the box below before replying.
Be aware that malicious compliance may result in more severe penalties.
Back
Top