1/700 & 1/350 scale BH Cygnus builds

Crap, that's no good. :(

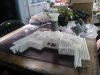
Just had my last order arrive. Port upper engine deck has the same kind of discontinuity as psimon's spine. And I've found both my upper platform parts (I had to make it in left and right halves for filesize reasons) are faulty too, dammit. The lower rows of X framing around the sides are hairlike, each rod is only half the diameter it should be and most of them are broken/loose. The file shows the rows same upper and lower so I have no explanation for this other than a printing error. Am redesigning the part (as a lower-resolution single piece) anyway, I don't know if I can get a refund for these, they came in an earlier order.

Mythshaker, I see they have printed yours in FUD. Hoping they are OK! They will need slight modifications by the by. You'll need the same lower spine part, stern Fuel System B and stern fuel module A as me, not the generic ones I'll leave uploaded. Talk to me before you order and I'll re-enable them for you. Nothing major, just need to open out four of the forward-wall cells for fuel pipes that are included on the other parts. It's all afterthought stuff, I'm still recovering from mistakes made during the October rush.

BTW, they've printed your engine mounts in FUD too. I have found these are fragile in WSF. I think I probably need to disable the FUD option on them but let's cross our fingers.
 
Re: 1/700 & 1/350 scale BH Cygnus builds

I'll certainly show pics of what arrives. Should show up monday; or tuesday; or later than that; or not at all. The delicacy is one of the things that attracts me to this whole model.

I noticed the upper rear platforms are not now available. What's the issue?

The fineness and smoothness of what I got earlier in FUD impressed me, which is why I'm trying to get as much FD or FUD as I can. I will have several parts in WD next time and we'll see how that works out. Print lines and fuzziness I find a bit annoying. The main engine mounts were interesting, the port one was complete a few days after I submitted the order and the starboard not until the end.

I'm saving the spines and other center section elements for last. That makes a 2+' long model 6+' long and begs for an armature prior to fitment to me. Hiding the rear doesn't look like a problem but hiding the bow between the observatories looks a bit tricky to me.

Any chance of getting the rear fuel manifold in FUD?
 
It's the issue as described above. Printing error *probably*, but if there is something wrong with the file that I can't find, I don't want anyone else to order.

I fear the engine mounts may arrive in a number of pieces. :( FWIW, you really don't find print lines on WSF parts when they are mostly girderwork, it's a much bigger issue for more solid surfaces.

Hiding - not quite following? The observatory bases and the bow core piece make up a unit with solid walls all the way down; it sits on top of the forward end of the spine acrylic armature but shouldn't allow light leakage if properly prepared (black paint inside) and assembled. Definitely don't assemble any of the mains structures permanently until I have the armature worked out - that'd be a recipe for disaster. Some pieces need to be carefully cut apart to fit around the clear parts and there's a lot of sprues to remove. Fitting things like the A and B tanks is tricky and wil require some cutting too; best done after all pipework is in hand. Various pieces will need to be slid into place before others can be added, etc.

For example, the spine frames go on first, with the double Power Centre modules needing to be separated. The forward part of each of those is just a standard Side Module and can be slid onto the armature lengthways from the front before the bow is added. The PC modules themselves need to be slid onto the armature sideways, because obviously they can't go lengthways with the big bite out of them. The cutting should be very easy - only involves snipping five of the longerons. I'll need to put together instructions for all this of course, and will do.

I've begun design work on the armature, btw.

Sorry, rear manifold is not printable in FUD in the current version. Not sure what I can do to change that, but I'll try a couple of things and see how it goes.

Hey someone just ordered the larger Palomino. Post pics when you get it, whoever you are? :)
 
Re: 1/700 & 1/350 scale BH Cygnus builds

PS in case not clear - the armature and the interior acrylic panelling will be one and the same item. There will be separate units for the bow, centre and stern, with the centre piece of course being the main unit that everything else hangs off.

I've made provision for two 19/32" brass tube supports entering the lower spine, similar to Dave's arrangement. I went for 19/32" because a) it looks a bit better/beefier than 1/2", and b) there was no half-inch tube in stock at my LHS. :)

I will include inside parts to facilitate the stand tubes and maybe something for the electrical arrangements if I can be fagged, haha. I'm toying with using printed Transparent Detail parts as joiners so that I don't need to design the acrylic pieces with beveled edges. It looks like it'll be expensive, though, so I'm hoping to find a local lasercutter who can handle beveling instead.
 
Last edited:
Some this just seems like FM to me. Why the front fuel manifold prints great in FUD and there is a problem with the rear manifold just seems... odd. What's the given reason?

My 3d Printer just destroyed another printing plate so I hesitate to say much about issues with 3d printing.
 
It's too big. I could possibly break it down into more parts.

?? How'd that happen, bad leveling?
 
Oh forgot. How to tell the Stern and Forward fuel modules apart, for Dave's model: only one of them should have the landing pad for the Probe Ship. Hope that helps!
 
Guess what arrived today? Informed Shapeways but it appears they are trying to print replacements pronto.

IMG_0045.jpg

Very impressive! I'm very happy with the WSF. Some other things I have received in WSF, model train stuff, were nowhere near as impressive. They are a bit bowed, away from the parts they will attach to, at the ends, so I hope adhesives will work well in the attachment long term. What are you [planning] to use for adhesives?

You're sure this thing is 6.5' long ;)? Again, these parts are much smaller than I would have thought. It appears the engines however, given the attachment points on the mandibles, are going to be larger than I would have thought.

The rear fuel manifold is that much larger than the front? I would have thought an inch at most.

Can the heat shields be made available in FUD?

I was assuming the armature would go through bow internal framing to the nose piece and with that rather large hole in the middle might make it a bit challenging in Z.
 
Ha. Gotta love the post.

Tolja! :D It's good stuff for girder-ish parts - you can see flaws in photographs much more easily than you can in real life. It's less good for solid parts and that's probably what your train pieces were like? Depending on orientation in the printer tray and how fine the layering settings are, I find things like domed pieces can come out with very bad lines.

Mine are bowed too, but nothing that can't be flexed out. I'm using superglue AKA cyanoacrylate.

Yes, rear manifold is a fair bit wider than the front one *and* spindlier. Its main cross pipe doesn't connect the two spheres, unlike the front one. Nope, heat shields too big I'm afraid, and they need to have some strength.

Nah, armature slims down to a boxier shape that fills in between the observatories and ends there (I'll probably have a couple of tongues going forward to the box behind the docking bay). That's all lightbox because there are light holes around the observatory drum mounting areas. Upwards floodlight effect as seen in the movie.

6.72' to be exact. :)
 
Latest prints:

20141227_151157.jpg

- faults on the sterm platform. Grrr.

20141227_151341.jpg 20141227_151249.jpg

- home printed engines vs. Pinshape ones. Too much Z-axis vibration.

20141227_151231.jpg 20141227_151222.jpg 20141227_151216.jpg 20141227_151210.jpg

- the lower row of Observatory antennas completely fall off their sprue, oh well. Upper ones are OK.

20141227_151143.jpg 20141227_151131.jpg 20141227_152247.jpg

You get one spare Tower antenna, because it was just easier to array nine of the suckers. :p

There are sprues on the main upper deck parts which have to be removed before the Platform can be fitted. It all seems like it'll work OK. I am leaning towards reordering the platforms as single pieces though; if I can get the sodding things to upload that way, which has always been a problem.
 
Wow, this thing is going to be awesome! Thanks for the pics.

We'll see if the FUD parts come out any better. I've got the mandibles rubber banded back to back until I need them. Maybe that will keep the warp minimized. The interior fuel lines for the reverse engines are amazing.

The engine shields are too big for FUD? How about WD? I'd like a nice smooth surface for those.

Holy carp! The older Palomino upper hull FUD was $40 the new is $240. The entire FUD Palomino goes from ~$100 to about ~$500. WTF?

What are the geometric parts now on the Shapeways site?

I love the command tower interior.

Are you going to try the 2 piece spire?

Are there any A pipes to come? I thought you said all the pipes were listed.

As far as my 3d printer Slicr tends to make up it's own beginning Z and in the last case decided -1.8mm and I didn't catch it for about 15 minutes. Left nice grooves on the aluminum plate.
 
Like the look of the nostromo in the background and is that the beginnings of a dropship I see being constructed?
 
The rubber band idea is a good one. You might even want to slip some kind of spacer between them at the middle, to exaggerate the bending effect.

If a detail material was available I'd enable it, but no dice; the build trays for those materials are much smaller. I've printed mine at home but might go for WSF versions in the next SW sale - I'll let you know how they turn out if so. My suspicion is that SW will *most likely* (it's always a risk saying this) choose to orient them in their build tray in the horizontal, but on edge position. That would avoid the tree-ring types of banding you can get and keep artifacts to a bare minimum.

Relax, different Palomino! The new one is nearly double the size - see my post #676.

Tower interior just a test version; the final one could be the last part I'll do. It was one of the first I tried, but failed; I've had to double the thickness of everything. :( Last thing to do is rebuild my little Maximilian as he's somehow lost his torso.

2-piece spire is in print in my latest order. The A pipes are now included in the A modules and A tanks, while the Bs were more of an afterthought. Making a virtue of necessity there as I originally just tried to get the A modules uploaded and ordered ASAP before the price change. (Prints failed, so inadvertent opportunity to make changes.) See my remarks above tho, about being wary what you order! I'm still trying to juggle a lot of stuff and I'm losing track of what version is which. Best to contact me before ordering any of the parts I listed.

Oh god, that sucks. Slic3r is to be avoided IMO. I'm using anything except that, mostly Cura - give Cura a try if there's an Apple version, it's a bit simple but works well for most models. A combo of Cura for printing and pronterface for general printer control, pre-heating and troubleshooting is pretty good.

Seriously, ditch Slic3r. Even without disasters like that, it generates support material that's like tungsten steel.
 
Last edited:
Oh the geometric parts are experimental tomfoolery; clear joiner pieces for the armature. Will be a non-starter if the local laser cutters can handle the bevels. I'm just feeling lazy about beveling a lot of perspex manually.

32buds, the Nostromo is just the old Halcyon kit. And the other stuff was just some printer experiment stuff; I was clearing out a bunch of stuff from my printer desk at the time.
 
Martyn, have you thought about making the Probe Ship? If so, please do it in the 700 and 350 scales...That would be the ultimate combo...Cygnus, Palomino and Probe Ship.
 
Boy, must have been up too late last night. I woulda sworn the smaller Palomino was gone. But viola, it's there.

So the A piping comes with the tanks? Does the underneath piping come with the fuel frames?

Good idea with some cardboard for a spacer in the center of the mandibles.

So now the Stern upper is one piece? And FUD? Is there going to be a new one piece lower too? Now I'm not going to feel AS bad if the half parts are not perfect.

Have you considered doing the bridge in two parts with the lattice work being separate (maybe on a sprue)? Gonna be interesting finishing it as it is painting through the lattice.

Now I'm going to do a head scratch. The engines print in FUD but the heat shields won't. Must be a Z limitation. I woulda thought the engines were printed vertically but maybe not.

My big order is in town so it should be delivered tomorrow.

My next order will be pretty much all from the observatory forward stuff. OBTW, given the way the observatory antennae are made, how do you get the observatory sub dome installed (which I assumes goes right in the middle of the antennae)?
 
FP, yes I have the drawings for the Probe Ship and will do it in 1/700, 1/350 and 1/192. :)

The A piping is 60% on the tanks and the rest on the A framing modules.

It took about six attempts to get that stern upper platform to upload as one piece. I'm trying it for the lower as well but honestly it is like magic if it works. I don't know what is making the difference. It's not changes to the modelling.

The bridge *is* in two parts - the floor with the main ring of seats and the elevator, and the inner cage with the walls and overhead struts.

The engines print in FUD? Really? Huh. The heat shields are only a little longer. I had one engine printed vertically years back, but I wouldn't rely on SW to orient them that way again (it is best). I went with Pinshape for these - good results in their equivalent of WSF, and cheaper.
 

Your message may be considered spam for the following reasons:

If you wish to reply despite these issues, check the box below before replying.
Be aware that malicious compliance may result in more severe penalties.
Back
Top