My BTTF Inspired Bag V2 Page 4

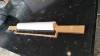
So a guy is asking me about the tube bag in a photo I posted on IG. I explained that was version 1 and this is version 2 and then went on to explain the differences.

To my surprise, the new end cap and custom insert I have made (molds of for easy replication) fit right on the ends of the V1 bag.

I think at some point, this bag is going to be upgraded.

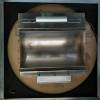
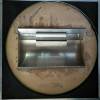
And during last few weeks of insainly hot weather, all the parts in this container warped. Lucky this plastic has memory and I have been able (with the help of some jigs) to heat and flatten them back into the original shape.
01e40d73e84d0a2c02473ea961edbd82.jpg
356581d26f6bcb6cd7de16659c5ceba2.jpg
593b5ae12e8dfd926afa08b85c4f8408.jpg


Sent from my CPH1701 using Tapatalk
 
So that thermal forming jig works but polypropylene probably won't. I discovered something interesting today about polypropylene and that is it expands when it gets hot. When cold, the precut parts fit perfect in the jig. After heating, the plastic was too wide for the jig.

So I decided to test a different plastic. Better results but not perfect or even really duplicatable.

Them I discovered that I have made a big mistake on my tube bag design. That new spacer ring I made is good but needs other parts to make it fully functional. How I missed that when I designed it is beyond me. Lucky I picked up on it now.

Any this thread has become more of a blog so hope you guys don't mind my rambles from time to time.

Even though this thing is kicking my ass, I don't give up with out a good fight.

I have stuff on the pour table right now so can't make up the bits I need. I have got the mold made, just need to fill it.
a2fa10b2e9559f9b35071cbd1834ce52.jpg


Sent from my CPH1701 using Tapatalk
 
Progress at last.

This is not a final version as the handle recess is too large and was redesigned in the latest revision. The purpose here was to simply test that tight tolerances issue with the lids binding is now fixed.

There are challenges with assembly when attaching the end caps. In this instance, I have used smaller windows than what the original design was meant to use and it makes assembly a bit easier.

So the lids move quite easy and the MAGs fit [emoji2]
98d6e234e170b6c1cfe3f02bfa0cbe37.jpg
d7b4ee5493cb77cc9ae2822c76d78723.jpg
54bb697ccdafda7585a0b6ce95a1697d.jpg
adb2d68d8b42114acd2d6f9f635ae6cd.jpg


Sent from my CPH1701 using Tapatalk
 
SO MUCH AWESOME!

Are you still thinking about decals for the lettering? And how about electrochromic film on the panels?
Yeah looking pretty good.

Right now I am just wanting to have a working, duplicatable process. Decals and the film are just icing on the cake. I want my cake first.

Sent from my CPH1701 using Tapatalk
 
So just got these parts in.

The first image is of the frame for holding the plastic during forming.

2nd image is the new handle recess. I have clean up the weld and add the small lip on the front. This lip will be an angle part to define the edge and add strength to the lids. The reason I want an angle is so I can drill mount or registration points into the tool. The curved part is the larger diameter of the two parts for the lids.

The handle part will come out and the smaller diameter part goes in for the body pulls. This way I have 2 sizes that fit inside the end caps.

Off to assemble this now. I am going to grind a bit off the end of the insert so I don't have to fight with it to fit it remove it. And of course make up the handle part with the lip.
d4ae6705bfc81917547fe5bcc0abee84.jpg
c9c4e1cb7751dbdfbe458c783d77d60f.jpg
38c2760d3c4bee7a861ebe51f2f076e3.jpg


Sent from my CPH1701 using Tapatalk
 
What a day. Got lots done so that is a good thing.

Image 1 finished off the handle recess. I just need a piece of half inch angle and that tool will be ready.

Image 2 the heating box is built. Not the pretties thing I have ever made but it well constructed.

Image 3 the heating element. I going gas as I am over electric elements that don't heat evenly. I have to redesign the flume as the burner is 10 inch and I was originally working on 16 inch.
4bae06965c77649f9b4eef87a634b174.jpg
42492923dfcb70f98e534d9d0ef782af.jpg


Sent from my CPH1701 using Tapatalk
5503389eafe5795a7c52b59d72cf9bac.jpg
 
And the new flume is drawn up ready. Not sure if the aluminum place is open on Saturday, so this might be a Monday morning job.
25f4d32100197c362a7554043e80c8b0.jpg
7b045599c4653ba1cf7b6b940b7b9312.jpg


Sent from my CPH1701 using Tapatalk
 
Flame on! Did my first burner test and got a solid 145 degrees Celsius. I know that ABS only needs 110 C and I am hoping polypropylene doesn't want much more. Perspective wants about 180 C, so I would need to MOD the burner to get it hotter.

Then onto the tool. As I hopefully described in earlier posts, I am making an interchangeable female tool for the lids and body of the Tube Bag. My rig can also be used for males tools as well after I make an adaption plate.

Image 3 is of the tool set up for the body pull. It has the sleeve seated into the larger diameter rolled part that is the main part of the tool. The body needs to be smaller so the lids can wrap around it. The lid handle tool is just sitting on the edge.

Image 4 has the sleeve removed. You can see it is marked BODY.

Image 5 has the handle tool in place. There are holes to quickly align and remove this part. You will notice that there is a big undercut with the angle extending out each side. This will shape the front edge of each lid and give reinforcement to the lids. The tool needs to come out quickly so that I don't damage the plastic part on ejection.

Something very cool about female tooled vacuum forming is that to release the part, you create suction during the pull and keep it sealed until after the part has cooled to the touch. Then quickly open the valve to represurize the chamber. The sudden rush of air forces the pulled part out as well as finishes cooling the part.
bb6cb3bf8beaf52a3bc68624bb9a4279.jpg
afa02b9961d762994ac9afb7b39fb69f.jpg
c1e27859eb9373a39997c8457670a899.jpg
8fe5bc3cf3df90b8c112353c9fe3b7e8.jpg
54630cda810a8c6a244b1ae5268c7dc7.jpg


Sent from my CPH1701 using Tapatalk
 
And making sure everything fits.
Tomorrow I will see if I can make the stand and the mech to swing the frame over the heater.
8fdb518759baacfd67e34d6e60002631.jpg
a10856d72c35d7cbfc58bc7ba237e532.jpg


Sent from my CPH1701 using Tapatalk
 
Tube Bag update.


Finally made the handle tool.

18aa00b754ec2f8f9acf8dbff93c7a47.jpg


There are three tools in one for the lids.

d04aafa56cf4c7d79ef8f95915d878a6.jpg


And assembled.

7b5390e13dd83fc4126a85c1197df8c9.jpg
 

Attachments

  • 18aa00b754ec2f8f9acf8dbff93c7a47.jpg
    18aa00b754ec2f8f9acf8dbff93c7a47.jpg
    61.6 KB · Views: 57
  • d04aafa56cf4c7d79ef8f95915d878a6.jpg
    d04aafa56cf4c7d79ef8f95915d878a6.jpg
    77.2 KB · Views: 43
  • 7b5390e13dd83fc4126a85c1197df8c9.jpg
    7b5390e13dd83fc4126a85c1197df8c9.jpg
    74.2 KB · Views: 50
  • 18aa00b754ec2f8f9acf8dbff93c7a47.jpg
    18aa00b754ec2f8f9acf8dbff93c7a47.jpg
    58.4 KB · Views: 58
  • d04aafa56cf4c7d79ef8f95915d878a6.jpg
    d04aafa56cf4c7d79ef8f95915d878a6.jpg
    72.9 KB · Views: 52
  • 7b5390e13dd83fc4126a85c1197df8c9.jpg
    7b5390e13dd83fc4126a85c1197df8c9.jpg
    70.2 KB · Views: 48
  • 18aa00b754ec2f8f9acf8dbff93c7a47.jpg
    18aa00b754ec2f8f9acf8dbff93c7a47.jpg
    58.4 KB · Views: 54
  • 18aa00b754ec2f8f9acf8dbff93c7a47.jpg
    18aa00b754ec2f8f9acf8dbff93c7a47.jpg
    58.4 KB · Views: 57
  • d04aafa56cf4c7d79ef8f95915d878a6.jpg
    d04aafa56cf4c7d79ef8f95915d878a6.jpg
    72.9 KB · Views: 51
  • d04aafa56cf4c7d79ef8f95915d878a6.jpg
    d04aafa56cf4c7d79ef8f95915d878a6.jpg
    72.9 KB · Views: 53
  • 7b5390e13dd83fc4126a85c1197df8c9.jpg
    7b5390e13dd83fc4126a85c1197df8c9.jpg
    70.2 KB · Views: 45
  • 7b5390e13dd83fc4126a85c1197df8c9.jpg
    7b5390e13dd83fc4126a85c1197df8c9.jpg
    70.2 KB · Views: 48
  • 18aa00b754ec2f8f9acf8dbff93c7a47.jpg
    18aa00b754ec2f8f9acf8dbff93c7a47.jpg
    58.4 KB · Views: 63
  • d04aafa56cf4c7d79ef8f95915d878a6.jpg
    d04aafa56cf4c7d79ef8f95915d878a6.jpg
    72.9 KB · Views: 49
  • 7b5390e13dd83fc4126a85c1197df8c9.jpg
    7b5390e13dd83fc4126a85c1197df8c9.jpg
    70.2 KB · Views: 47
Last edited by a moderator:
"The death star will be completed on schedule".

When ever that may be...

This will be ready for a heat test and maybe even the first vacuum test by Monday.
a81fdfa82e4e8a5df50fa7e0b1499467.jpg
81fcfcea051ed20a507d9260d55423c2.jpg
d4945c320baa135489951fa982d11d41.jpg


Sent from my CPH1701 using Tapatalk
 
I have taken the 4 parts of the smaller frame to be welded up at my friend (the engineer that likes to make stuff) and he showed me his flame torch. This runs off standard LPG but produces an awesome amount of heat that can be aimed. This means I can mount the heat source above the chamber.
 
Found this online. I think I can build a cheaper version using the burner I already have, along with a small fan.

This should solve the heat issue and allow me to reduced the size of the heater.
3dfe427748c86ac16cf1fbcedeb2d542.jpg


Sent from my CPH1701 using Tapatalk
 
Found this online. I think I can build a cheaper version using the burner I already have, along with a small fan.

This should solve the heat issue and allow me to reduced the size of the heater. https://uploads.tapatalk-cdn.com/20180429/3dfe427748c86ac16cf1fbcedeb2d542.jpg

Sent from my CPH1701 using Tapatalk
So I made up this fan/pipe thing a few years ago and decided to test it out with my heating box to create a fan forced heater.

Previously, the hottest I could get the oven was 145 degrees C and that took close to 10min to achieve.

I added the fan and check out the temp now. I didn't capture a picture for some reason, but max temp was 210 degrees C! All done in less than 5min!

Now I just need my frame back to run some tests and I think we are good to go.
0bf95ff6fa16c242cd3bdc26b33a6179.jpg
e5813a993622f668ca3cf73b1233cf38.jpg


Sent from my CPH1701 using Tapatalk
 
This thread is more than 5 years old.

Your message may be considered spam for the following reasons:

  1. This thread hasn't been active in some time. A new post in this thread might not contribute constructively to this discussion after so long.
If you wish to reply despite these issues, check the box below before replying.
Be aware that malicious compliance may result in more severe penalties.
Back
Top