1/24 X-Wing near 100% from scratch

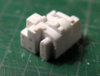
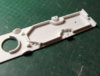
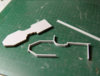
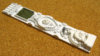
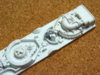
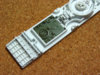
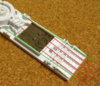
Absolutely stunning work Rafa. Each piece is a work of art, I'm blown away by how crisp & precise your work is. How you did that Essex part is just mind-boggling, knowing just how small this part really is mate!.:love

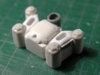
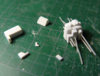
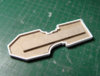
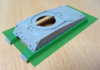
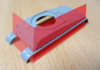
Great start to the 8-rad part Rafa. If your'e not happy with your final scratched part, don't buy the kit, I have a spare I can give you. Of course, I think you'll be able to pull it off.

It is an honor Sir to be viewing this amazing build, from scratch, with not one resin part to be seen.:)

Stu

Stu. Many thanks for your kind words and for your offer on the 8-rad part.

You live in New Zealand and I live in Spain… uhmm… that's exactly at the other side of the world…
Hey, Stu. Look just below you, between your feet. There, a little further down is where I am.:lol

Now seriously, I think the shipping charges may be overkill for only a small piece of plastic.

And the honor is mine to get the kind interest and collaboration from people as talented as you are.(y)thumbsup

Rafa
 
The praise is well deserved Rafa, only the brave take the route your'e going down.

Postage costs for the one part are not that much mate, if you need the part, it's yours, I can cover it, no problem.
Stu
 
The part of the 8-rad Panzerspäwagen completed.

For to get the details on the four corners of this piece, the rounded pieces with bolts, I used a simple technique that allows me to copy small details like these quickly and avoiding the use of resins or other chemicals.

First I make a single detail taking care of its accuracy, and stick it on a flat piece of styrene. I also do some Milliput putty balls and let them dry for 1 or 1.5 hours. Then I impregnated with talcum powder both the master's and Milliput balls to prevent them from sticking and I press the putty balls against the master to capture the details, getting a negative mold of the piece. Once the putty has hardened completely (+ / -24 hours), I use plastic rods extracted from the sprues of any model kit and heat up one end with a lighter flame. When the plastic is very liquid, I firmly press the end of the rod against the inside of the mold and wait a few seconds for the plastic to cool before lifting the rod. This way I get plastic copies of the detail I want and just need a little sanding to get a crisp outline before slicing off the detail of the rod.

I hope this little tip can be useful for some of you.:cool


Postage costs for the one part are not that much mate, if you need the part, it's yours, I can cover it, no problem.

Stu, thanks again for your kindness. I think my piece from scratch will do the job well.

Thanks for looking.

Rafa
 

Attachments

  • 232_8rad-03.jpg
    232_8rad-03.jpg
    109.9 KB · Views: 588
  • 232_8rad-04.jpg
    232_8rad-04.jpg
    88 KB · Views: 611
  • cast-01.jpg
    cast-01.jpg
    109.7 KB · Views: 530
  • cast-02.jpg
    cast-02.jpg
    114.8 KB · Views: 668
  • cast-03.jpg
    cast-03.jpg
    106.6 KB · Views: 542
  • cast-04.jpg
    cast-04.jpg
    122.8 KB · Views: 551
Ha, yeah, that 8-rad part will do fine Rafa, awesome job.
I knew you'd pull it off anyhoo mate, piece of cake really:lol.
Stu
 
Hey fellas.
Thank you very much. Your kind words really encourage me to continue my efforts.:cool

Today I finished the second part of the Harrier. Again I used the "skewer technique" to connect the eleven small pieces that comprise it (maybe this time a little extreme).:behave

Thanks for looking.

Rafa
 

Attachments

  • harrier2-05.jpg
    harrier2-05.jpg
    123 KB · Views: 563
  • harrier2-04.jpg
    harrier2-04.jpg
    128.3 KB · Views: 563
  • harrier2-03.jpg
    harrier2-03.jpg
    121.8 KB · Views: 590
  • harrier2-02.jpg
    harrier2-02.jpg
    157.8 KB · Views: 600
  • harrier2-01.jpg
    harrier2-01.jpg
    153.2 KB · Views: 536
Excellent job! Can't help but give a comment everytime you post something, Rafa. Wish I could see what tools you use and how you do it. I'm glued to this thread.
 
Excellent job! Can't help but give a comment everytime you post something, Rafa. Wish I could see what tools you use and how you do it. I'm glued to this thread.

Hi Crackerjazz.
As always, thank you very much for your interest and I am very happy that you find useful my little tricks.

My tools are simple, no expensive or sophisticated machinery here. Of course, I have my little treasures, which are nothing special, but I use them quite often and am used to them from long ago.:love

In future posts I will try to show my favorite tools and how I use them.

My best wishes,
Rafa
 
Building the base of the droidstrip, the piece of the Scharnhorst.
Some circular parts, like the pieces of the Yamato, I do using my mini drill for lathing.

Thanks for looking.:)

Rafa
 

Attachments

  • yamato-01.jpg
    yamato-01.jpg
    123.5 KB · Views: 665
  • scharnhorst-05.jpg
    scharnhorst-05.jpg
    128.1 KB · Views: 689
  • scharnhorst-04.jpg
    scharnhorst-04.jpg
    171.3 KB · Views: 656
  • scharnhorst-03.jpg
    scharnhorst-03.jpg
    124.6 KB · Views: 634
  • scharnhorst-02.jpg
    scharnhorst-02.jpg
    139 KB · Views: 619
  • scharnhorst-01.jpg
    scharnhorst-01.jpg
    129.6 KB · Views: 649
Hello guys.

Droidstrip is complete. After so long planning and construction, it's a really special feeling to finally hold it in my hands.:)

The first stage is concluded. Next up: the backplate.

Hey Atom-san, I paid special attention to the inclination of the Ticonderoga piece that you and Lord Tox detected. Thank you very much for such a good job.(y)thumbsup

Thanks for looking.

Rafa
 

Attachments

  • droidstrip-01.jpg
    droidstrip-01.jpg
    205.6 KB · Views: 666
  • droidstrip-02.jpg
    droidstrip-02.jpg
    262.4 KB · Views: 748
  • droidstrip-03.jpg
    droidstrip-03.jpg
    277.8 KB · Views: 701
  • droidstrip-04.jpg
    droidstrip-04.jpg
    311.6 KB · Views: 724
Hi! Rafa-san!

The great achievement that you accomplished makes me happy!:)
Very very impressed.

Compared to your work what I did was only copy and paste of vintage kits.
You made all the part from styrene sheets.
It is a skill of God.
The force will be with you always.:thumbsup
 
Hey Rafa, why pay expensive kits when you can do everything by yourself ? That's the question I am wondering right now lol I without a doubt dont have your skills though, great work my friend !
 
Atom-San, MonsieurTox ... Believe me, I would be very happy if I could buy all the kits I need for my projects.
My health, my nerves and my eyecare would appreciate it.:lol

Thank you very much for your kind words and for your support of my work.:love

Rafa
 
Hy friends.

I'm already working on the backplate, but I'm not sure about a step. :confused

Can anyone tell me the right way to cut the Panther part?.

I hesitate between two options: Cut horizontal or vertical.
To clarify this, these two images show the horizontal cut is green and vertical cut is red.

If I make the vertical cut (red), the resulting piece will be about 1 mm. higher than if I make the horizontal cut (green).
Can anyone clarify my doubt?

Thank you very much in advance.:)

Rafa
 

Attachments

  • horizontal.jpg
    horizontal.jpg
    107.7 KB · Views: 540
  • vertical.jpg
    vertical.jpg
    105.7 KB · Views: 514
Hy friends.

I'm already working on the backplate, but I'm not sure about a step. :confused

Can anyone tell me the right way to cut the Panther part?.

I hesitate between two options: Cut horizontal or vertical.
To clarify this, these two images show the horizontal cut is green and vertical cut is red.

If I make the vertical cut (red), the resulting piece will be about 1 mm. higher than if I make the horizontal cut (green).
Can anyone clarify my doubt?

Thank you very much in advance.:)

Rafa

Hey! Rafa-san!:)

I did the vertical cut (red). I made the comparison pic. Please look.:thumbsup

If you cut a sherman horizontally, the decrease in height of the sherman may have an influence to the positioning against shiden.
I mean, If you adopt the horizontal cut (green), the height of 1/72 Sherman will be different from the original .
Anyway I think that ILM adopted a easy way, the vertical cut was more easier way to cut sherman than horizontal cut. Don't you think so?:lol
 
This thread is more than 5 years old.

Your message may be considered spam for the following reasons:

  1. This thread hasn't been active in some time. A new post in this thread might not contribute constructively to this discussion after so long.
If you wish to reply despite these issues, check the box below before replying.
Be aware that malicious compliance may result in more severe penalties.
Back
Top