Stargate Movie Abydos Coverstone

Badmonkey

New Member
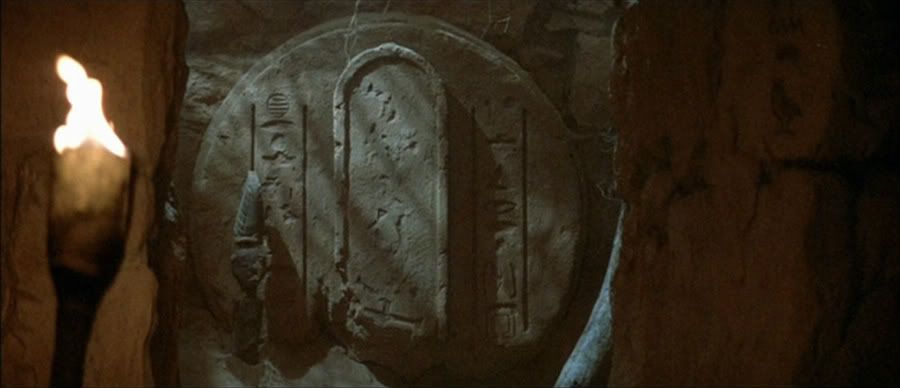
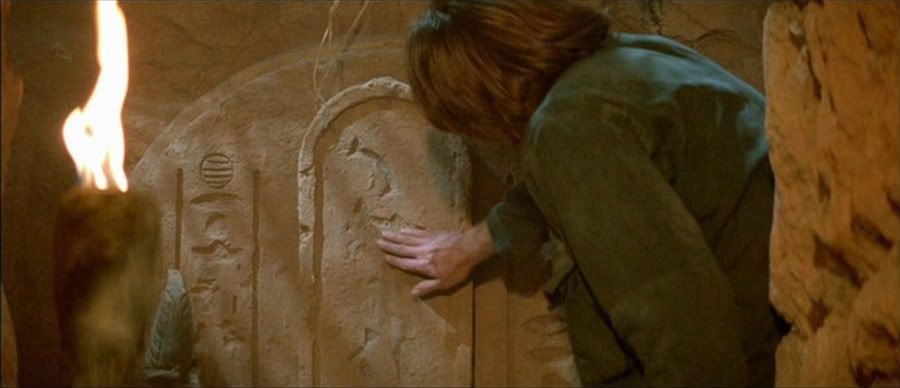
I love the Stargate movie so I've decided that for my first very own prop build I would like to make the coverstone that is found on Abydos with the glyphs that make up the stargate address for Earth. It's the one where the symbol for the point of origin is missing (Pictured below). It has a very Rosetta Stone feel and I think would make a great piece to display.

I'm trying to work out what materials would be the best to use. I obviously want it to look like it's made from sandstone but would prefer not to have to use real stone! My first inclination is to have a foam base with the details sculpted on top from some kind of putty or clay.

This is my first prop replica, I usually work with costumes, so I would really appreciate any suggestions anyone may have with regards to materials.

Also, has anyone ever seen the original prop? I would love to get my hands on a photo. The only full photo in the movie, the one I've displayed, has sand inside of the glyphs that Daniel Jackson brushes out with his hand. However, once he brushed out the sand they don't show another full view of the glyphs and I'm having trouble working out what they should look like. Please note, these glyphs are not the same as the ones used for Earth in the SG-1 series.

Abydoscoverstone-1.jpg


Abydoscoverstone2-1.jpg


Cheers!
 
Last edited:
If you made it with a flat surface and applied some glue and light sand prior to painting (or mixed the sand into the paint) would this not give enough of a texture to simulate sand stone ?

I look forward to see how you go with this as it wil make a good wall hanging for a SG display.
 
I've never seen a blueprint of the offworld glyphs from the movie come up for sale. So I'm not sure other than finding screen caps from the Abydos gate, that you'll get better glyph reference.

Best bet for the stone look is to probably sculpt it in your medium of choice and then pull a mold and cast in hydrocal.
 
Are you doing the entire thing, the whole circle, or just the center piece where the glyphs are? You'll need to find a key, something with a known size in the frame with what your building so you can extrapolate the size of the piece useing it as a guide. Kind of like useing a legend on a map, you see?

If I were doing it...

Sheet (4x8) of 2" foam from Lowes or Home Depot.

Over-head projector it on a wall where the foam is hanging.

Draw the details with a Sharpie marker.

Carve it up with a exacto knife and use a wire brush for the "broken" edges.

"Spray Seal" the foam, one can should do it.

Use "Spray STONE" for the texture.

If you can't get the Spray STONE in the right color, paint it.

Done...

That's how I would do it minus the spray stone. I've seen some people do similar items with foam, but they used various rocks to press into the foam and give it texture. Then they painted it to look like rock. Some times the spray stone paints look fakey or just like various colors stippled on, not necessarily like rock.
 
These are all great ideas! I've got the time to do this right, so I'm going to do a test of each idea. The best result will probably be a combination of everything.
 
I just found your post. I finished refurbishing the original set piece of the Abydos stone today. A friend of mine who lives in San Diego owns it. It is going on display at ConDor Covention, January 19-21.
 
Last edited by a moderator:
Nice project. I hope to see more of this. I would love to see these made out of foam. They'd be easy to ship out.
 
One way to duplicate the stone texture would be to cover it in glue, spray glue would probably ideal, then sprinkle sand over it.
 
One way to duplicate the stone texture would be to cover it in glue, spray glue would probably ideal, then sprinkle sand over it.

If somebody does this in Styrofoam, I can recommend a thin set mortar fortified with polymer so it sticks to foam. It's cement, but you can also add some sand to the wet mixture before applying.
 
IMG_1535.JPG

This is the Brantford stone from the opening scene of JUMANJI. I added sand to the wet mix. The inside is literally a block of foam with carved lettering in it.
You can see that the mortar mix preserved the detail of the lettering. It gives an excellent appearance of rough gray stone.

You can also add concrete pigment to make the mortar more brown color.
 
Last edited:
View attachment 851725

This is the Brantford stone from the opening scene of JUMANJI. I added sand to the wet mix. The inside is literally a block of foam with carved lettering in it.
You can see that the mortar mix preserved the detail of the lettering. It gives an excellent appearance of rough gray stone.

You can also add concrete pigment to make the mortar more brown color.
I'd have never thought that would have stuck ... how hardy do you think it'll be? I'd be using it as a escape room prop and it will be moved and handled daily.


Sent from my SM-G965F using Tapatalk
 
I'd have never thought that would have stuck ... how hardy do you think it'll be? I'd be using it as a escape room prop and it will be moved and handled daily.


Sent from my SM-G965F using Tapatalk

There is actually a product called BOOST that you can add to mixes to make them stick to foam. That is literally their market strategy.
I searched the web and found this mortar mix from Home Depot that already has the equivalent of BOOST mixed in. So you don't have to worry about getting the mixing ratio correct.

If you have delicate details in your object, you can use a thinner layer of the mortar. And then use a thicker layer for all the non-delicate areas. The thicker you make it, the better it's going to hold up. This is indoor/outdoor mortar, so it holds up better to environmental conditions than if you used an indoor only mortar.
I used a combination of fine sand (from Home Depot, somewhere around $5 for 40 lbs) and also some course sand I got from eBay that was a small quantity for considerably more money. It depends on the effect you're trying to achieve.
I will look up the exact product from Home Depot and post it.
 
This thread is more than 5 years old.

Your message may be considered spam for the following reasons:

  1. This thread hasn't been active in some time. A new post in this thread might not contribute constructively to this discussion after so long.
If you wish to reply despite these issues, check the box below before replying.
Be aware that malicious compliance may result in more severe penalties.
Back
Top