You are using an out of date browser. It may not display this or other websites correctly.
You should upgrade or use an alternative browser.
You should upgrade or use an alternative browser.
Slave to a Rhythm (with no grace)
- Thread starter Guy Cowen
- Start date
- Status
- Not open for further replies.
Aha no its the 1/20 Bt46 Clear cowl part that shows the shrinkage up. I know I'm slow mate :lol
I'm just triple checking the Brabham part isn't trimmed before I make another boo boo.!!!
In the absence of a camera here's a PS version
Original with a fare amount of Entex door handle to the right of the BT46 part

How the BT46 part lies on the cast Door, this is slightly better than the real parts also.
I'm just triple checking the Brabham part isn't trimmed before I make another boo boo.!!!
In the absence of a camera here's a PS version
Original with a fare amount of Entex door handle to the right of the BT46 part
How the BT46 part lies on the cast Door, this is slightly better than the real parts also.
Last edited:
Starting to get my head around the wings. They do make a lot more sense once the shaping starts. Nothing is glued, all just testing stuff at the min, this is a cast door.
The shuttle part is trimmed quite a bit, dont know if this is correct re its length being shortened but its what i see so have gone for it.
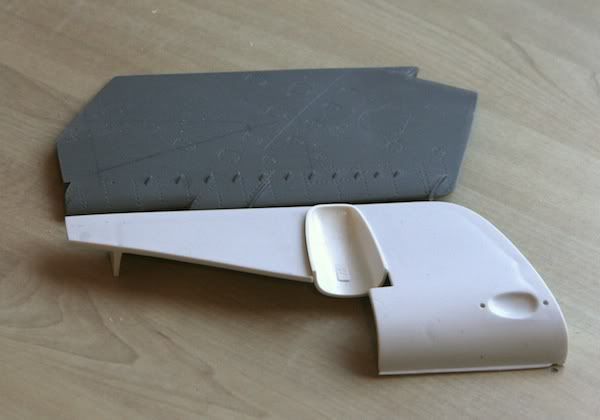
Still a WIP
Looking at the way this may be made, I would suggest not cutting the shaped hole out of the Harrier wing till the Door is cut, these need to line up with the AMT truck siding, if the harrier is cut first it could mess with the Door too much thats what I figure anyway! But who knows?
The shuttle part is trimmed quite a bit, dont know if this is correct re its length being shortened but its what i see so have gone for it.
Still a WIP
Looking at the way this may be made, I would suggest not cutting the shaped hole out of the Harrier wing till the Door is cut, these need to line up with the AMT truck siding, if the harrier is cut first it could mess with the Door too much thats what I figure anyway! But who knows?
Thanks for leading the way on this Guy. This darn thing is so complex!
Cheers Lee. I'll just see what happens, I'm def cancelling the scratch for now as its so much work but will go back to em.
Scott, I think once you start it does kinda fall into place, just looking at the wings it does look like a mine field of WTF! Yu have to start to get your head round em, I also think you can build a wing before the Armature as the internal structure of the wing will denote the size of bar or mount tube used.
I think I'm not going to have wing mount points, mainly to keep the cost down a I know it would never be displayed this way at he mount would have to be more like the ILM mounts. I'm going for a Port side mount and engine and Rear mount. So it can stand up on end in flight mode, display as it does in Exhibits and a side mount should I want to wall mount it or display it on its side. As long as the wings rotate together and lock then I'm happy with that.
Also, i often wonder about the armature through here. It must be a hollow, threaded tube that is capped by those round F1 parts on the end. I think figuring out where that goes will help a lot. As usual, please post your results so I don't have to figure it out!
")
Mostly kidding. Again, thanks for taking this on and posting your progress Guy. You're a real natural at this!
Mostly kidding. Again, thanks for taking this on and posting your progress Guy. You're a real natural at this!
Guy adding the wing tip mounts would be easy and cheap IMO, id consider it. Cant say for sure on size, its just threaded tube, you could tap it out yourself, maybe plump for alloy tubing?
If your doing this, go the whole shebang i say bud, its a world first, NOBODY has pulled off this build yet.
lee
If your doing this, go the whole shebang i say bud, its a world first, NOBODY has pulled off this build yet.
lee
Thanks for leading the way on this Guy. This darn thing is so complex!
I'm sure there must be some completed wings out there, be great to hear from Isel, Moe or Rich or anyone that may have tackled these already?
I'm just going to go for it as best I can, Paint by numbers style but with partly obscured numbers and a few letters thrown into the mix :lol
Lee, its the cost in buying new tools thats add's up at the mo I really have to be careful. I want the armature to be sturdy but not too complicated. Mostly going to be Birch Ply and some metal fixings here and there, well at the moment it is. I'm gunna put my Y -wing on ebay next week to raise some Slave/AT-ST Funds.
My Marder just landed so thats a big go on the next wing part later tonight. Be great to get one of those sonic cutters that Jason showed but they're not available in the UK.
My Marder just landed so thats a big go on the next wing part later tonight. Be great to get one of those sonic cutters that Jason showed but they're not available in the UK.
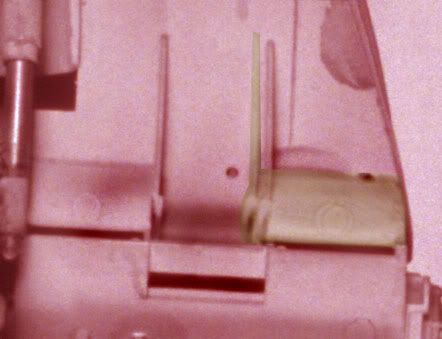
Been looking for the part in yellow (not the 3 88mm parts) I'm pretty sure its a Tamiya 1/20 F1 kit.
I have a close match from the 1/20 Bt46 clear cowl part B3?
It could be the 1/20 P34 but cant check till the am.
I noticed Tim has a red part on his build but cant locate any parts that work from a Ferrari. I think the Bt46 part is damn close though. Any thoughts?
I have a close match from the 1/20 Bt46 clear cowl part B3?
It could be the 1/20 P34 but cant check till the am.
I noticed Tim has a red part on his build but cant locate any parts that work from a Ferrari. I think the Bt46 part is damn close though. Any thoughts?
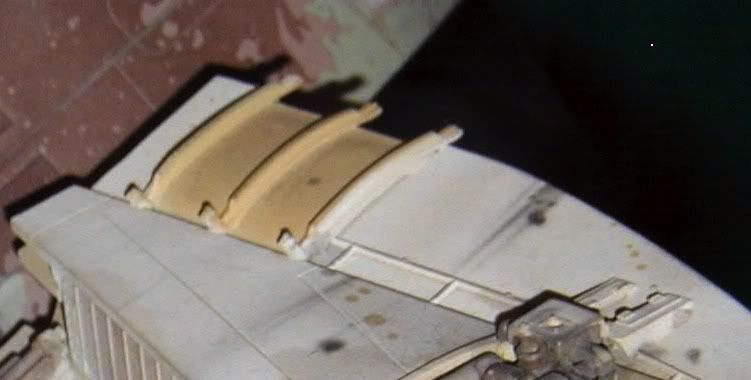
Yeh, I think the Bt46 part is a little too thick for the job! I thnk the 310B may be a contender and also looks like there may be a few other parts in the kit that may be on the wing?
I've also found the Port wing part from the Panzer III is also in the German Sturmgeschuetz III Ausf.G.
I've also found the Port wing part from the Panzer III is also in the German Sturmgeschuetz III Ausf.G.
Last edited:
3d-builder
Sr Member
If you don't use them I will slap you!:behave
:lol
:lol
First bit of head scratching today on the wing assembly. The ref doesn't really give a good example of the area on the wing where the Van panel joins the Harrier wing to the Entex door.
To look at, the van panel looks to be the same width across its length, this wont work! To achieve the angle between the Harrier and Door on the out side edge of the wing you have to cut the van panel so it tapers.
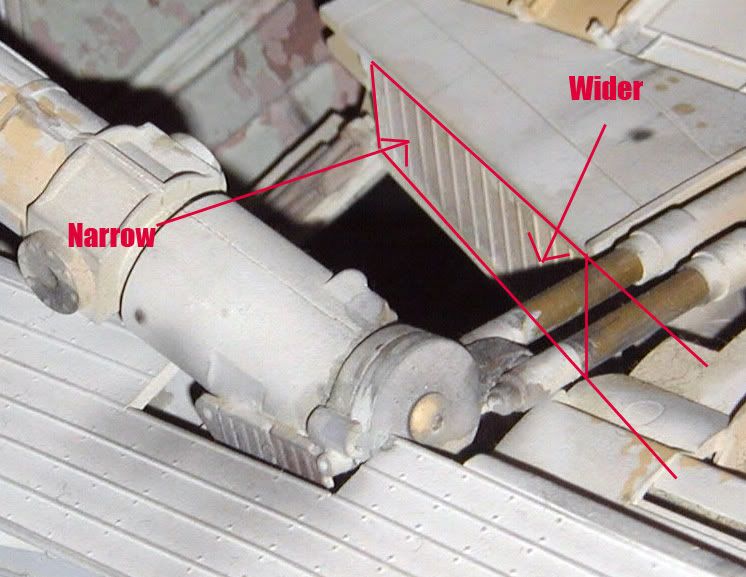
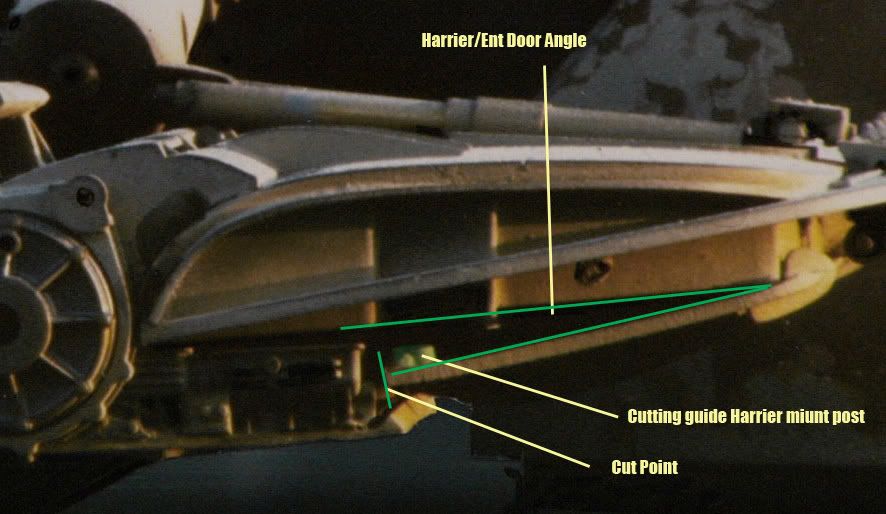
To look at, the van panel looks to be the same width across its length, this wont work! To achieve the angle between the Harrier and Door on the out side edge of the wing you have to cut the van panel so it tapers.
I really do believe the wings are probably the most complicated part of the model to nail. You have to get the pistons working (I see the dome head hex screw holding down the end of that assembly in your pic, front and center), the whole thing swiveling on an armature mount point, and all those odd angles correct, with limited reference.
To me, the underskirt stuff is just stacking crap on top of one another, by comparison! LOL
To me, the underskirt stuff is just stacking crap on top of one another, by comparison! LOL
I really do believe the wings are probably the most complicated part of the model to nail. You have to get the pistons working (I see the dome head hex screw holding down the end of that assembly in your pic, front and center), the whole thing swiveling on an armature mount point, and all those odd angles correct, with limited reference.
To me, the underskirt stuff is just stacking crap on top of one another, by comparison! LOL
I agree Jason, its Maths Degree material :lol, good job I'm doing it all be eye n feel or I'd never get it done. The Van panel has to be cut with a curve to it also, using the harrier wing as a sanding tool. All great fun :cry
The wings do make more sense as they come together though, bit like a jigsaw. I'm hoping to have some good results over the weekend with something that looks pretty close. Also the shuttle part has to fixed before any work can be done, the door is just too unstable with the hole there and no shuttle part.
- Status
- Not open for further replies.
Similar threads
- Replies
- 16
- Views
- 813