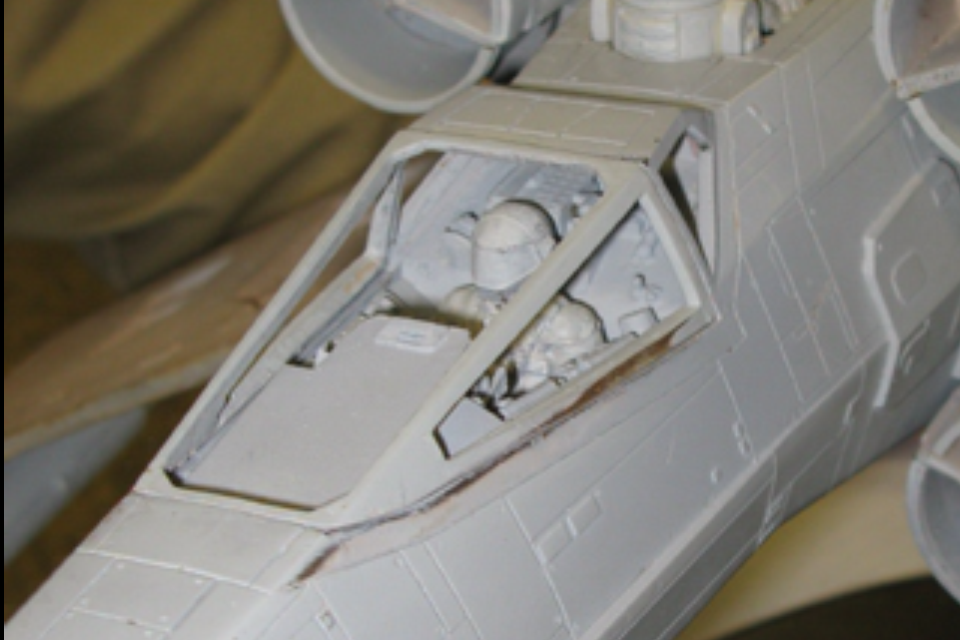
Pyro X-Wing kit WIP

I'm looking at this part.Because,this part looks oval in the picture posted by Treadwell,but it looks like rounded shape in the picture posted by Kevin in this thread.
The part is about 1mm thickness so same diameter rod is needed to be a column.What do you think?
The part comes from Bandai Tiger I.

When I first looked at this pic, I was thinking you're referring to the part on the left. It would actually be part 30 on the right wouldn't it? It's the cylindrical part and would have large indentations to receive that muffler cover piece shown on the left. That would more likely be the x-wing cockpit part. What do you think?

PS - this refers to the pic in post #32
 
Nighteyes,

Don't worry about the PM:)And I think Scott is right.What do you think?

Scott,

I think you are right!:thumbsup
 
Here's a photo that GKvfx posted of a complete Pyro.
photo-20.png


This cockpit is more completely cast. Look at the joystick arm coming off the console and what might be an incomplete vertical U bolt at the back.

But not a good look at our mystery part in question. Maybe Kevin's has the indentations on top. If not lets pick an easier part to find.
 
Scott,

Sorry,but I was talking about the part on the left.Now,I checked the part 30.
It's too thin.Sad...

Nighteys,

Thank you! The picture looks great.That's why the pilot arms didn't come with kit right?

It was my original theory that air would be captured in this spot of the mold creating strange crescent shapes.

I think so.It's strange.Every cockpit seems to have a air buble on the top.

By the way,I'm trying to fit the rear plate to the back of the fuselage which is diffucult.Yes,it's not a good job.
 
You have already referenced the Pyro copy owned by forum member Dave G. That fuselage is the original configuration of this kit and the backplate is cast in place but with some detail lost around the edges. The recent copies by BrundelFly treat us to an original untrimmed backplate.

I think you have done a great trimming without losing and detail. Id recommend thinning the walls of the back of the fuselage also but it looks like you might have done that already.

Another part of my theory on that Tiger part is that the 5 holes on top were enhanced along with the other additions to the cockpit. It seemed to me that 5 circles on top of a similar diameter part found on the same kit sprue as two other parts nearby must share some common origin. The cylinder itself is soft along with the rest of the original detail. Still a guess though.
 
You have already referenced the Pyro copy owned by forum member Dave G. That fuselage is the original configuration of this kit and the backplate is cast in place but with some detail lost around the edges. The recent copies by BrundelFly treat us to an original untrimmed backplate.


Yes,but the back of the canopy is not cut off from the fuselage.It looks nice.It wasn't easy for me to adjust the canopy to the fuselage.

Thank you for your kind word on the timiming I did,but I shelved the SaturnV a little bit too much.
Today I've fixed it.
As for the back wall of the fuselage,I cut the back wall and replaced with a styen sheet glued it forward.


And yes the parts on a cockpit looks soft.By the way,I'd like to know if Kevin's black cast cockpit has 5 holes or not.:)
 
wizardofthenorth,

Sorry for the delay in my response.It is about 15mm.The trench of the R2 strip is about 25mm wide on the pyro kit.So if the original master was 25.4mm(1 inch),the pyro kit fuselage woud be 2% of shrinkage as the rear plate is 2% smaller than the donor part(Sherman).So if you don't want to use the rear plate of the kit Maybe it would be more than 15mm.Well,accually I'm still losing my way if I should use it or not

To degress a little.I've also measured the canopy a little bit.Since the canopy was too big.I cut in half and glued them back together to fit on the fuselage.I think it is 1% smaller than the pyro kit canoy.So in my opinion the hero X-wing is 1% smaller than the master.Pyro kit is 2% from the master which is awesome if I'm correct.
 
Last edited:
I will be using the kit plate for sure. I am thinking to take the back wall back even farther based on your analysis, as the backplate is fairly thick. Then adjust the depth with a shim.
 
Yes,the rear plate is thick,but I wonder it is thicker than the original and what we see in the recess is back wall or not.
 
To my eye, the back plate definitely seems thicker to picks I have seen...at least on the casting I have. Although I haven't trimmed it down to see it's final fitting. I am still in scribing and cleaning up phase. And I am sooooper slow.

I would think that is the back wall, as from the pics I have seen, the back wall I think is part of the base molded fuselage.
 
Thanks for your advice.But the lower fuselage shouldn't have a back wall right?And thank you for the rear plate picture.It is a first time for me to see it.It is very interesting.

I'm working on the lower fuselage.I don't like scribing panel lines on resin.
 
I 've molded an armature cap.(I don't know what to call.)It doesn't look good,but
sitill okay to use.I also did the brick pattern sheet briefly.
The condistion wasn't good.The resin was almost cured,so I didn't have much time to do,but even that it's difficult to make the thickness equally.If you have one more mold on the back of the brick patten sheet,it will work better I think.
By the way,if you want a SS looking pilot in 1/72 scale,buy a takara X-wing!
 
Hello,

Well,this is difficult to explain.

I've just put my fuselage on an armature.But then I've run into a problem.
When the wings are closed,the center line(horizontal)in between of upper and lower(armature)is lower than I expected. Do you guys think this is correct?
I'd like to know your opinions.Any opinion will be wellcomed.
 
Last edited:
Hello,

Well,this is difficult to explain.

I've just put my fuselage on an armature.But then I've run into a problem.
When the wings are closed,the center line(horizontal)in between of upper and lower(armature)is lower than I expected. Do you guys think this is correct?
I'd like to know your opinions.Any opinion will be wellcomed.
 
I don't think we can exactly trust the straight lines of the fuselage. The history of the reassembly of this Pyro by John Eaves includes the reattachment of the nose cone. My guess is he did this to hide the twist/bend of the fuselage he had reconstructed. I noticed a lot of the straight lines are not quite. Also if you cut one of these on the vertical axis as it was originally configured your resulting halves would not lay flat.

That all said, the Pyros were not made for an armature so the issue your facing may have been a trait of the original Pyro master. I'm not yet to the point of fitting an armature but it would be my opinion to keep the wing mounts as parallel to the flat top of the fuselage as possible.
 
Thank you for your reply.
In my opinion,John Eaves didn't try to hide or idearize the pyro fuselage that he got.
Because there are cracks here and there on the pyro kit fuselge.

And I didn't know the nosecone was added by John Eaves.I thought there was a big hole for the suport rod,so the big hole was filled for molding.

By the way,here is a pic of the full scale X-Wing measured based on RED 2 studio model.
Still this is not the answere,but I think this is interesting.
 
Last edited:
This thread is more than 5 years old.

Your message may be considered spam for the following reasons:

  1. This thread hasn't been active in some time. A new post in this thread might not contribute constructively to this discussion after so long.
If you wish to reply despite these issues, check the box below before replying.
Be aware that malicious compliance may result in more severe penalties.
Back
Top