You are using an out of date browser. It may not display this or other websites correctly.
You should upgrade or use an alternative browser.
You should upgrade or use an alternative browser.
Found prop piece!! (Joe Versus The Volcano)
- Thread starter msisaac
- Start date
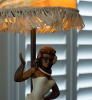
Hey everyone... I used this thread to help create a lamp for my Mom's 60th b-day. I thought I would post a video because:
a) I'm really proud of how it turned out and
b) I wanted to return some of the help I got from this website. I can help out with the music if anyone wants (yes - it's playing music!) and can go into further detail about the mechanics of my lamp.
My one regret is that I didn't create a larger base. It's a bit top heavy, so I'm afraid it might take a tumble, but it's really beautiful. I didn't have time to get the little pineapple thing on top, but with my design it would have been spinning anyway.
Message me if you want help!
Thanks!
Last edited by a moderator:
https://youtu.be/UMrvo2d4ntg
Hey everyone... I used this thread to help create a lamp for my Mom's 60th b-day. I thought I would post a video because:
a) I'm really proud of how it turned out and
b) I wanted to return some of the help I got from this website. I can help out with the music if anyone wants (yes - it's playing music!) and can go into further detail about the mechanics of my lamp.
My one regret is that I didn't create a larger base. It's a bit top heavy, so I'm afraid it might take a tumble, but it's really beautiful. I didn't have time to get the little pineapple thing on top, but with my design it would have been spinning anyway.
Message me if you want help!
Thanks!
Hi!
I am making a lamp for my friend who loves the movie and I am super excited about this project! How or where did you get the music?? Please let me know, I would love to make my lamp play music.
Thanks!
Jess
DavesArchives
New Member
Wow, y'all are really making some amazing replica's of the JV lamp! I love it! I finally acquired the remainder of the pieces I needed to assemble the lamp. The base of the lamp I made from scratch using a small electric hand saw and a Dremel tool....I've never gotten this heavy duty into a craft project and there were a lot of 'how the hell do I do this' questions that popped up along the way. I'll briefly go over the remainder of the assembly and final touches.
I knew it would be too difficult to try and make the shade rotate and create the shimmer effect, so I opted to only add music. I purchased a German music box on ebay for about $15 and I think it's pretty neat. Anyway, here's the project steps.
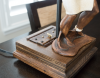
Created the base using two cuts of plywood for the top and a precut square base I picked up from the local hobby store. I glued the wood together and then screwed in everything after it dried. I cut out a section inside of the top portion of the base to place the music box inside of. I then took a couple paint sticks that I got free form the hardware store and cut them to size to reverse mount the music box onto. I added some decorative trim to cover up open areas. Sanded it down and added cheap dark stain.

Now that the music box base was done, I needed to cut a half circle to the back of the hula figurine in order to make room for the lamp pole to go through. I applied painters tape to the cutting area, drew the cutout section and cut away with a dremel diamond coated cutting wheel, made for cutting ceramics. Luckily, no cracks! After cutting and sanding, it fit in perfectly.


I knew it would be too difficult to try and make the shade rotate and create the shimmer effect, so I opted to only add music. I purchased a German music box on ebay for about $15 and I think it's pretty neat. Anyway, here's the project steps.
Created the base using two cuts of plywood for the top and a precut square base I picked up from the local hobby store. I glued the wood together and then screwed in everything after it dried. I cut out a section inside of the top portion of the base to place the music box inside of. I then took a couple paint sticks that I got free form the hardware store and cut them to size to reverse mount the music box onto. I added some decorative trim to cover up open areas. Sanded it down and added cheap dark stain.
Now that the music box base was done, I needed to cut a half circle to the back of the hula figurine in order to make room for the lamp pole to go through. I applied painters tape to the cutting area, drew the cutout section and cut away with a dremel diamond coated cutting wheel, made for cutting ceramics. Luckily, no cracks! After cutting and sanding, it fit in perfectly.
DavesArchives
New Member
Now onto the lacquer. I used a spray on varnish for the lamp shade. The lamp shade was fairly mat and needed some heavy color pop, just like the one in the movie. It was glossy in the movie as well, so I opted for a gloss varnish. I applied 5 coats. The dimples you see flattened out for the most part after drying.

Added poly coat finish to the base. Simple one coat, glossy.

Time to figure out this crappy Ikea lamp assembly I bought from Goodwill. It's a crappy lamp and cheap and was difficult to work with. With some finagling, I was able to pull out the one way cable inserts with hobby pliers, and recut them again because I completely tortured the cable. This was almost the most delicate part of the project. I had to remove the bulb housing because it was the only way for me to run it through the wooden base I made. After disassembling and running through the base, I made sure to tie the electricians knot with the wires before final assembly. Be sure to not forget that. Voila, it worked.


Added poly coat finish to the base. Simple one coat, glossy.
Time to figure out this crappy Ikea lamp assembly I bought from Goodwill. It's a crappy lamp and cheap and was difficult to work with. With some finagling, I was able to pull out the one way cable inserts with hobby pliers, and recut them again because I completely tortured the cable. This was almost the most delicate part of the project. I had to remove the bulb housing because it was the only way for me to run it through the wooden base I made. After disassembling and running through the base, I made sure to tie the electricians knot with the wires before final assembly. Be sure to not forget that. Voila, it worked.
DavesArchives
New Member
Final assembly
The darn lamp shade from the manufacturer DOES NOT fit onto the Ikea threading at the base of the housing. Ikea went with some proprietary size! So...back to the ol' Dremel tool. I used a metal cutting wheel to cut out about 1/5" of metal from the inside of the shades mounting ring. I apologize for not getting any photos of this. Be sure to protect your hands, mouth/nose and eyes. Lots of sparks and fumes. After about 30 minutes of cutting out grinding away at the ring, it was large enough to fit over the shades mounting ring. Hallelujah!!
Now, onto the final touches. Glue. I glued the top part of the flat metal base of the Ikea lamp to the bottom of the wooden base I made. I used a permanent bond glue for this. Easy peasy. I did the same for the hula figurine. The bond takes 24-72 hours to completely dry.

Now for the last part. The grass skirt fringe for the base for shade, and the rope knot top for the top of the shade. All you need for this is craft glue and a glue gun. Easy.
After that, the project is complete! After so many months of scouring the internet and thrift stores for the appropriate pieces, I finally have made my very own Joe Vs The Volcano Hula Lamp! I couldn't be happier with how it turned out. I wish the best of luck to all of you on creating your own and please feel free to ask me any questions about this project. -Dave


More shots")
The darn lamp shade from the manufacturer DOES NOT fit onto the Ikea threading at the base of the housing. Ikea went with some proprietary size! So...back to the ol' Dremel tool. I used a metal cutting wheel to cut out about 1/5" of metal from the inside of the shades mounting ring. I apologize for not getting any photos of this. Be sure to protect your hands, mouth/nose and eyes. Lots of sparks and fumes. After about 30 minutes of cutting out grinding away at the ring, it was large enough to fit over the shades mounting ring. Hallelujah!!
Now, onto the final touches. Glue. I glued the top part of the flat metal base of the Ikea lamp to the bottom of the wooden base I made. I used a permanent bond glue for this. Easy peasy. I did the same for the hula figurine. The bond takes 24-72 hours to completely dry.
Now for the last part. The grass skirt fringe for the base for shade, and the rope knot top for the top of the shade. All you need for this is craft glue and a glue gun. Easy.
After that, the project is complete! After so many months of scouring the internet and thrift stores for the appropriate pieces, I finally have made my very own Joe Vs The Volcano Hula Lamp! I couldn't be happier with how it turned out. I wish the best of luck to all of you on creating your own and please feel free to ask me any questions about this project. -Dave
More shots
Attachments
Last edited:
DavesArchives
New Member
Thanks, Robert! I love how it came out. So happy with finally finishing as well. The only thing to top it off would be a finial. The shade wasn't designed that way so maybe later I'll think of a hack to allow me to set the finial on top. Also, I think one of the most important things to do with creating this replica is to gloss varnish the lamp shade. Zazzle uses a cheap print method over the shade. It's easy to scratch off the color...very easy. Also, it's matt and makes the artwork look dull. A nice gloss varnish not only protects the artwork, it makes the colors much more saturated and the blacks look black, not gray...looks absolutely wonderful when varnished and gives the overall project the color pop that it needs.
DavesArchives
New Member
Every time someone makes a lamp with my designs, it just makes me smile and be Happy. It's more fun seeing how other people make their lamps than if I was making the lamps and selling them.
Without your shade art, I wouldn't have been able to finish this. Can't thank you enough for your work!
DavesArchives
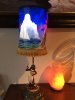
New Member
Haha! I can't get enough of this lamp...thought I'd post a fun shot I took of it with the lights off.

Astroworldfan
New Member
Howdy all. I wanted to take a moment thank Chris, Jintosh, and everyone who contributed to this board for the work they put in and shared. Thanks to you guys and a lil effort I was able to create the lamp I've wanted for years!

Beautiful lamp. That's an interesting base under the girl.
Zinger
Active Member
Well done! I loved that movie.
"But can he do the job. I know he can get the job but can he DO the job? I'm NOT arguing that with you. I'm not arguing that with YOU. I'm not ARGUING that with you. I'm not ARGUING that with you Harry! Harry... Harry... Yeah Harry... but can he DO the job. I know he can GET the job but can he do the job?"
"But can he do the job. I know he can get the job but can he DO the job? I'm NOT arguing that with you. I'm not arguing that with YOU. I'm not ARGUING that with you. I'm not ARGUING that with you Harry! Harry... Harry... Yeah Harry... but can he DO the job. I know he can GET the job but can he do the job?"
Logan Cade
Well-Known Member
Beautiful Jobs on the lamps, Guys!
It seems there is different size figures, one about 11" and the other 7" or so. Anyone know the correct one they used in the movie?
Also, anyone know the name of the music that's playing with the lamp?
It seems there is different size figures, one about 11" and the other 7" or so. Anyone know the correct one they used in the movie?
Also, anyone know the name of the music that's playing with the lamp?
https://youtu.be/UMrvo2d4ntg
Hey everyone... I used this thread to help create a lamp for my Mom's 60th b-day. I thought I would post a video because:
a) I'm really proud of how it turned out and
b) I wanted to return some of the help I got from this website. I can help out with the music if anyone wants (yes - it's playing music!) and can go into further detail about the mechanics of my lamp.
My one regret is that I didn't create a larger base. It's a bit top heavy, so I'm afraid it might take a tumble, but it's really beautiful. I didn't have time to get the little pineapple thing on top, but with my design it would have been spinning anyway.
Message me if you want help!
Thanks!
Hi! Can you share any details in how you motorized the shade and got the wavy motion behind the image? Also, any info on your music feature would be amazing.
Thanks in advance!
Similar threads
- Replies
- 13
- Views
- 556