You are using an out of date browser. It may not display this or other websites correctly.
You should upgrade or use an alternative browser.
You should upgrade or use an alternative browser.
ZF-1 BUILD UP problems and questions
- Thread starter marsattack
- Start date
On the sightpod the sides are Voyager, the middle bits are Maquis and the side parts are Kazon. On the bottom part it is all maquis. Thats about it. I have not made the control panel yet. I have no reference for it so i am still trying to figure out how i want to do it. Whether i just use some flat styrene or kitbash it. I am leaning toward kitbashing. I really can't do too much more until my frame is together and i figure out how to secure the sight pod.....and the rest of the pod for that matter. I think that will be everyones biggest hurdle, dealing with the pods. They are all a little different depending on how its cast , how it shrinks, how it's put together. Especially the latter. They all have different widths at the opening.
marsattack
Sr Member
HI guys, I am not getting involved in the domes.
I have a set form Lewis and a set coming form Zombie.
I have no access to them from here so unlike the RS switches I am not able to get them.
I was going to cast them so I cant ruin the originals but I am not selling them.
Droidboy: I was wondering when you where going to start the pics??
You and Griefboy are the only ones with completed upto date parts!
I just got shock caps and I have zombies here so you are in front
Zombie, hahah what are those? screw boxes???
I will have to post some pics too, I think I am expected to.
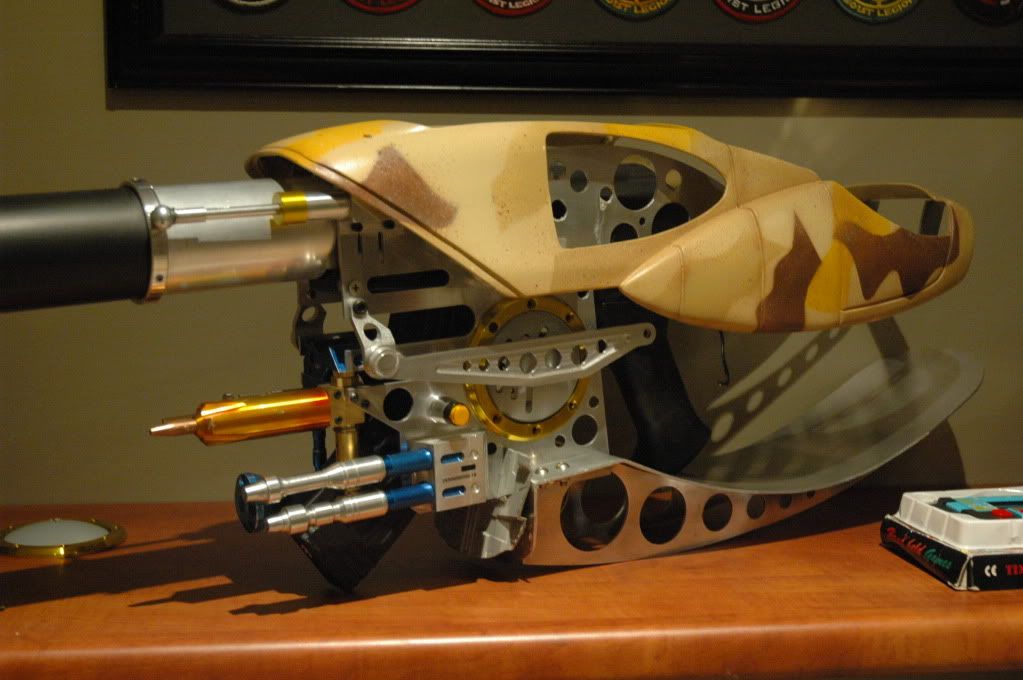
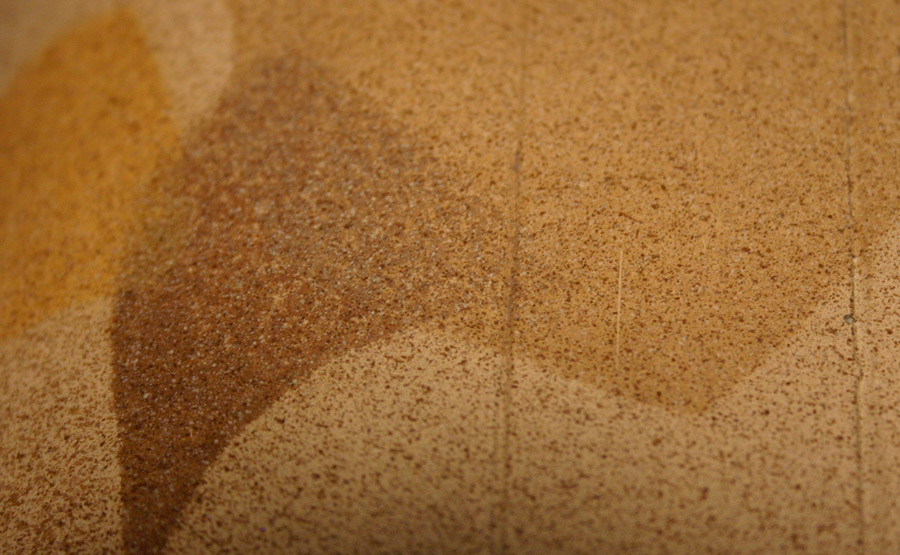
Pod's yellow is too yellow , so it will be toned down as suggested , will touch up colours and a flat clear to make the surface shine uniform.
Tried the propstore closed pod design.
I have a set form Lewis and a set coming form Zombie.
I have no access to them from here so unlike the RS switches I am not able to get them.
I was going to cast them so I cant ruin the originals but I am not selling them.
Droidboy: I was wondering when you where going to start the pics??
You and Griefboy are the only ones with completed upto date parts!
I just got shock caps and I have zombies here so you are in front
Zombie, hahah what are those? screw boxes???
I will have to post some pics too, I think I am expected to.
Pod's yellow is too yellow , so it will be toned down as suggested , will touch up colours and a flat clear to make the surface shine uniform.
Tried the propstore closed pod design.
Pod's yellow is too yellow , so it will be toned...
No, no, no, your paint is correct. Yes, I know the yellow looks like neon compared to the other colors right now, but there is a fine-mist of overspray (the dark brown) that needs to cover the entire pod and, trust me, this will change the look of the yellow to the correct hue.
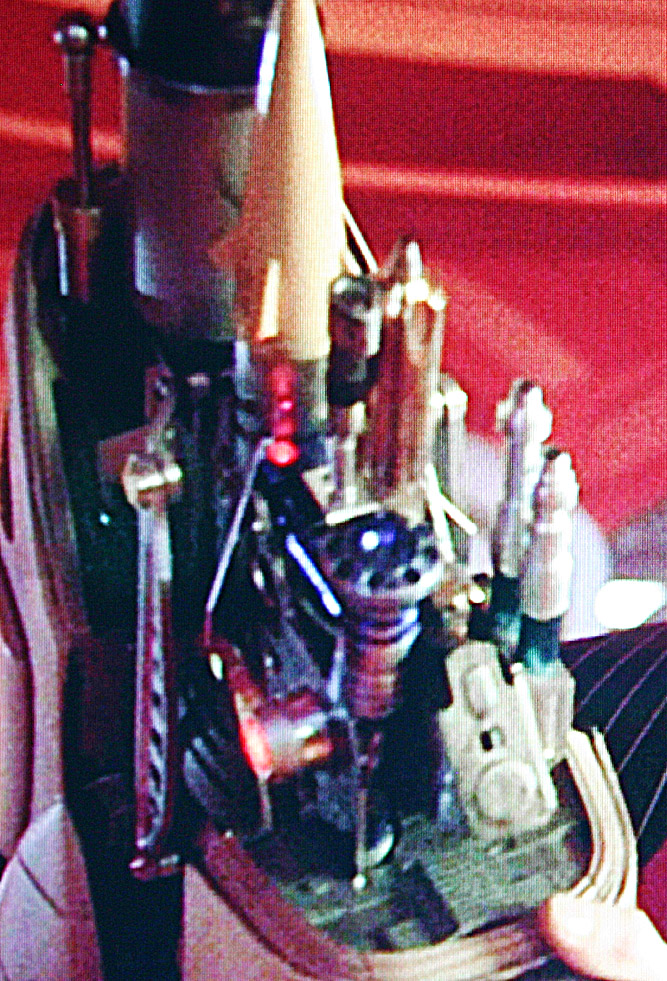
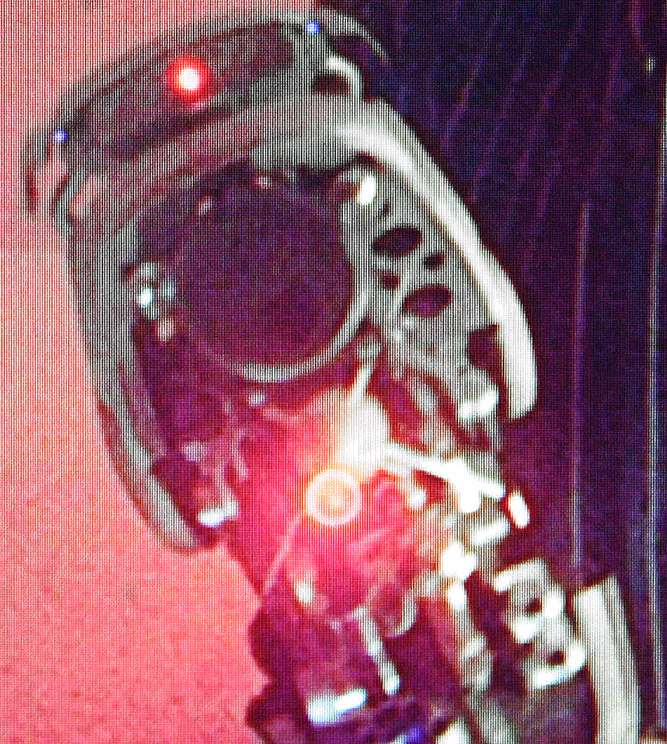
Close up of screen used pod
Looking good. How many of us are using 2 piece pods that need to be epoxied together and how many have Superkrates 1 piece pod?
I have a two piece and it's not going together very well. I'll have to give it a shot again when the weather get better.
Thanks Kurt.
Lewis you ain't kidding. The pod was the biggest pain to epoxy together.
Lewis you ain't kidding. The pod was the biggest pain to epoxy together.
Lewis you ain't kidding. The pod was the biggest pain to epoxy together.
Great!
Ok people, tell me who wants the domes and how many. I'll get costs of them plus postage to whereever.
Lewis
One more try...
So I had my first major screw up today. I cut the Marquis piece that goes on the front of the whale tail in the wrong place. So now to find another kit. Frak!
Next things on the list are to figure out how to attach the shocks to the main barrel, and the paints for painting the pod and the blue and yellow parts on the gun. Not to mention add the flanging for the pods. It's go time!
Droid, the barrel ring will have to be drilled and tapped for an M5 screw thread. You need to mount your barrel to see where exactly to drill it so the shock is parallel to the barrel.
Lewis, i don't think those domes have enough dome to them. Those are dished domes. From what i can tell the prop has full domes but they are cut down to fit. I am going with 3.5" domes that are cut down. I am hoping to make a jig to cut the slots. Still trying to get to that point. If i can get a jig made i will offer real domes with slots....like i said i am trying to get there.
Lewis, i don't think those domes have enough dome to them. Those are dished domes. From what i can tell the prop has full domes but they are cut down to fit. I am going with 3.5" domes that are cut down. I am hoping to make a jig to cut the slots. Still trying to get to that point. If i can get a jig made i will offer real domes with slots....like i said i am trying to get there.
marsattack
Sr Member
Kurt might send the pod to you mate!!
Bloody hard job this painting and ok will try and mist it.
Thanks for the tip.
Droidboy, don't cut the front marqui until you jave the pod ready to put on, it's a plastic part that is glued and can be the last thing you do.
I can give you measurements to the middle ring where to drill and tap for the shock
Mount rods but I have the airsoft in it.
So you can use it as a careful guide.
Will post here tonight.
Thank you guys
Mars
Accurate paint templates for download & printing on 8.5 x 11 @100%:

KramStaar
Sr Member
Great work everyone!
Agreed, absolutely fantastic build..
Congrats guys!
Highest regards
MARK
Lewis, i don't think those domes have enough dome to them. Those are dished domes. From what i can tell the prop has full domes but they are cut down to fit. I am going with 3.5" domes that are cut down. I am hoping to make a jig to cut the slots. Still trying to get to that point. If i can get a jig made i will offer real domes with slots....like i said i am trying to get there.
yeah I'm not sure now either. Its hard to tell. On some pics it looks quite flat and dish like:

then others rounder:
and then ball shaped:

")
yeah I'm not sure now either. Its hard to tell...
Easy answer when you think about the bending of the frame near the front rail mount - the rail barely clears the dome. Since you already have the rocket-vent ring (gold anodized) and the rail assembly, just measure the distance between them (when mounted) for the correct dome height.
please excuse the poor screen cap quality.
Today's progress:
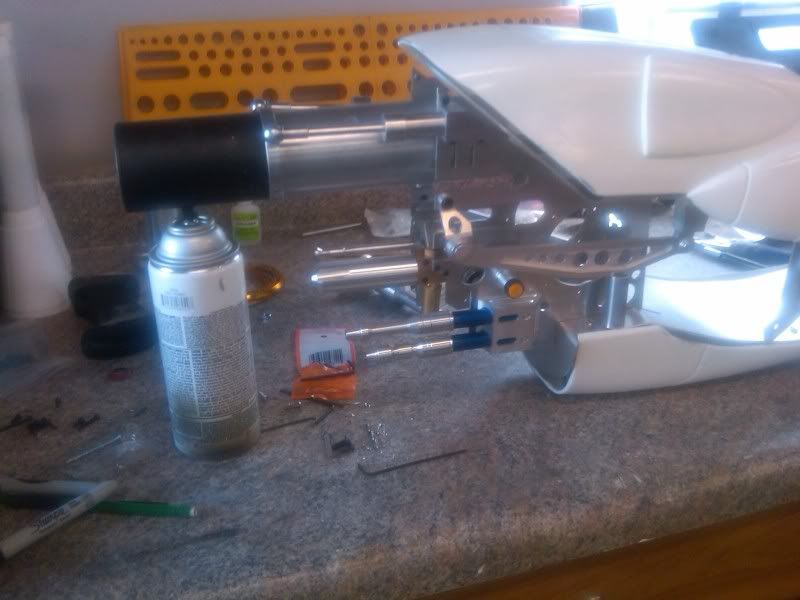
I was able to attach the shocks to the ring on the big tube, and after a couple of mis-fittings, was able to get the big tube positioned where I wanted it.
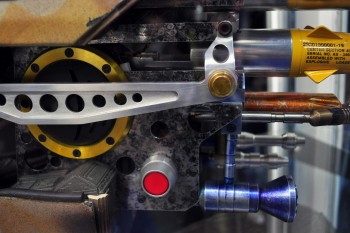
Also assembled the side brackets and have them half mounted in place and added the red and yellow buttons.
Today also found me buying an SAE and Metric tap and die set ($14.99 each from Harbor Freight) to tap the screw holes on the plates. I ended up having the neighborhood machine shop do the holes in the ring for me ($10) because I didn't want to screw it up.
With the exception of taping out the screw holes for the gold rings, I'm about caught up with the build I believe.
Gregg
I was able to attach the shocks to the ring on the big tube, and after a couple of mis-fittings, was able to get the big tube positioned where I wanted it.
Also assembled the side brackets and have them half mounted in place and added the red and yellow buttons.
Today also found me buying an SAE and Metric tap and die set ($14.99 each from Harbor Freight) to tap the screw holes on the plates. I ended up having the neighborhood machine shop do the holes in the ring for me ($10) because I didn't want to screw it up.
With the exception of taping out the screw holes for the gold rings, I'm about caught up with the build I believe.
Gregg
I am going to build up this frame i have here this week and post up the build. I am also going to come up with some aluminum angle brackets for it and send them out to you guys with the next batch of screws.
Similar threads
- Replies
- 5
- Views
- 979
- Replies
- 9
- Views
- 1,025
- Replies
- 1
- Views
- 363