You are using an out of date browser. It may not display this or other websites correctly.
You should upgrade or use an alternative browser.
You should upgrade or use an alternative browser.

WarPig
Sr Member
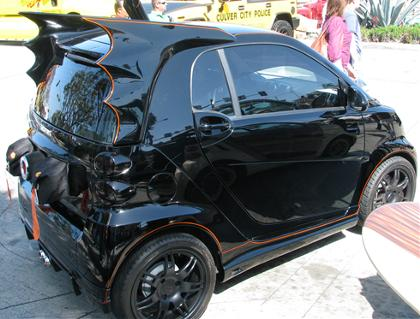
why does this thing have a parachute on it?
So you can drive it off a cliff and land safely. :lol
jnjoker100
Well-Known Member
why does this thing have a parachute on it?
1966 george baris batmobile that its mimicking had dual parachutes. Second episode "Smack in the middle" he deploys the parachute to make a hairpin turn
creebobby
Well-Known Member
Fiberglass R & D
I've gone back to the R & D stage to figure out how to get a skin on this bat.
My goal is to get a hard shell:
1. With minimal steps to the fiberglassing.
2. With minimal filling.
3. With zero sanding into fiberglass.
If the end result is semi-faceted, I'm okay with that.
So I set out to figure a 'one step' glassing process for skinning this thing.
First I made a test section, skinned it with chipboard, then used Super88 spray adhesive to glue down strips of fiberglass tape. I glazed it with a layer of poly resin and the results were bad. Slight imperfections in the weave rose up to create 'bacon' ripples, and a lot of the edges rose up and generally misbehaved (Once wet with poly resin, the fiberglass cloth acts like oily snakeskin.) The result was rock solid, but would require mucho bondo and sanding to smooth out.
View attachment 53618
View attachment 53619
But looking at the rear, the chipboard was hard as a rock, and perfectly smooth.
View attachment 53620
So I got to thinking - what if I reversed the process?
I made a single facet out of chipboard, lined the back with two layers of self-adhesive fiberglass drywall tape, glazed it with poly resin and held it to the foam frame with packing tape.
View attachment 53621
View attachment 53622
View attachment 53623
View attachment 53624
When the resin dried I pulled the tape off - Voila, a rock hard skin without any bacon!
View attachment 53625
For the real thing, I'd have the fiberglass tape stick out 1/2" past the cardstock where the next piece attaches, so that all the facets would interlock for strength.
Once fully skinned, I'd glaze the top with poly resin and then reinforce the back with fiberglass tape around the honeycomb structure ala the first test above. (The back can be bacon city - it just has to be strong.)
Thoughts?
BoozeBeGood
Sr Member
1966 george baris batmobile that its mimicking had dual parachutes. Second episode "Smack in the middle" he deploys the parachute to make a hairpin turn
Very realistic too!! :cool
YouTube - Batman - Batmobile 3
creebobby
Well-Known Member
Door Piece Glassed
I tried out my new method on one of the two door pieces.
I made patterns of the sections with overhead transparencies:
View attachment 54549
I made cardstock plates lined with fiberglass tape:
View attachment 54550
All the pieces:
View attachment 54551
The finished piece all glassed up:
View attachment 54552
View attachment 54553
The shell is rock solid, as far as I can tell, and very light.
I got greedy by making one big 'pelt' for the long straight section. When it got gooped with resin, the paper and fiberglass tape started going separate directions, and I ended up with a few uneven seams that will require either a patch layer or bondo.
I think about one square foot is the biggest skin plate I should try to glass at once.
Also, for very curvy sections, I'll need to curl the cardstock before applying the fiberglass tape - otherwise the tape wants to lift from the paper when wet with resin and forced over the form.
All in all, though, a great first piece.
creebobby
Well-Known Member
Pieces for other door.
I made the pattern pieces for the other door.
I made sure the curvy pieces were curled when I fiberglass taped them, and broke up the long section into appropriately sized segments. I have the ends taped together so that they stay curled until I glass them.
View attachment 54554
I made the pattern pieces for the other door.
I made sure the curvy pieces were curled when I fiberglass taped them, and broke up the long section into appropriately sized segments. I have the ends taped together so that they stay curled until I glass them.
View attachment 54554
creebobby
Well-Known Member
Fiberglass Strength Framing
I decided to reinforce the skeleton and all the mounting points on the front half before I skin it.
I worked out a grid of fiberglass reinforcement that wraps the top of the skeleton and around all the mounting spots:
View attachment 54555
View attachment 54556
The fiberglass tape is held in place with 'weatherstripping nails' and small 'carpet tacks'.
I backed all the 'holes' with cardstock that I hot glued in place.
View attachment 54557
I faceted and wrapped the headlight and turn signal areas:
View attachment 54558
View attachment 54559
All this doesn't look like much in photos, but it took a lot of work!
slave1pilot
Sr Member
Check this out;
Homemade Porsche Car [13 Pics] | theLAWL - StumbleUpon
Homemade Porsche Car [13 Pics] | theLAWL - StumbleUpon
Monteburns
Sr Member
Looks like a killer build so far & great work on the skeleton. :thumbsup
clancampbell
Sr Member
This is looking fabulous!
Rich
Rich
creebobby
Well-Known Member
Slave1Pilot - that Porsche build is awesome, thanks for the link - looks like pvc tubing and . . . packing tape? Wonder how he made the skin hard - it looks like he sanded through the tape into the tubing at one point.
But yeah, it's pretty related to what I'm doing.
I did two full hot days of glassing up the fiberglass support grid on top of the skeleton:
View attachment 56368
View attachment 56366
View attachment 56367
I laid down one line of resin at a time, pressed a length of carbon fiber tape onto the line, then glazed it with a second coat of resin. The carbon fiber was fussy and slowed things down considerably. It was also more 'dimensional' than I'd hoped - I probably won't be using it anywhere else.
Since these pics I did a session of sanding and dremel-ing to get all the glassing as flat as possible.
It's June in Texas, and I'm wearing a full-face respirator to lay this stuff up - I think I got mild heat exhaustion from the two days I did - on top of that, I deliver pizzas in this miata with no a/c. It's killin' me!
So I've designed plans for a DIY ice box a/c system, and parts are on the way.
Last edited:
SteveStarkiller
Sr Member
holy heat stroke!
stay cool out there,
looking great creebobby
stay cool out there,
looking great creebobby
WarPig
Sr Member
Looks fantastic, man. Are you planning to keep delivering pizzas in it once it's a batmobile?
You should get a Batman suit and deliver Bat-pizzas! :lol
Very, very, very cool project! Way to jump into a big job like this and work that b****! I can't wait to see those fins!
Laranorac
Active Member
looks fantastic, man. Are you planning to keep delivering pizzas in it once it's a batmobile?
please!!! I would order pizza all the time!
Similar threads
- Replies
- 11
- Views
- 1,611
- Replies
- 18
- Views
- 2,097
- Replies
- 20
- Views
- 2,664