Resculpting a GH ANH Darth Vader mask (Pic heavy)

CSMacLaren

Sr Member
then-and-now.jpg


Hi guys... I thought I'd share a project that has embarassingly taken me about 2 and a half years. But boy did I learn a lot from it.

It started as a restoration - with a flawed casting with a face-transplant piece.

gh_theoretical_1.jpg


And then cutting the bad piece out to put the good piece in.

cutout_before_and_after.jpg


As you can imagine, I call this project "Quasimodo"

Then... ta-daaaa...

gh_side_01.jpg


But then I didn't really like how the mask looked so I resculpted the whole darn thing. Two and a half painfully long years later.... :cry

IMG_0281.jpg


Brand new tubes, reworked frown, frown bump, nose, nose bridge, nose arch, eyebrows, inner eyelids, lower eyelids, cheek faces, whiskers, chin, head (cut it up and re-angled the pieces, then rejoined them and belnded them so the bloated head shape is gone), and neck.

With my custom dome which, similarly, went through major surgery with much that has been resculpted:

IMG_0276.jpg


IMG_0273.jpg


Edit: The right tusk (wearer's left) is not yet done. I had to rush out of the house, so I left that a bit wimpy so I could address it later. :)
 
Last edited:
Holy shards of fiberglass batman!

That is almost not believable CS!

Great work!

The final result is seriously awe inspiring. :)
 
That looks awesome! I am tossing around the idea of sculpting my own Darth Vader head. However, I am wary of the skill level necessary to pull off this project. As a senior in high school over a year ago, I took a year's worth of ceramics class in high school and have some general experience with tools from theater tech shop. Are there any suggestions that you can give to someone with my background looking back over the build?
 
That looks awesome! I am tossing around the idea of sculpting my own Darth Vader head. However, I am wary of the skill level necessary to pull off this project. As a senior in high school over a year ago, I took a year's worth of ceramics class in high school and have some general experience with tools from theater tech shop. Are there any suggestions that you can give to someone with my background looking back over the build?


poodoogazebo

How awesome! I wish I could do ceramics, and all that cool glazing stuff. I watched a video of someone who made over twenty pots and stuff, and he put them in a kiln. Only 2-3 survived. The guy was like crying. Poor guy. Don't know what to say.

But in terms of sculpting Vader, I found that sculpting from photos is difficult because the brain picks out the obvious lines, and you sculpt them accordingly - without properly interpreting the three dimensional relationships when they're represented on a two dimensional plane. It helps to watch the DVDs and step the video back and forth as Vader is turning his head. Then you see how the lines and surface reflect light, their inter-relationships, depth and dimension. For example, here is a great example of what *not* to do. I found a great photo of the ROTS Vader and just sculpted away.


"I'm Caaassper... the Friendly Ghost... the Friendliest-- ah, nevermind."


The above started looking better, until I realized I was biasing the sculpt according to one photographic angle. It looked really off at other angles. Given that this was a taxidermy clay (used for sculpting bones) it was bone-hard to sand and to correct my mistake. Oil-based or water-based clay is definitely the way to go.

In addition to approaching the concept that the subject is really a three dimensional shape, it is ultra important to keep in mind - when studying screenshots - is how close the camera lens is to the subject. The closer the lens, the greater the fish-eye perspective distortion. The farther back the camera, the more lateral detail you pick up. This greatly affects your perception of Vader. In the early days of the fandom, vendors biased their Vader products based on misinterpreting what they saw in the film, not taking lens distortion into account.

If you can, the fastest way to understand Vader as a three dimensional sculpture is to acquire the most accurate LFL-descended casting possible, and be aware of any deficiencies, warpage, etc. of the casting, and any vendor/artist re-interpretation or modification if you're trying to be true to what you see on screen. Anything like a Don Post Deluxe derived helmet to a 20th Century is a good starting point and great reference.

I would say that your goal as an artist is to train your eye. I'm not professionally trained in any way - I'm just a self-taught individual who is occasionally encouraged and mentored here or there. But what I've learned is that your powers of observation are going to be more important than sculpting itself. If you can look at your own work 1-3 months from now and say, "I sculpted that piece of crap? What was I thinking?" then you know you are developing as an artist.

One of the most valuable lessons I've learned was to approach this "Quasi" (Quasimodo) project was not to try to do it "screen-accurate" for accuracy's sake, but that it was done out of fun and art. You see, in myopically fussing over details, you can miss the flow of the overall look. Vader is not a geometric shape, nor is comprised of geometric shapes, so people scratchbuilding a 3D model for pepaukra or commercial video gamers have yet to capture its detail. All the surfaces flow. Some appear to be the byproduct of sculpting tools, while others a byproduct of Brian's fingers. The surfaces interrelate. You carve or sand one surface, and it will impact the adjoining surface. Well, you know how fussy and anal Star Wars fans can be about their props. When I found that approaching this sculpt as an accurization project (sculpting ever-so-carefully after hours of studying screenshots), the look was off in that it had accurate details but the personality of the sculpt was terrible. I then decided to use my Dremel and blast away major areas at a time and redid them. I'd occasionally look over at a 20th Century or at an ESB movie poster to confirm if I was on the right track - and that was about it. The results you see here are because, basically, I wanted to have fun - not just with the end result but in the process of making it.

Another lesson I've learned along the way is to dare to make mistakes. Sometimes the best features I achieve are because I took the risk and blasted something away, knowing that I could set my progress back and I could lose quintessential artistic features that seemed to come about by chance. So many of these Vader modifications take me a long time because it takes me months to work up the courage to do anything about it!

I have to acknowledge and thank Brian Muir for encouraging me to sculpt in oil based clay, and I can't thank him more profusely for suggesting that. I've use two-part epoxy clays, which involves a painful amount of sanding and dremeling to refine, and some of my projects are months - if not years - in the making because of the curing period the clays require, and all the subtle modifications and edits add up (not to mention feeling too chicken to do some resculpts). Oil based clay allows me to take the knowledge and know-how I've accumulated over the years and work on a sculpt to where the medium is prohibiting the creative process. In other words, I can see my results, step back and evaluate, resculpt, step back and evaluate. It takes me days instead of months.

My last advice is to give yourself simple goals and to give yourself a sense of progress and achievement. My first attempt ever to scratchbuild a Vader began years back, and despite my best intentions, it started like this:

scratchbuild_9.jpg


Just keep on at it. (Yes, that's Casper from the thumbnails!)

I hope this helps. Let me know if I can answer any other questions!
 
Thanks for the kind comments, guys!

Wow, very nice. I honestly wouldn't recognise it as a GH.

What was the basis of the dome?


The dome was Don Post Deluxe vendor copy, but too wide when viewed from the front, and with too much added to the rear to make the flange longer. So this Frankenhelmet ended up not going well with any mask I paired it up with.

I originally piled on 2-part clay to make the domecap taller, but that turned out to make the helmet too huge, overall. So I decided to cut the dome in half and reduced it from 0.5-1" unevenly, which necessitated that I resculpt significant portions of the domecap, in addition to reducing its height. I also cut away the excess flange length, and then had to calibrate it to the dimensions of the mask. I also had to resculpt portions of the flange to re-establish their proper angles and the silhouette they create.

The mid strip is completely resculpted, not so much as a result of the dome width reduction, but because of the aforementioned height-gain modification that required putting clay over the original mid strip. Well all that work had to be undone, haha!

For whatever reason, the frown was very weak and flat, so I had to resculpt that. Also, because the fold line was a byproduct of the brow, I had to resculpt that as well.

The widow's peak area took several attempts to get right, and each time I'd use a Dremel flapwheel to blast it away. It's just about there - I still have some refinement to done (it's still a work in progress, so bear with me).

IMG_0264.jpg


In the past, I might modify a Rubie's plastic helmet by sharpening the mid strip or adding a widow's peak, but by comparison, this project was more than merely doing modifications. It encompassed a complete rearchitecting of a warped dome and resculpting its surfaces.

Hope that answers the question. It's almost done. Phew!
 
Mac, you bring a whole new level of comittment to a project you start!
For a self taught sculptor, you've done an astonishing job on this....in fact, for a professional sculptor this is amazing!

Sorry, got a bit emotional there!

Rich
 
I'm deeply touched by community support and the warm comments. Thanks, guys!!

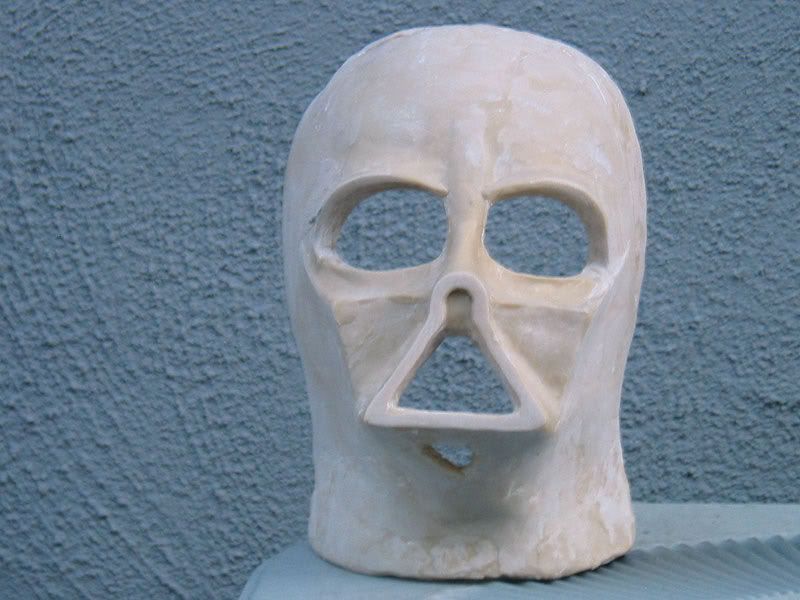
I still have some tweaks and refinements to make. As I was wet-sanding Quasi this morning, a lot of the black acrylic paint (which I use because it's non-toxic and helps me study the surfaces better) came off, revealing overlapping layers both white and off-black clays - each bringing back memories of the efforts to bring Quasi this far. I was taken aback by the history all at a glance. Originally, I decided to only photograph my work in black, partly because most of my work-in-progress shots in the past seemed to be too distracting for people to interpret, and partly because I wanted to keep certain methods out of the hands of recasters. But it became apparent that this was a superb opportunity to photo-document my work, so if I ever had to approach eBay to confront a recaster, I could say, "Look, this isn't just a mere modification of some off-the-shelf mask we're talking about here. This is indeed my work!!"

Quasimodo-IMG_0296-Comp.jpg

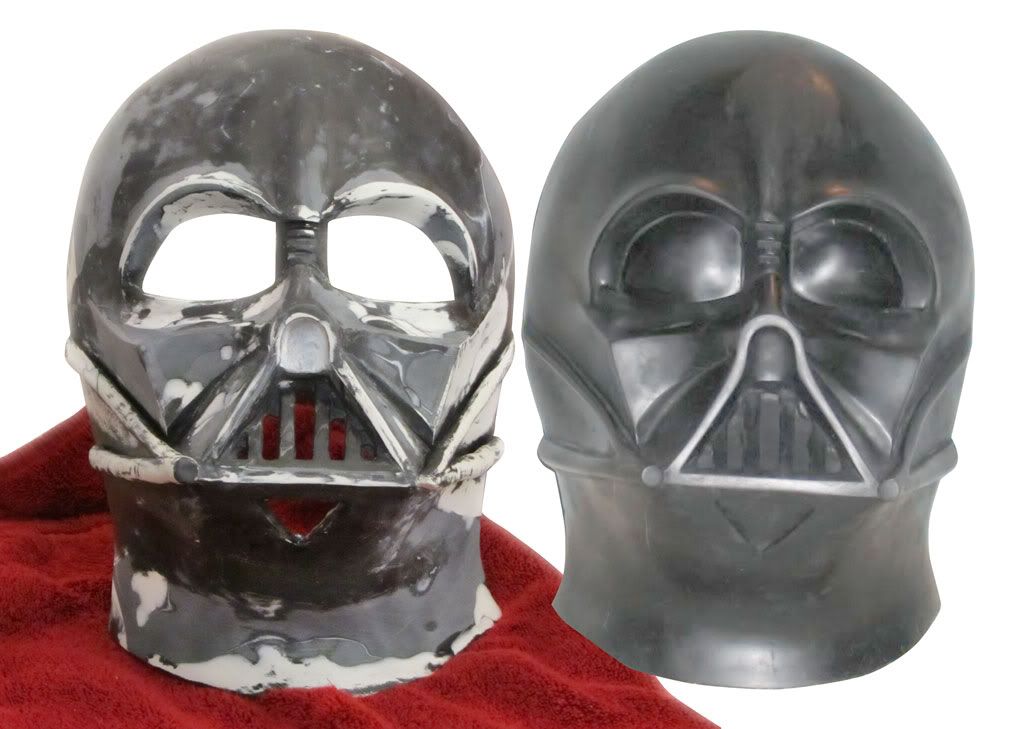
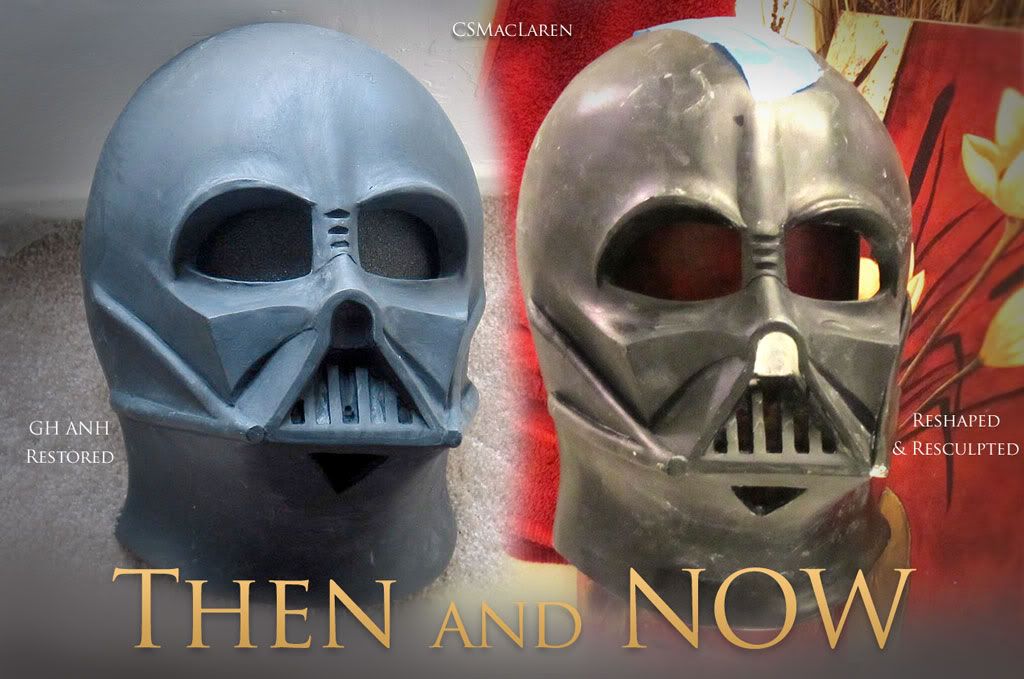
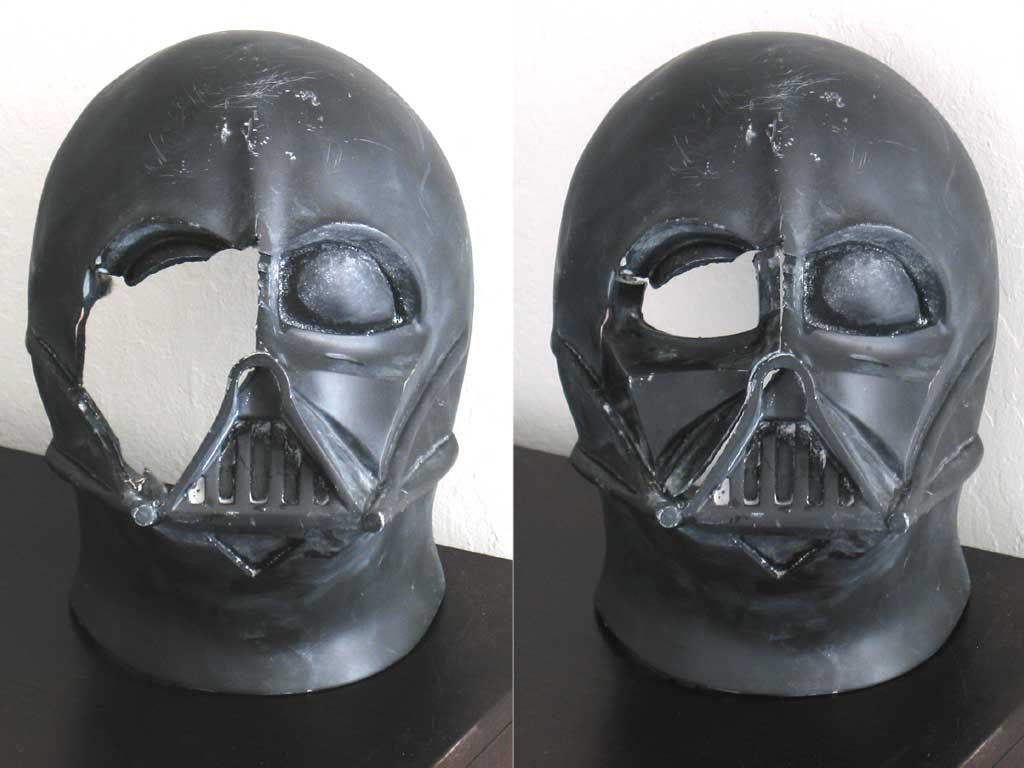
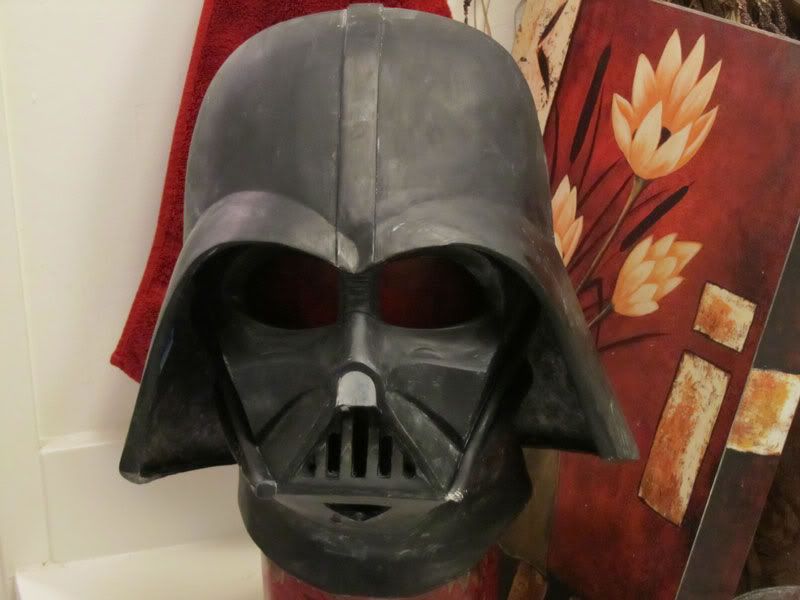
(Above: Left - Quasi. Right - GH ANH)

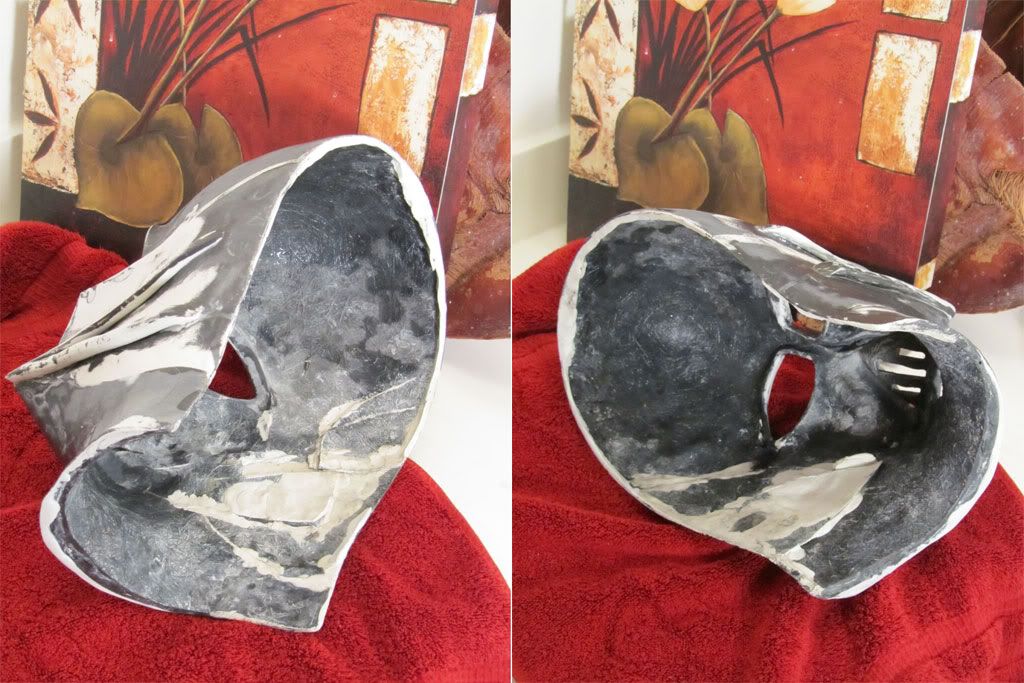
The above may be difficult to interpret, but if you've tracked my progress thread on The Prop Den, I use two part clay that's white, and on occasion I either paint over it, or I mix black acrylic paint directly into the clay, which results in an off-black appearance. As you study the photo carefully, you'll see that the crown and certain parts of the chin remain black and are more or less the same. The rest that is off-black and white are the areas that are either sculpted over, or outright replaced. (And when I said "replaced" I literally mean "Mac took a Dremel and eradicated that area, and outright sculpted that area brand new". I got to the point where I grew really tired of sanding and modifying. I achieved better results replacing the area or facial feature outright. Sanding the two-part clay seemed a little more benevolent to my lungs than creating more fiberglass dust.) Also, not all the black acrylic paint came off the white and gray areas, so it's probably confusing.

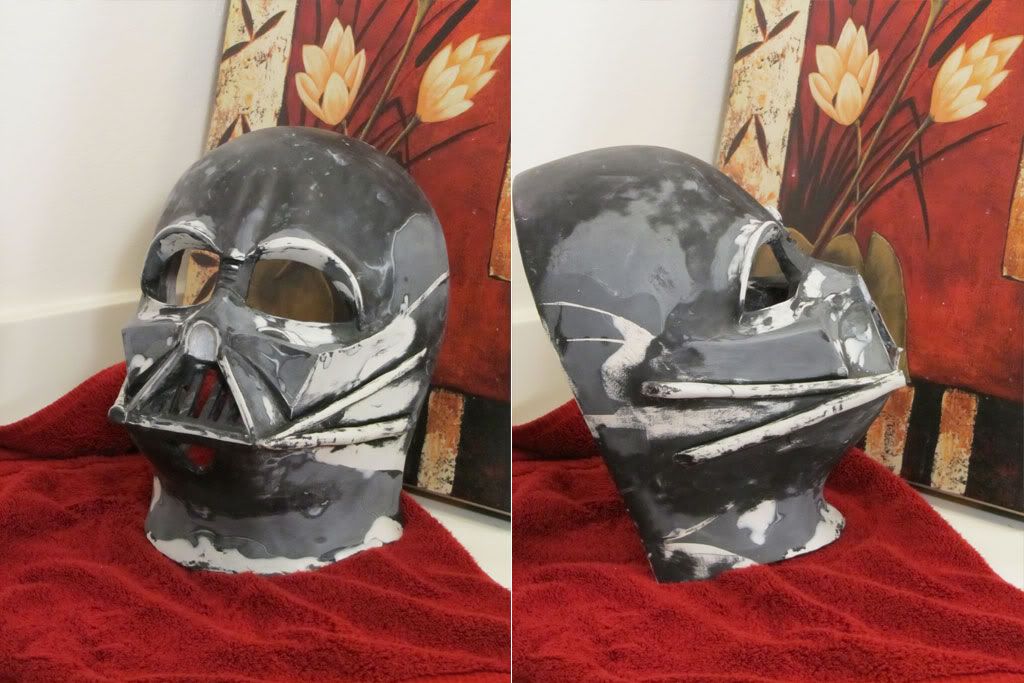
But if you don't mind focusing past the "camouflage" and just compare the lines, surfaces and structures, you can see that Quasi is very much a different animal, now, compared with its progenitor, the GH ANH.

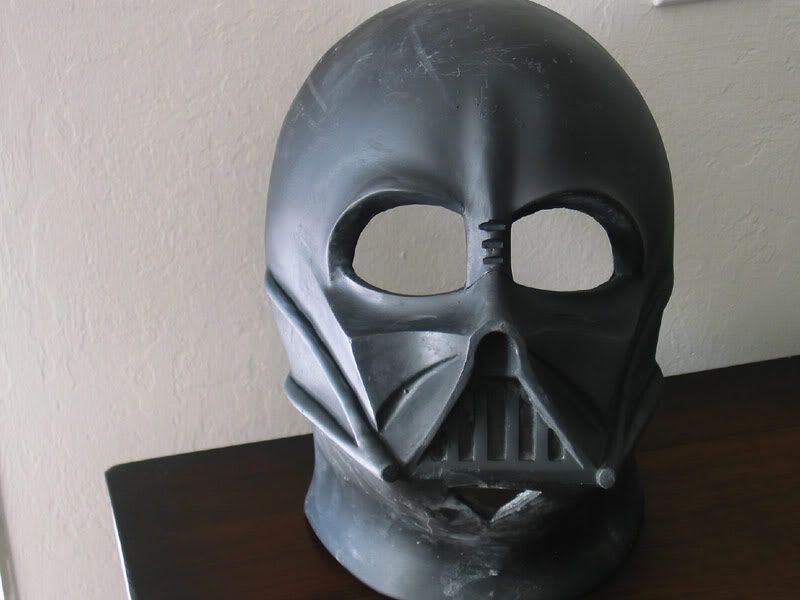
One thing you may have noticed is that the head shape of Quasi differs greatly, although there very crown retains the same shape. I could not sand, bend or manipulate the GH ANH skull for the life of me, to create a more slender head shape. The more slender appearance you see is the result of literally cutting the tubes off, then cutting up the skull and neck, and re-angling and re-joining the separate pieces, and blending them until they were seamless.
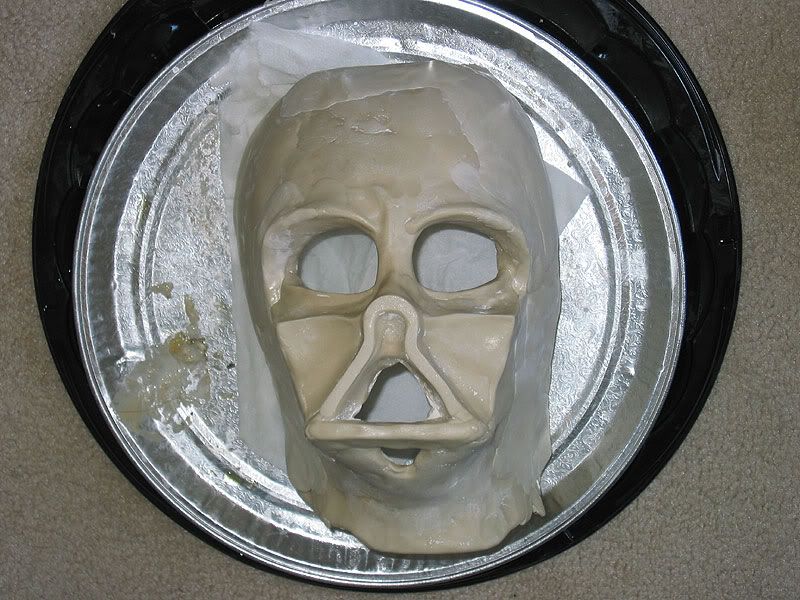
So on the inside:

Quasimodo-inside.jpg


You can see that each cut surface represented a separate attempt, so this took several passes to get the head to the shape I wanted. In specific cases, the pieces of fiberglass merely served as an armature, as I set them deep enough to where I could add more two-part clay on the outside to get the sculpted surface I wanted.

Quasimodo-outside.jpg


Pardon the mess, but bear in mind as you're looking at the above, that both white and grey areas are the two-part clay (again, I sometimes mix black paint directly into the white clay, rather than just paint over the clay). I realize it's not obvious, but the darker areas are not necessarily the original gelcoat!

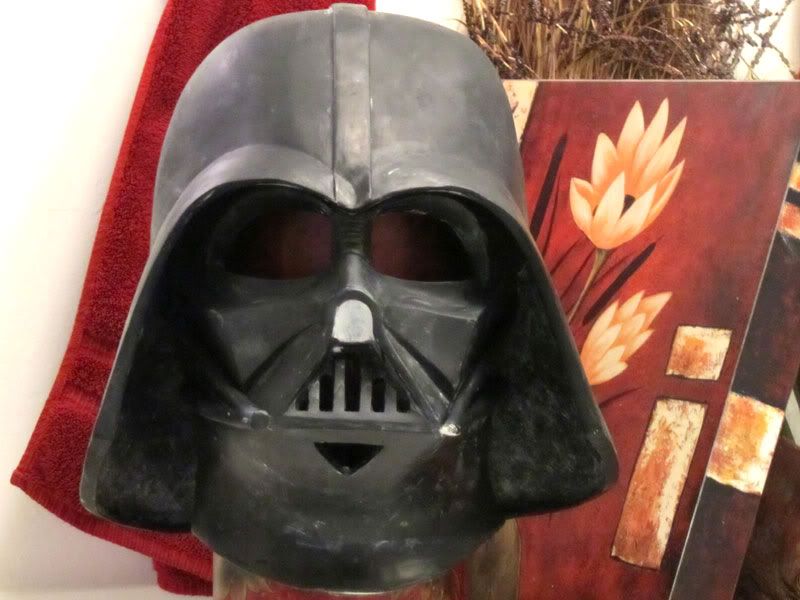
Quasi is a bit like Frankenstein under the paint in that you never knew it had been cut up into so many pieces. Each facet represents the history of its metamorphosis.

Yes, I'm seriously considering doing a run of these. I will endeavor to make Quasi as affordable as possible; my only caveat is that I'm going to ask future owners to join me in a serious gentleman's agreement not to recast this and to not allow this to fall into the hands of recasters. If you've followed the progress thread on The Prop Den, this helmet represents two and a half years (or more) of labor of love.

Having seen the work of fellow sculptors such as Cyberman and the tragedy of seeing substandard, warped white polyurethane cheap recasts of his Darth Maul on fleabay, and seeing how the recaster is lurking among us, I will say to that recaster now: if you want a Vader so badly, I'll send you a Don Post Deluxe. Just please leave my sculpt alone.

But for everyone who, like me, had a run of bad luck with online vendors but who simply wanted to have something that captured that movie essence, then I hope this can help you towards your collecting dreams!
 
Last edited:
If you have the go-ahead, I'd also be interested in an affordable cast/kit.

It's been a while since I last spoke with him on the subject, but GH and I spoke again on Quasi. He was a gentleman and spoke well of it and gave me his support.

In our conversation, it turned out that we both share the same concern towards deceptive marketing campaigns, as we've both seen with Vader vendors taking advantage of the uninitiated fans over the years. If Quasi had existed years ago, a unscrupulous vendor would have probably modified it a little, then turned it around and claimed it as "their work" from some highly exclusive LFL cast with "lineage" or "provenance" to the original molds.

I can't stand any of that, and as many of you already know, I - like many of you - was a victim of propaganda like that when I was a new guy starting out in the fandom.

After seeing too much chest-thumping and vendors building their private empires of fame, I really hope that the community builds its values around different values, and that fan art and craftsmanship - done openly and honestly as a labor of love - will set the tone for the Vader collecting community.

On that very note, I think GH liked those priorities and the effort that went into Quasi. :)

The remaining green light will come when it's finally finished - then sent to someone I can trust to mold it and cast it. Then we paint it up and see if it lives up to our expectations!
 
Last edited:
This thread is more than 13 years old.

Your message may be considered spam for the following reasons:

  1. This thread hasn't been active in some time. A new post in this thread might not contribute constructively to this discussion after so long.
If you wish to reply despite these issues, check the box below before replying.
Be aware that malicious compliance may result in more severe penalties.
Back
Top