Organic Mechanic
Sr Member
Looks like I'm the first to this party. Maybe it will inspire everyone else to do the same. I hope so, because I'm very interested in seeing what went into those awesome entries. :cool
EDIT: In my fervor to type all of this, I neglect to point out that I was offering this thread as a General build thread, not just specific to my entry. Please feel free, but not obligated, to add your own build to it.
*************************************************
I started with the concept that I was NOT doing a screen used design. Fair enough, but that meant I need a Jedi/Sith to build a saber for. I came up with this fellow;
Ra-Talla Singh
Ra-Talla, a human Jedi, was a contemporary of legendary Jedi Master, Qui-Gon Jinn. Though strong in the Force, he was no "Skywalker"...or even a "Qui-Gon Jinn". In fact, though he put all he had into his training, he spent the entirety of his Padawan years in Jinn's shadow. The Jedi didn't see it that way, nor did his "friend" Qui-Gonn, but such was Ra-Talla's weakness. He was a touch too proud.
This jealousy never left Ra-Talla throughout his time with the Jedi, and in time it served to harden his view of the council, and his duties. This may be the reason Ra-Talla developed a natural usage of Force techniques normally associated with the Dark Side, though he never turned. His dedication to Justice never wavered, though his methods rode the line. Sometimes a bit too closely.
His last mission for the Jedi was a turning point in Ra-Talla's life. Having cornered his target, a Mandalorian Bounty Hunter, in a bar on the lowest, grittiest level of Corusant, he attempted to persuade the Bounty Hunter to cooperate by by holding his unactivated lightsaber to his exposed throat. The Bounty Hunter, foolishly, mocked the threat. No Jedi would do such a thing...
The Council was less than pleased. Master Windu was particularly harsh, demanding an explanation for the headless suspect being left to be looted by the scum of the lower levels. Ra-Talla had no explanation to give, and was rather relieved that none suspected that he now wore lighsaber-proof chest armor under his robes, though he was sure he would be stripped of his Knight status for the way he dealt with the criminal.
Before his doom could be proclaimed however, a distress call came in, apparently his old rival's former student, Obi-Wan Kenobi, had gotten himself into quite a bit of trouble on Geonosis. He was ordered to join the strike force being sent to deal with the situation.
Ra-Talla never made the rendezvous at Geonosis. Fed up with the Jedi order, he kept going, past the outer ring, landing his craft only once he knew his power cells were too depleted to make it to the next system. On the Jungle planet, Ebane, where the Republic, and the Jedi were unknown, Ra-Talla Singh made his home. Living as a hermit, he lived out his days employing vigilante justice to protect the people of his new home. He never abandoned his Jedi teachings, though he did routinely "bend" the rules a little.
In 11ABY, Ra-Talla Singh died in battle with a petty criminal, though the thief could take no credit. At 82 years of age, his body simply gave out when he attempted to finish off his opponent with a lightning attack.
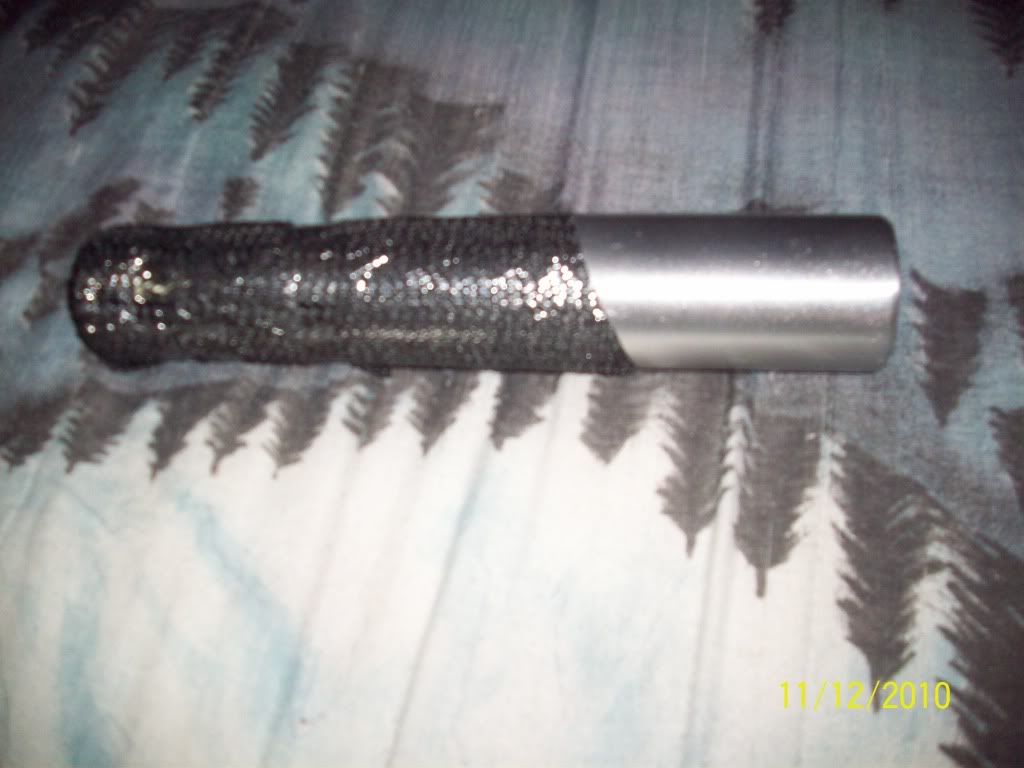
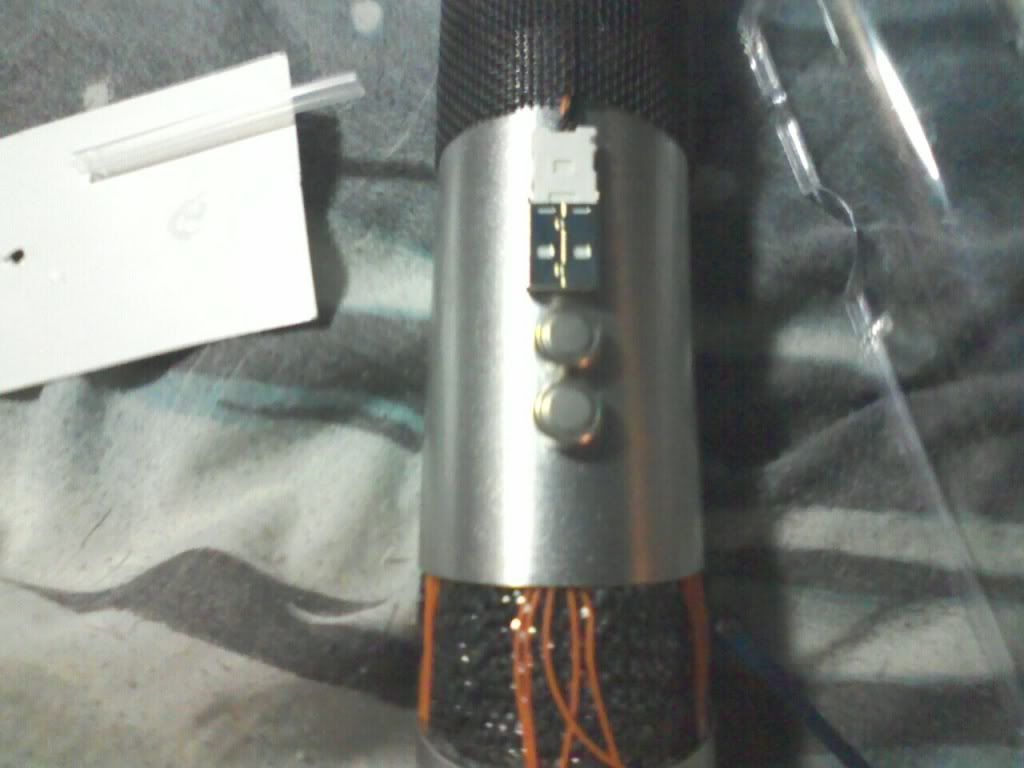
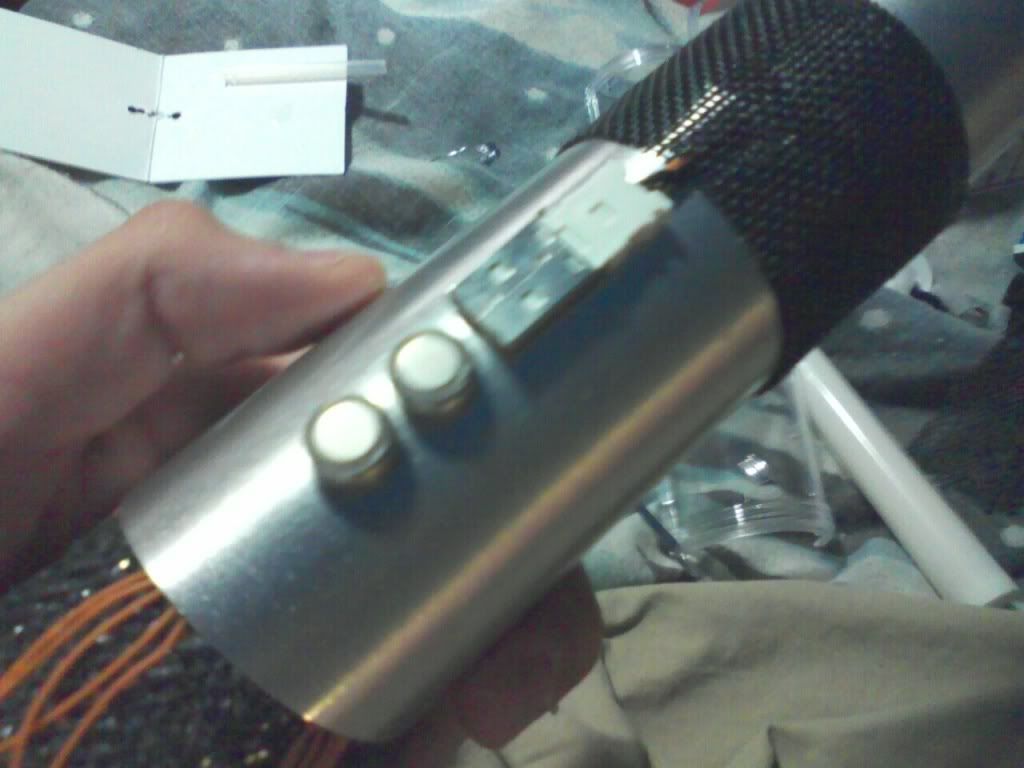
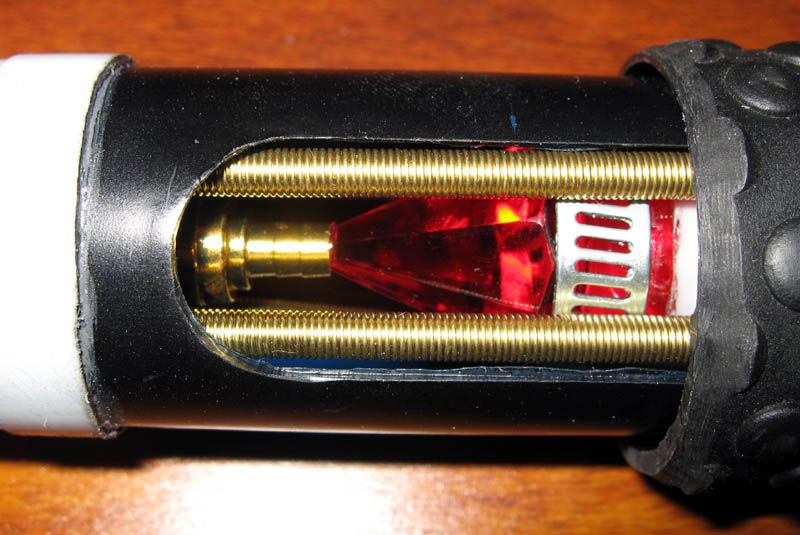
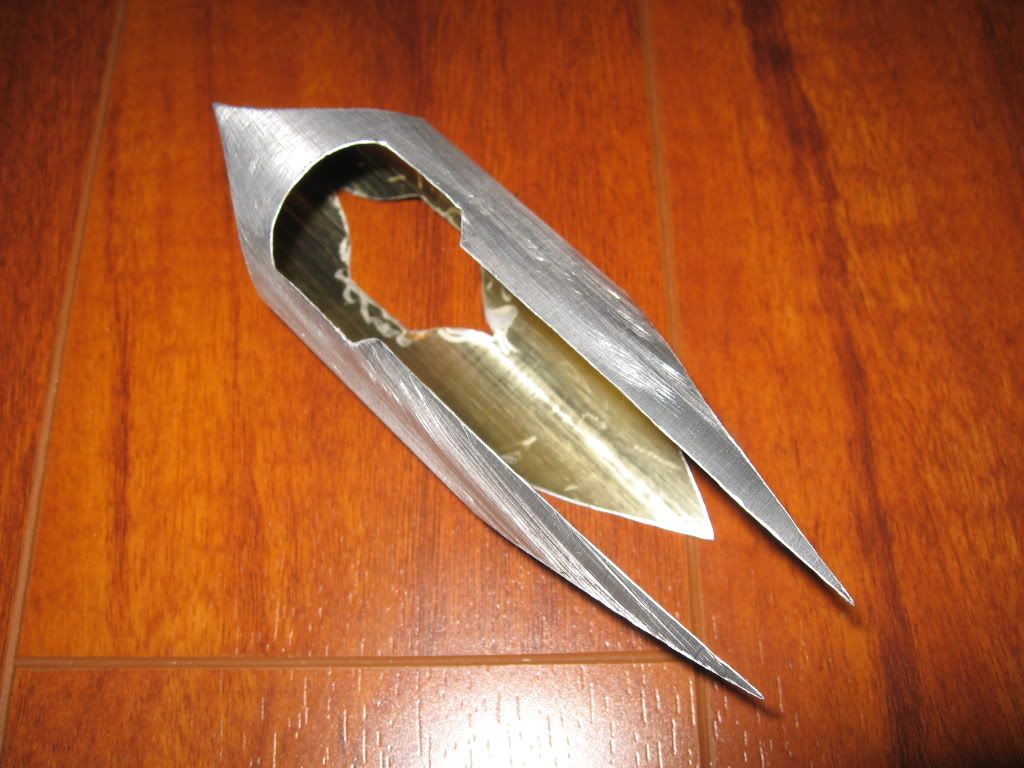
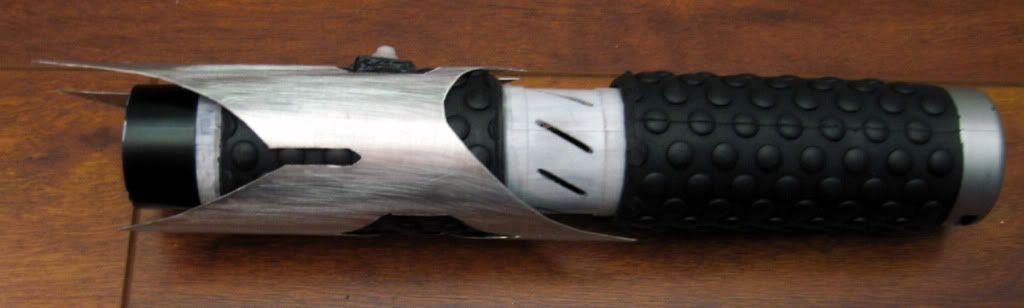
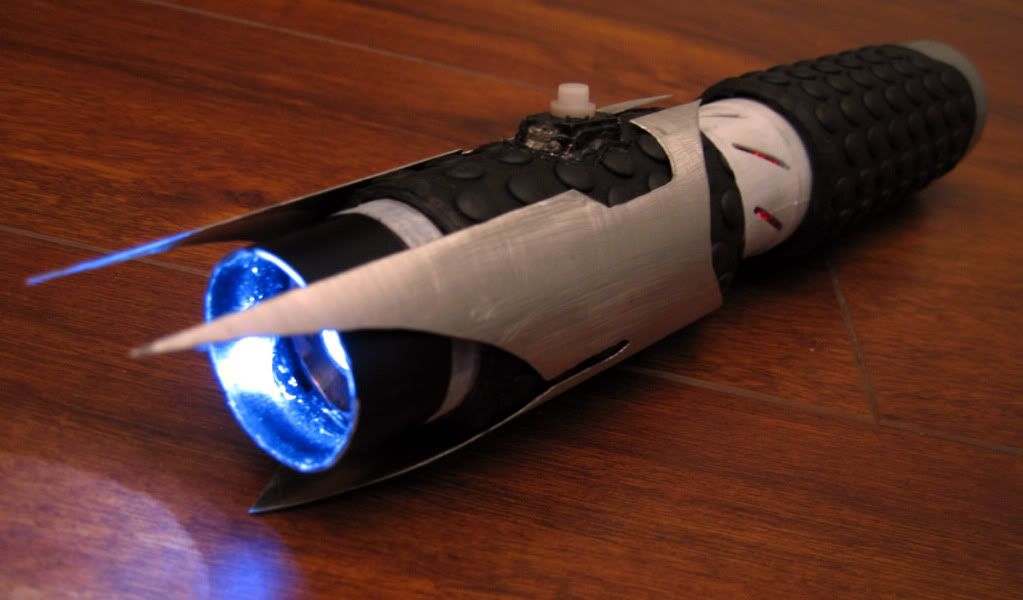
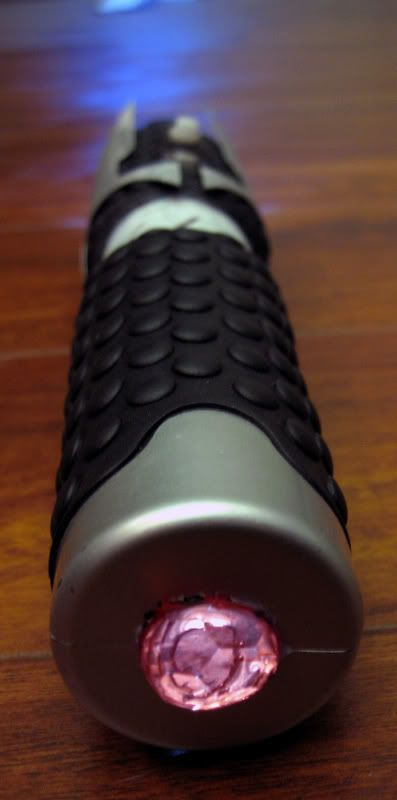
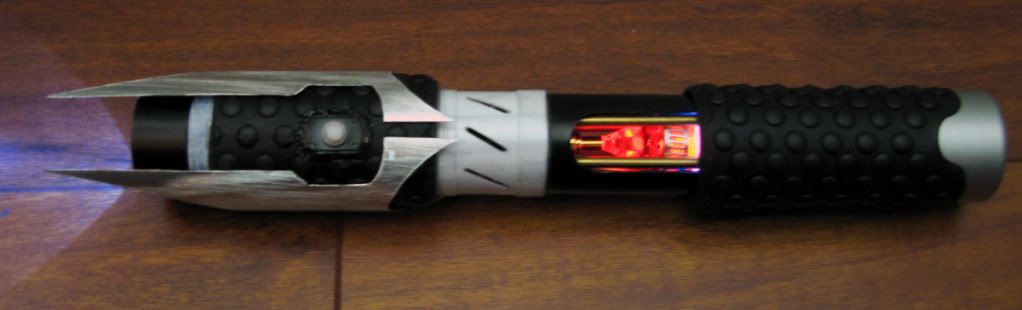
Hanging from the old man's belt was the very lightsaber he had built as a Padawan learner, and had carried into countless battles since. Behold, the Saber of Ra-Talla:
View attachment 40276
View attachment 40277
View attachment 40278
View attachment 40279
*************************************************
*************************************************
For this design, I really wanted the classic, outer covering free design utilized by Obi-Wan Kenobie. It just looks so utilitarian to not have all the shiny shrouding on the saber. Perfect for the short concept I came up with for my Jedi.
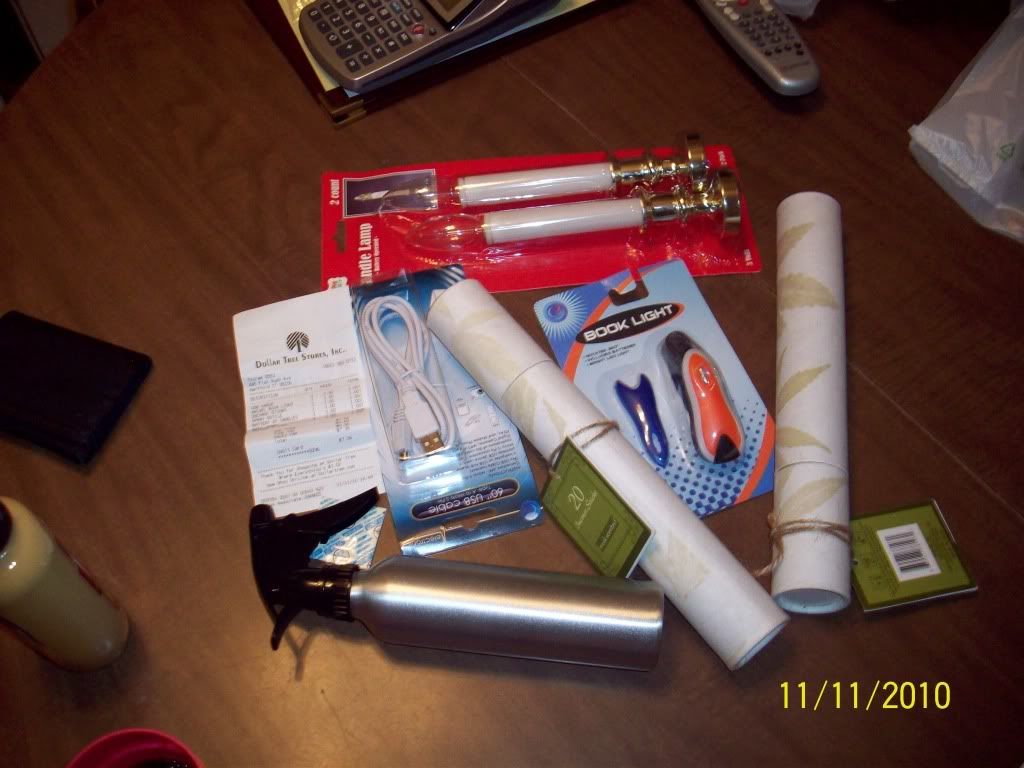
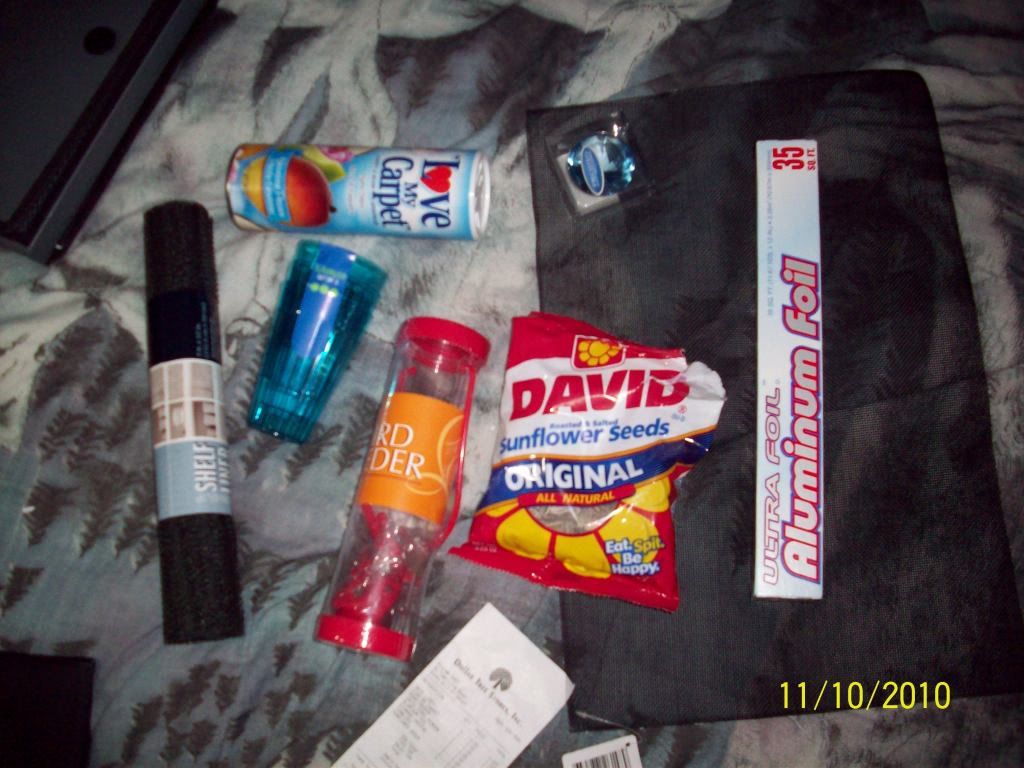
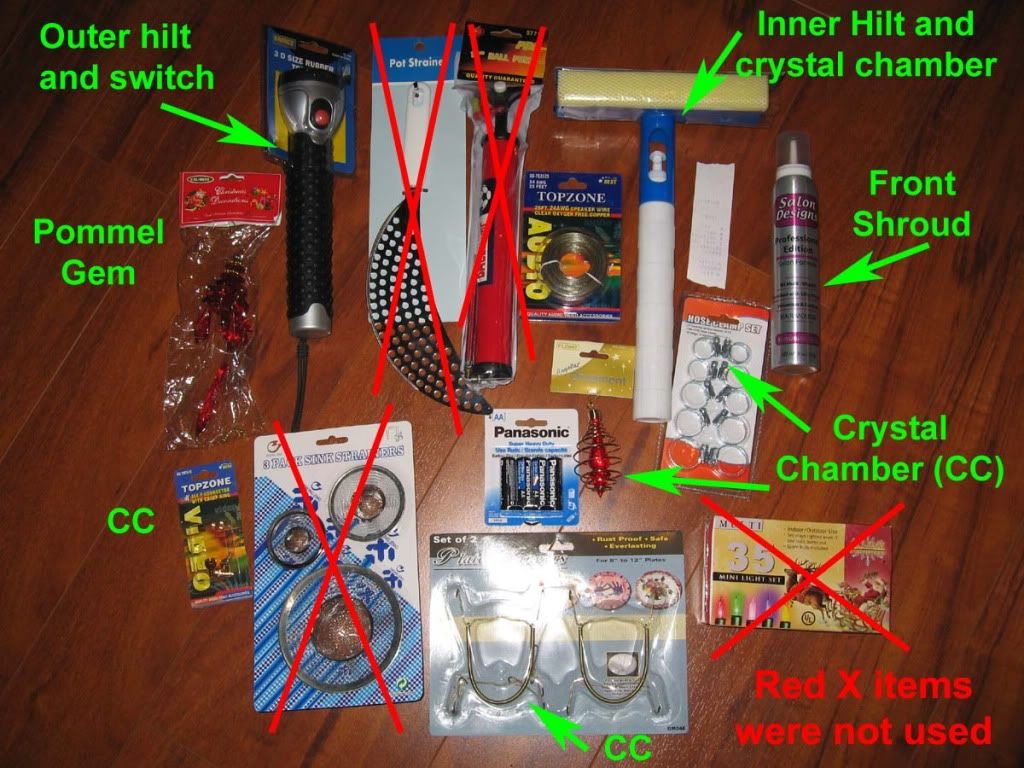
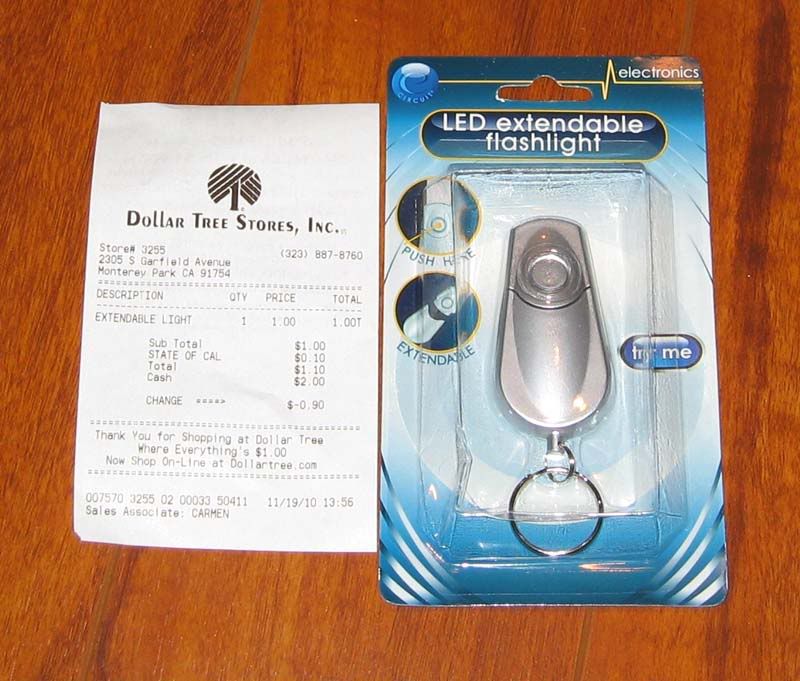
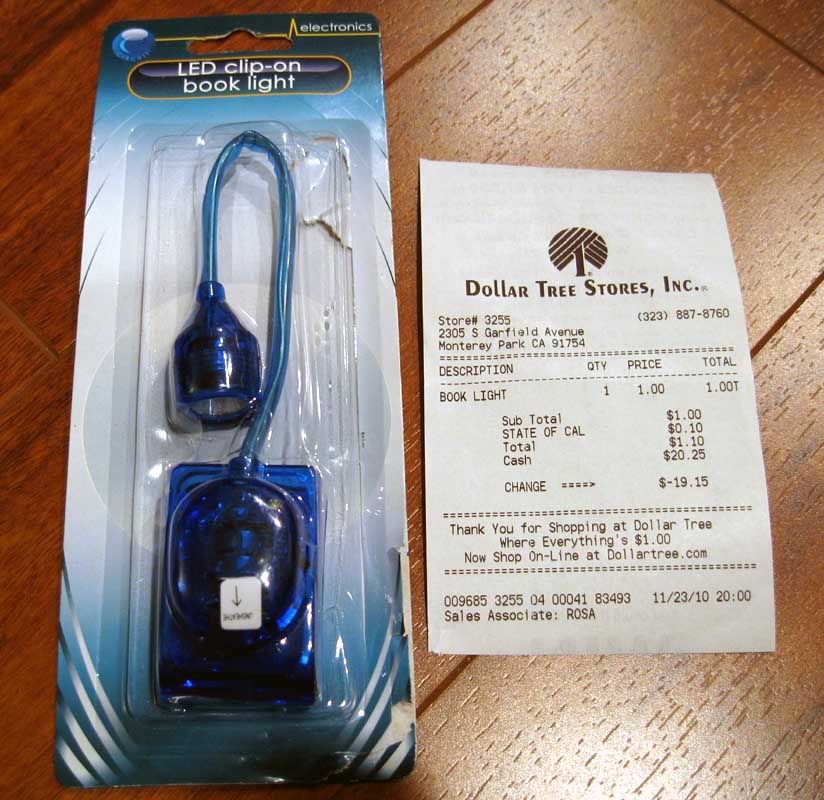
To achieve this spent about 2hrs in my local Dollar Tree picking out these supplies.
View attachment 40280
Now unfortunately, I didn't take a single WIP pic. :unsure But I can TELL you what I did at least.
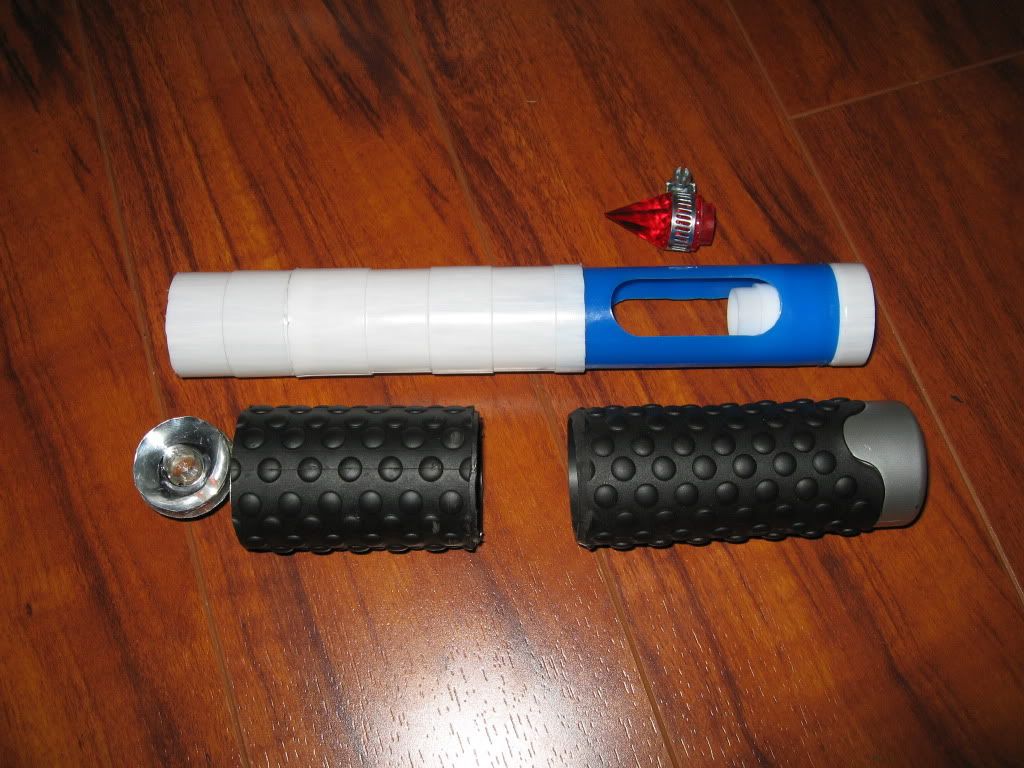
The key to this design was creating the heatsinks/grips. To do this, I carved my hilt from a block of flower arranging "Dry Foam". Now anyone who's worked with this stuff knows it to be EXTREMELY crumbly. If you shot the block with the airgun on your compressor, it would blast a hole right through it. So, to make the hilt viable after carving it, I gave it a couple coats of wood glue, using wood putty to fill most of the pits inherent to the medium, only leaving what I thought made for good rust holes and dents, then finishing with another coat of glue.
That bad boy is rigid now.
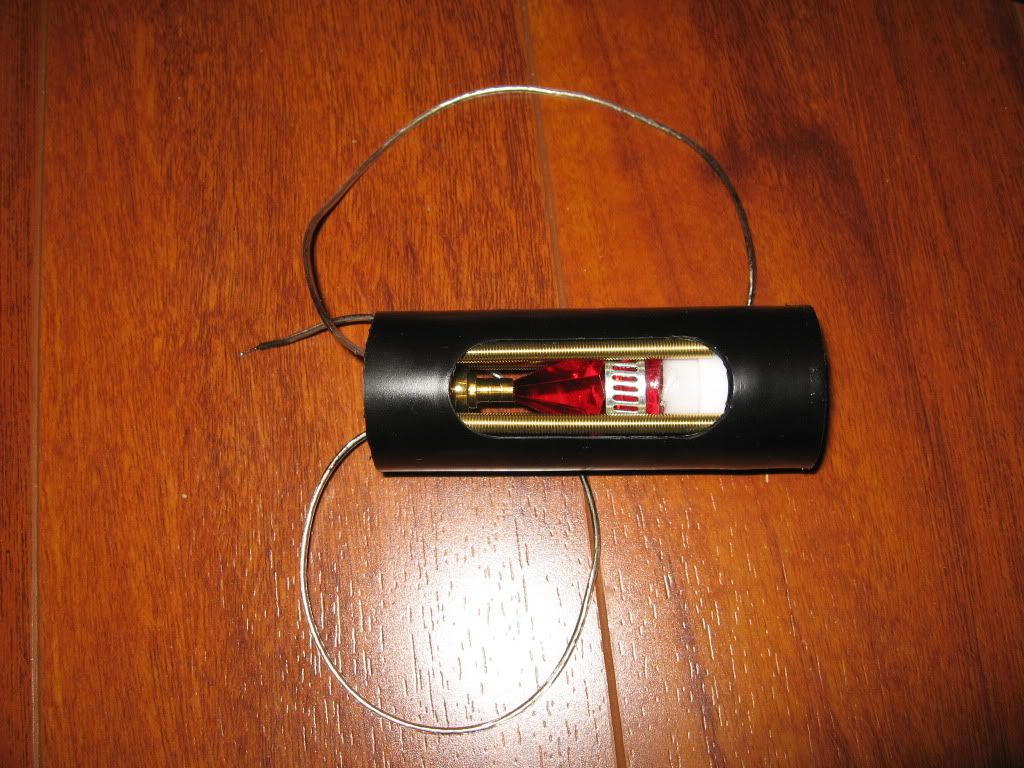
For the neck, and emitter, I sanded down the battery operated candle (which I couldn't resist, though I knew it was going to be used by many), and removed it's guts. Then I cut the top section from the wine stopper, cut a small section of spoon handle (3/8" dowel anyone?) to use as an alignment pin, and super glued the three of them together. Getting the neck centered in the hilt was a trick, and required some over sizing of the hole. Thank the Force for hot glue.
I used more hot glue to fill the plug holes in the phone coupler, using my exacto knife to trim the excess. Then I sanded the sides until it would pass for parallel, and used a small needle file to cut the two flat slots in the top of it. A carefully cut hole in the hilt, and some more hot glue, and VOILA, pseudo Graflex Clamp.
The bag of google eyes earned me an eyebrow raise from the wife, but the round topped, cylindrical shape was just what I wanted, and they came in multiple sizes. The pommel, and the ring of pommel studs are all google eyes, sanded, and super glued into place, as are the blade length, and blade intensity knobs on the "clamp".
For the "D"-ring, I cut a bit from on of those "Bulb Hanger" things, and bent it into shape, using the flat metal spring clips from the key rings to create a hinged bracket for the "D"-Ring. I also used a "Bulb Hanger" to make myself a matching stand. (See first pic)
The saber built, it now came down to appropriate battle damage for 40+ years of use before moving on to painting.
For the emitter/neck damage, I broke out my heat gun, and a handful of randomly shaped objects. I decided that any damage to the neck and emitter should be the result of a weakness in Ra-Talla's technique, so it's pretty much all done in the same area. Dude really needs to rethink those wide, haymaker style attacks.
For the "clamp", I just wanted some dents, so I figured I'd just whack it with some round stuff. I made the very wise decision to make a test piece to try this technique out on. WHACKING GLUE COATED DRY FOAM IS NOT A GOOD IDEA! It caves in in a way you would not believe. The glue cracks very cleanly, and foam "puffs" away to nothing leaving a hole, not a dent. Like a balloon though, a bit of tape change the dynamic. So I rapped the clamp in tape to give it a few whacks.
NOTE: This is the only point in the process that I remembered to snap a pic. lol
Saber Pre- Clamp Denting:
View attachment 40281
Then it was time to finish sand, and paint. I used a black primer for my base coats. Then I grabbed my ruddy brown primer, chrome, and copper rattlecans, and prepared for my first dry brush experience.
First try:
View attachment 40284
It was OK, but the rust was too heavy, and the clamp was not quite shiny enough.
Second try:
View attachment 40285
Well, I repainted the black parts to a rust free look...no love. I had left too many pocks & pits in those sections to have no visible rust.
On my third try, I got the results I submitted, including the slightly shinier clamp.
I love my Lightsaber. :cool
EDIT: In my fervor to type all of this, I neglect to point out that I was offering this thread as a General build thread, not just specific to my entry. Please feel free, but not obligated, to add your own build to it.
*************************************************
I started with the concept that I was NOT doing a screen used design. Fair enough, but that meant I need a Jedi/Sith to build a saber for. I came up with this fellow;
Ra-Talla Singh
Ra-Talla, a human Jedi, was a contemporary of legendary Jedi Master, Qui-Gon Jinn. Though strong in the Force, he was no "Skywalker"...or even a "Qui-Gon Jinn". In fact, though he put all he had into his training, he spent the entirety of his Padawan years in Jinn's shadow. The Jedi didn't see it that way, nor did his "friend" Qui-Gonn, but such was Ra-Talla's weakness. He was a touch too proud.
This jealousy never left Ra-Talla throughout his time with the Jedi, and in time it served to harden his view of the council, and his duties. This may be the reason Ra-Talla developed a natural usage of Force techniques normally associated with the Dark Side, though he never turned. His dedication to Justice never wavered, though his methods rode the line. Sometimes a bit too closely.
His last mission for the Jedi was a turning point in Ra-Talla's life. Having cornered his target, a Mandalorian Bounty Hunter, in a bar on the lowest, grittiest level of Corusant, he attempted to persuade the Bounty Hunter to cooperate by by holding his unactivated lightsaber to his exposed throat. The Bounty Hunter, foolishly, mocked the threat. No Jedi would do such a thing...
The Council was less than pleased. Master Windu was particularly harsh, demanding an explanation for the headless suspect being left to be looted by the scum of the lower levels. Ra-Talla had no explanation to give, and was rather relieved that none suspected that he now wore lighsaber-proof chest armor under his robes, though he was sure he would be stripped of his Knight status for the way he dealt with the criminal.
Before his doom could be proclaimed however, a distress call came in, apparently his old rival's former student, Obi-Wan Kenobi, had gotten himself into quite a bit of trouble on Geonosis. He was ordered to join the strike force being sent to deal with the situation.
Ra-Talla never made the rendezvous at Geonosis. Fed up with the Jedi order, he kept going, past the outer ring, landing his craft only once he knew his power cells were too depleted to make it to the next system. On the Jungle planet, Ebane, where the Republic, and the Jedi were unknown, Ra-Talla Singh made his home. Living as a hermit, he lived out his days employing vigilante justice to protect the people of his new home. He never abandoned his Jedi teachings, though he did routinely "bend" the rules a little.
In 11ABY, Ra-Talla Singh died in battle with a petty criminal, though the thief could take no credit. At 82 years of age, his body simply gave out when he attempted to finish off his opponent with a lightning attack.
Hanging from the old man's belt was the very lightsaber he had built as a Padawan learner, and had carried into countless battles since. Behold, the Saber of Ra-Talla:
View attachment 40276
View attachment 40277
View attachment 40278
View attachment 40279
*************************************************
*************************************************
For this design, I really wanted the classic, outer covering free design utilized by Obi-Wan Kenobie. It just looks so utilitarian to not have all the shiny shrouding on the saber. Perfect for the short concept I came up with for my Jedi.
To achieve this spent about 2hrs in my local Dollar Tree picking out these supplies.
View attachment 40280
Now unfortunately, I didn't take a single WIP pic. :unsure But I can TELL you what I did at least.
The key to this design was creating the heatsinks/grips. To do this, I carved my hilt from a block of flower arranging "Dry Foam". Now anyone who's worked with this stuff knows it to be EXTREMELY crumbly. If you shot the block with the airgun on your compressor, it would blast a hole right through it. So, to make the hilt viable after carving it, I gave it a couple coats of wood glue, using wood putty to fill most of the pits inherent to the medium, only leaving what I thought made for good rust holes and dents, then finishing with another coat of glue.
That bad boy is rigid now.
For the neck, and emitter, I sanded down the battery operated candle (which I couldn't resist, though I knew it was going to be used by many), and removed it's guts. Then I cut the top section from the wine stopper, cut a small section of spoon handle (3/8" dowel anyone?) to use as an alignment pin, and super glued the three of them together. Getting the neck centered in the hilt was a trick, and required some over sizing of the hole. Thank the Force for hot glue.
I used more hot glue to fill the plug holes in the phone coupler, using my exacto knife to trim the excess. Then I sanded the sides until it would pass for parallel, and used a small needle file to cut the two flat slots in the top of it. A carefully cut hole in the hilt, and some more hot glue, and VOILA, pseudo Graflex Clamp.
The bag of google eyes earned me an eyebrow raise from the wife, but the round topped, cylindrical shape was just what I wanted, and they came in multiple sizes. The pommel, and the ring of pommel studs are all google eyes, sanded, and super glued into place, as are the blade length, and blade intensity knobs on the "clamp".
For the "D"-ring, I cut a bit from on of those "Bulb Hanger" things, and bent it into shape, using the flat metal spring clips from the key rings to create a hinged bracket for the "D"-Ring. I also used a "Bulb Hanger" to make myself a matching stand. (See first pic)
The saber built, it now came down to appropriate battle damage for 40+ years of use before moving on to painting.
For the emitter/neck damage, I broke out my heat gun, and a handful of randomly shaped objects. I decided that any damage to the neck and emitter should be the result of a weakness in Ra-Talla's technique, so it's pretty much all done in the same area. Dude really needs to rethink those wide, haymaker style attacks.
For the "clamp", I just wanted some dents, so I figured I'd just whack it with some round stuff. I made the very wise decision to make a test piece to try this technique out on. WHACKING GLUE COATED DRY FOAM IS NOT A GOOD IDEA! It caves in in a way you would not believe. The glue cracks very cleanly, and foam "puffs" away to nothing leaving a hole, not a dent. Like a balloon though, a bit of tape change the dynamic. So I rapped the clamp in tape to give it a few whacks.
NOTE: This is the only point in the process that I remembered to snap a pic. lol
Saber Pre- Clamp Denting:
View attachment 40281
Then it was time to finish sand, and paint. I used a black primer for my base coats. Then I grabbed my ruddy brown primer, chrome, and copper rattlecans, and prepared for my first dry brush experience.
First try:
View attachment 40284
It was OK, but the rust was too heavy, and the clamp was not quite shiny enough.
Second try:
View attachment 40285
Well, I repainted the black parts to a rust free look...no love. I had left too many pocks & pits in those sections to have no visible rust.
On my third try, I got the results I submitted, including the slightly shinier clamp.
I love my Lightsaber. :cool
Last edited: