ROGUE ONE Jyn Erso - open build thread!

I'm working on a fitting muslin, but wanted to give the pintucks one last run. So a quick follow up: How far apart are your completed pintucks, Restill?

Sorry it took so long to respond! I measured each finished pintuck to between 11 and 12 mm* wide, from the edge of the previous pintuck to the edge of the next pintuck. I tend to work in cm more than inches. :p
 
Last edited:
Thanks! I generally work in Imperial measurements, but I can rough it out from metric. =D

And no worries -- I threw the muslin together with a plain panel and found that the pants are huge! I have a lot of alterations to make before I can even think about adding the tucks back in. Going to call in a little help from the mother-in-law, as cutting down a size(ish) will work for the hips, but anywhere else, and I'm going to be taking out inches. Lots of inches. There are, at least, several seams to make a very adjustable, fitted pair of pants. I'm not comfortable drafting my own, else I would, at this point. Shirts, yes. Pants, no.

Swapping gears over to vest or jacket and shirt today...

Oops, it just occurred to me that I wrote "cm", but I meant mm. 1.1 to 1.2 cm, 11 to 12 mm. Where was my head?

Good luck fixing the pants! Sometimes it really helps to put something down and back away from it for a while if it's frustrating you. That's been me for this entire project...
 
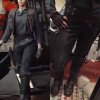
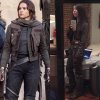
Found these clips at the military surplus store to use for my baton clip. I don't know what kind of pack or strap they come from, they were in the bins of spare hardware. For 25 cents apiece, I'm okay with not having 100% screen accuracy on this one.... :) Also, I forgot I did have a picture of the real clip saved. It isn't the best view but at least shows the attachment.
IMG_3243.JPG Rogue-One-Press-Junket-Skywalker-Ranch-December-3-2016-031.jpg


Here's what I've got so far for the baton. I've figured out a way to make the Traywick Designs 3-D printed one actually extend, using parts from a toy lightsaber. I took the saber apart and used the second and third pieces from the tip (center section in the photo). Both pieces had to be cut shorter by about 3/8" to fit inside the closed baton. I'm going to screw a small piece of wood dowel on the inside of the knob end, so I can attach it to the saber piece. (I have no idea if the extension is the correct length or not, but it works.)
IMG_3208.JPG IMG_3218.JPG IMG_3217.JPG
I have in the past tried painting these toy lightsaber blades, without much luck, so I thought I'd try something different - metal repair tape (aka flue tape). It's used to repair duct work and is kind of like sticky aluminum foil. If you can put it on smoothly and flatten it down the edges aren't noticeable, even where I had to patch a small piece. I cleaned the saber pieces off with rubbing alcohol before applying the tape, hopefully it will stay on well.
IMG_3225.JPGIMG_3230.JPG

And progress on the paint job: I primed everything with Rustoleum Sandable Automotive Primer (in gray), then for the knurled parts I used Rustoleum Satin Black (seen on the knob) with a light coating of Rustoleum American Accents Satin Aged Bronze (the other two parts). I may go back and dirty it up later, but I think the color turned out nicely.
IMG_3237.JPG
 
Last edited:
Thanks for the clarification, though, once I got to looking at it, I figured out what you meant. =D

I took a Thursday off from the pants to do the pattern mods for the shirt, and start on the ones for the vest and jacket. Friday, my wonderful mother-in-law talked me through the changes I need to make on the pants. Going to end up cutting down two sizes, and then still taking an additional 3 - 4 inches out below the knee. It's going to be messy, so I'll probably start construction on the shirt first.

Currently debating whether or not I'm going to do the full kit in time for Celebration. Given the shorter time span I have to work with, I'm debating whether or not to do the jacket. (I usually only costume for DragonCon, giving me months to work through my projects!) Jyn's never seen wearing just the jacket with the ensemble, but she is seen wearing just the vest. I'll have to see where I am after this week. The jacket will probably be one of the first things to go, if things get too tight on time.
 
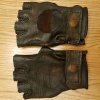
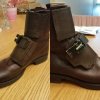
I finished my holster and belt. Rivets are a little too spaced out, but just a minor mistake on my part. Still need to weather everything. Gloves are pretty much done except for a couple more hand stitches around the snaps. I used leather belt straps from Tandy in various sizes; belt is 2 inch, holster straps are 1 inch, and thigh strap is 3/4 inch. Holster is made from a roll of Tandy leather I had laying around. I added a velcro closure on the left side. Gloves are Black Diamond with all the added detailing hand stitched. Glove straps and circular bicolored detail made from extra leather scraps. Deglazed, sanded, and dyed with Coal, Dark Brown, & Bison colors. Boots are Veronica in soft brown, hand stitched details on flaps, added the buckle and the hand stitched them onto the boots. I'll still rock these boots outside of costume with the flaps on! Added velcro for the closure using some heated Worbla so the velcro aint going anywhere. Working on the vest right now. How did you guys do the vertical stitching down the front? Did you hand stitch it? Still trying to locate the the "military suspender hook"....
tumblr_on2s34VA0q1qhld69o1_1280.jpgtumblr_on2s34VA0q1qhld69o2_400.jpgtumblr_on2s34VA0q1qhld69o4_1280.jpgtumblr_on2s34VA0q1qhld69o5_1280.jpgtumblr_on2sevVarH1qhld69o4_1280.jpg
 
Hi all! I ordered a pair of Jyn pants from PeeledBananasToGo on Etsy, so I'm not sure about patterns (I can't sew, and not trying that first on pants). The pants are pretty good if anyone is considering it, though I do think the crotch fits weird. (That area is weird on Jyn's photos, too.)

icm_fullxfull.118446783_pznxjdcw9sg8k4wo0c8s.jpgicm_fullxfull.118446763_58o7xvxcg0kcg0s0w44c.jpg
Here are the photos sent to me by the shop owner. Details are pretty good, though I might replace the snaps. They're good for now, I just want a final version that is absolutely perfect (previewing at SWCO, I'll do the full roll-out at NYCC in October). The color is a nice dark gray (it's darker than in these photos). I wanted the seams to be more pronounced though, and obviously needed to weather them.

17361888_10155835424345752_989817532150488035_n.jpg

I'm a makeup artist and mixed some white liquid foundation (VERY minimal) with all-purpose flour. Then I used a thin brush to rub them into the seams, and a blush brush to buff it in. I set the pants with some hairspray. I expect I'll have to do flour touch-ups before every wear, but since it's inexpensive I don't really mind, and most of it is sticking on.

This is how they came out!

17353235_10155835422395752_4325997604254164572_n.jpg17362375_10155835422430752_979308569790222796_n.jpg

And some comparison photos:

17424623_10155835422305752_133152008244418086_n.jpg17426353_10155835422255752_7882599886402167870_n.jpg

(Ignore the other pieces for now, nothing else is finished.)

Wondering if I should cut my hair or find another way to fake bangs/layers. So far I'm torn.
 
Hi all! I ordered a pair of Jyn pants from PeeledBananasToGo on Etsy, so I'm not sure about patterns (I can't sew, and not trying that first on pants). The pants are pretty good if anyone is considering it, though I do think the crotch fits weird. (That area is weird on Jyn's photos, too.)

View attachment 715620View attachment 715621
Here are the photos sent to me by the shop owner. Details are pretty good, though I might replace the snaps. They're good for now, I just want a final version that is absolutely perfect (previewing at SWCO, I'll do the full roll-out at NYCC in October). The color is a nice dark gray (it's darker than in these photos). I wanted the seams to be more pronounced though, and obviously needed to weather them.

View attachment 715624

I'm a makeup artist and mixed some white liquid foundation (VERY minimal) with all-purpose flour. Then I used a thin brush to rub them into the seams, and a blush brush to buff it in. I set the pants with some hairspray. I expect I'll have to do flour touch-ups before every wear, but since it's inexpensive I don't really mind, and most of it is sticking on.

This is how they came out!

View attachment 715625View attachment 715626

And some comparison photos:

View attachment 715627View attachment 715628

(Ignore the other pieces for now, nothing else is finished.)

Wondering if I should cut my hair or find another way to fake bangs/layers. So far I'm torn.
Have you tried putting your hair into a bun and pulling out all the flyaways and little hairs you'd normally pin down? It looks to me like that's how her hair is done. I don't think it's full bangs. Or you could always get clip-in bangs and style them.
Rsally love the weathering!
 
Have you tried putting your hair into a bun and pulling out all the flyaways and little hairs you'd normally pin down? It looks to me like that's how her hair is done. I don't think it's full bangs. Or you could always get clip-in bangs and style them.
Rsally love the weathering!

Thank you!

Jyn's hair is bangs and layers. You can see it best in this still

fb2538e51b03c3e1ea06adf402abb1c7a69546a3.png

As she goes throughout the movie, her bangs get slicked back, but it's pretty hard to create the layers that have the same effect. Totally looking for advice if anyone has it!

I've done the flyaway attempt, and tried pulling hair out, but it ends up looking silly :)
 
Gugghh, I feel like I haven't been here in ages. It's been something like 4 days. :p

I needed a bit of a break from crafting for a few days. I think this vest has been stressing me out, but not starting it is making it worse, so I FINALLY started patterning out the vest last night. I've also been trying to dye the ALICE patches (success, after 3 dyes!) and backpack webbing. The webbing ended up strangely too light brown and matched the vest fabric, even though the ALICE patches finally dyed perfectly. To fix it though...well, I thought, I've got this black dye, so I might as well try darkening this light brown. That was a bad idea, because the webbing is this perfect gorgeous black color now. Just completely black. I'm thinking about just buying some natural webbing and dying it dark brown, though I also ordered Jacquard color remover and brown dye again for kicks. I thinking I'm getting the hang of fabric dyeing now (yeah right)...

In other news, @erinnn, you're a weathering genius. I tried using the ageing sticks on leftover fabric to see how it goes and I think it'll work really nicely, but it's just slightly waxy on the fabric. I love the idea of adding flour to the seams to make them pop and I was just sent some makeup foundation so I think I'll give that a go too. The pants you ordered look fantastic.

Also, I'm getting worried that the seams I sewed on the butt of Jyn's pants won't contain me...they're starting to stretch and it's REALLY stressing me out. My serger thread was splitting horribly so I tried a back-and-forth zigzag stitch with my sewing machine instead. The fabric itself doesn't like the stitch and is pulling. It's terrifying. Do any of you happen to have seam-strengthening suggestions for the crotch/back of pants?
 
Can anyone offer how they did the waistband for Jyn's vest? I've torn my apart and am working on a version 2 of the vest for Celebration and am a bit stuck on how to gather it like hers.
 
Vest Waistband
Here is my approach but there are others.
The core of my waistband was a piece of 2" wide elastic with a pieces of 2 x 2 stiff craft interfacing sewn on at each end. The relaxed length was the slightly less than the waistband circumference so it would provide a little bit of "hug" but not too much. I then stretched the core out to see how much extra length I could obtain. For my elastic that was more than I needed. For example I needed about a 25 inch "relaxed" length so about 20 inches of elastic with a 2" tab on each end (24" total length, 25" minus the hug). The waistband itself was a piece of fabric folded lengthwise which was about 32" long. I sewed the narrow ends of the waistband, turned it rightside out and put it over the core. Then stretched the core to fill the shell. This means the elastic was stretched by about 7" or about 1/3 (of the 20" of the unstretched elastic) to completely fill the waistband. I hooped this to maintain the stretch and then stitched the parallel rows end to end. When released the elastic part gathers and the ends remain flat. This appears consistent with photos I have analyzed of the waistband. The open long edge of the waistband was then slightly stretched (the 1" hug") and sewn to the base of the vest.

You will need to test your fabric and elastic to see how much "extra" stretch you want or need in the waistband. It will probably be different from my measurements. Also I was using cotton twill, nylon is lighter and will definitely need less stretch to provide the same level of gathering. And one line of stitching will not give an accurate test. Multiple rows of stitching will provide a different result than a single row test. Also remember to use a "stretch stitch" or you may break your threads in use. I tried to start each row of stitches at the same vertical point so the stitching was both parallel and stacked directly above each other this makes the gathers align to some degree. You may or may not want that effect.
 
IMG_9793.JPG
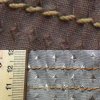
I've been obsessing over the Jyn Erso vest fabric for quite a while now, and this is the closest I've come up with. The top picture is a closeup from the Topps trading "relic" cards. (That matches up with the close ups of the display costumes.) The bottom is 100% polyester bathroom curtain, not nylon like it should be) but very close in weave/thread size to some 200D oxford nylon samples. It remains to be seen what will happen once I attempt to dye it. (I'm hoping that between the dye and the weathering, the sheen will be reduced somewhat.)

So... feedback? Keep going this route? Just go with the dye-ready, but plainer weave 200D nylon flag cloth? Keep looking and hope a one-off leftover roll from a handbag manufacturer ends up on EBay?
 
Can anyone offer how they did the waistband for Jyn's vest? I've torn my apart and am working on a version 2 of the vest for Celebration and am a bit stuck on how to gather it like hers.

I went a slightly different route, and used several rows of 1/4" elastic. (But still used the interfacing on the edges.) I think my waistband was slightly longer (by about an inch or two) than the area it was attached to. I sewed the channels for the elastic all the way to the edge and didn't thread the elastic through until after the waistband was attached to the rest of the vest. Then anchored it by hand stitching at the edges of the ungathered portion. I did have thicker fabric (cotton ripstop) so a nylon probably wouldn't need as much extra fabric. Also, that was either my 4th or 5th try.

https://instagram.com/p/BNqeH_IAZtK/

I don't know how much this will help, but this is how I anchored the edge (along with the interfacing) to keep the elastic from pulling the bottom of the waistband.
 
Last edited:
CarpElgin can you provide the specifics about the polyester curtain such as the Brand name, manufacturer, chain at which it was found, etc. Any details which could help someone track it down. The weave pattern look exactly correct and the polyester would be closer to nylon than the cotton I was using. Thank you.
 
Last edited by a moderator:
@CarpElgin can you provide the specifics about the polyester curtain such as the Brand name, manufacturer, chain at which it was found, etc. Any details which could help someone track it down. The weave pattern look exactly correct and the polyester would be closer to nylon than the cotton I was using. Thank you.

Oops! No problem! (I guess that means it looks good? Even though the diamonds are a bit too big and what not? Hooray! Because I can also give you the names of some mills that will do custom work for orders as small as 1000 yards... I wish I was joking about that.)

The company is Carnation, but your search will work best of you look for "Lauren dobby curtain." It's available in 2 different types of shower curtains, a sink drape, and I believe 2 different style of window curtain. I got the unruffled window curtains with tie backs in the color "linen" - from Amazon, but is also available from a whole bunch of big retailers like WalMart and Bed, Bath, and Beyond. There is a "chocolate brown" color, which is my fallback in case the dye doesn't take. (The shower curtains contain the most usable fabric, but I went with the other because it was available -- and was the least likely to have any sort of coatings applied. Again, we'll see how the dye takes later this week.)

If you want to stay with nylon (which will be sturdier) I have a few other alternative options (some diamond ripstop nylon or 200D oxford flag cloth -- either pre-dyed or prepared for dye) I can reference as well.)
 
I needed a bit of a break from crafting for a few days. I think this vest has been stressing me out, but not starting it is making it worse, so I FINALLY started patterning out the vest last night.

Good for you! I've not even started on the vest, and it's making me quite nervous. I know I have to start on it soon, but, dang it, I've got so many other irons in the fire right now, I'm allowing myself to be distracted. Redying my boots and trying to figure fit adjustments for the gloves have, at least, been productive distractions.

Also, I'm getting worried that the seams I sewed on the butt of Jyn's pants won't contain me...they're starting to stretch and it's REALLY stressing me out. My serger thread was splitting horribly so I tried a back-and-forth zigzag stitch with my sewing machine instead. The fabric itself doesn't like the stitch and is pulling. It's terrifying. Do any of you happen to have seam-strengthening suggestions for the crotch/back of pants?

I'm going to approach it not unlike the crotch seam -- double stitching, whether that be on the inside, with finished edges, too, or with a narrowed flat-felled seam. This not only reinforces the seam, but also adds a bit of emphasis. I've also seen tips suggesting to thread the needle with two threads/spools, rather than just one. I'll be doing a bit of testing this evening, trying to decide which way I'll be stitching my own pants.

And now, back to the sewing room...
 
I've also seen tips suggesting to thread the needle with two threads/spools, rather than just one.

A twin needle setup or a double thread and even a double eye needle can add neat, parallel stitch lines or added top strength with the doubled thread but it uses only a single bobbin thread. I have used double top threads when I thought the outside surface would be subjected to a lot of abrasion. But if the bobbin thread breaks, both lines of stitches will loosen. For strength you will want to use two separate stitch lines. Often there is even a third line of stay stitches (and the first ones sewn) which are added to each garment piece inside the seam allowance before they are sewn together. Your idea of the flat fell seam is a little more work, but is also very strong. But it can become very bulky when it crosses another seam line like the leg inseams.
 
Vest Waistband
Here is my approach but there are others.
The core of my waistband was a piece of 2" wide elastic with a pieces of 2 x 2 stiff craft interfacing sewn on at each end. The relaxed length was the slightly less than the waistband circumference so it would provide a little bit of "hug" but not too much. I then stretched the core out to see how much extra length I could obtain. For my elastic that was more than I needed. For example I needed about a 25 inch "relaxed" length so about 20 inches of elastic with a 2" tab on each end (24" total length, 25" minus the hug). The waistband itself was a piece of fabric folded lengthwise which was about 32" long. I sewed the narrow ends of the waistband, turned it rightside out and put it over the core. Then stretched the core to fill the shell. This means the elastic was stretched by about 7" or about 1/3 (of the 20" of the unstretched elastic) to completely fill the waistband. I hooped this to maintain the stretch and then stitched the parallel rows end to end. When released the elastic part gathers and the ends remain flat. This appears consistent with photos I have analyzed of the waistband. The open long edge of the waistband was then slightly stretched (the 1" hug") and sewn to the base of the vest.

You will need to test your fabric and elastic to see how much "extra" stretch you want or need in the waistband. It will probably be different from my measurements. Also I was using cotton twill, nylon is lighter and will definitely need less stretch to provide the same level of gathering. And one line of stitching will not give an accurate test. Multiple rows of stitching will provide a different result than a single row test. Also remember to use a "stretch stitch" or you may break your threads in use. I tried to start each row of stitches at the same vertical point so the stitching was both parallel and stacked directly above each other this makes the gathers align to some degree. You may or may not want that effect.

You described this so perfectly, I actually can't wait to sew the waistband. I know when I get started I'll likely want to kick and scream, but you've given me some ideas. I think I'll use a triple stretch straight stitch, and since I'll be using nylon, I will likely not need as much stretch as cotton twill to get it to gather correctly. I'll play around. Thank you for this explanation. Anybody else using nylon for the waistband?
 

Your message may be considered spam for the following reasons:

If you wish to reply despite these issues, check the box below before replying.
Be aware that malicious compliance may result in more severe penalties.
Back
Top