horrible effort on their part. A retool nd rework of the mauser would be appreciated, but not a crap Han ANH.
Still... they'll sell them and that's the bottom line for them.
Just read your comment on FB :lol
horrible effort on their part. A retool nd rework of the mauser would be appreciated, but not a crap Han ANH.
Still... they'll sell them and that's the bottom line for them.
Weird that Denix would pursue making parts. Looks like they might make a c96 without the logo though? Shame for those who just bought Denix's existing gun...like me...
...you have to remember that these mounts were jury-rigged onto the Mausers. The mounts used in SW were not production Mauser C96 mounts and were simply bolted and screwed, and glued onto the frames.
The Hero ANH mount that was also used in Sitting Target was a custom or limited production piece mounted on the left. (at least we think it was custom since no one can find another like it)
When they used it for SW, it was just bolted on with those two side mount thumb screws and crossbar. A short threaded rod was threaded and screwed (maybe welded/silver-soldiered) to the frame receiver, then two disk spacers, then the crossbar then the two thumbscrews to hold it all tight to the frame. The T mount slides over the dovetail on the crossbar and is tightened by the center thumbscrew. Viola !
Some others here have a long history and knowledge of the parts such as Chris (lonepidgeon) from Parts of Star Wars and has described the way it came about.


Nice find. Seems possible the thumb nuts may have been used. They look like standard types.
The threaded rods would have needed to be attached very strongly. We have guessed that the "washers" were silver soldered on the frame and the threaded rods screwed down.
Some members here have built live fire versions and shown that any blast strong enough to cycle the action would have shaken the mount off quickly. I think they added the crossbar and 2 thumb nuts later to help hold it on.
I thought I would get a pony into this horse race...unfortunately I started with a mule.
Unhappy with my MR DL-44 I was hunting for a base pistol...MGC being ideal. Unfortunately anything remotely close to a mauser is a no no in Canada.
I had a BB-gun with sharper details than the denix...but the body had buttons all over it. (just found out today that TFA used this as the base...too bad I am making ANH prop)
So....I think I voided the warranty on the MR replica and the BB-gun.
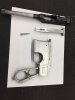
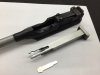
I completely demolished the MR denix....started machining out the details...and made room to accept the top portion/hammer/safety etc. from the BB-gun. I stripped both to the bone and also machined in some details on the BB-gun bits.
Luckily the metal took well to blackening. I got a bit artsy and laser etched in the writing on the barrel. Still more to do on those parts but its a start.
Chemically colouring "sketchy" metal is always a gamble...luckily the BB gun bits are liking it. If anyone is interested...the metal was bead blasted and then dipped 6 times in this product:
https://www.sculptnouveau.com/Details.cfm?ProdID=37
A-15
Next bits will be to finish machining the denix...fill some more holes...and blacken it as well.
Im planning on laser etching the marking on the side of the denix as well (crazy since they are covered up by the scope mount) Once I have the CAD done up I will post both sets of graphics for anyone who wants to do some scribing on their replica C96's
Thanks to all for the leg work in this thread...its a great foundation.
I thought I would get a pony into this horse race...unfortunately I started with a mule.
Unhappy with my MR DL-44 I was hunting for a base pistol...MGC being ideal. Unfortunately anything remotely close to a mauser is a no no in Canada.
I had a BB-gun with sharper details than the denix...but the body had buttons all over it. (just found out today that TFA used this as the base...too bad I am making ANH prop)
So....I think I voided the warranty on the MR replica and the BB-gun.
I completely demolished the MR denix....started machining out the details...and made room to accept the top portion/hammer/safety etc. from the BB-gun. I stripped both to the bone and also machined in some details on the BB-gun bits.
Luckily the metal took well to blackening. I got a bit artsy and laser etched in the writing on the barrel. Still more to do on those parts but its a start.
Chemically colouring "sketchy" metal is always a gamble...luckily the BB gun bits are liking it. If anyone is interested...the metal was bead blasted and then dipped 6 times in this product:
https://www.sculptnouveau.com/Details.cfm?ProdID=37
A-15
Next bits will be to finish machining the denix...fill some more holes...and blacken it as well.
Im planning on laser etching the marking on the side of the denix as well (crazy since they are covered up by the scope mount) Once I have the CAD done up I will post both sets of graphics for anyone who wants to do some scribing on their replica C96's
Thanks to all for the leg work in this thread...its a great foundation.
P.S.
Forgot to ask...
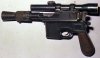
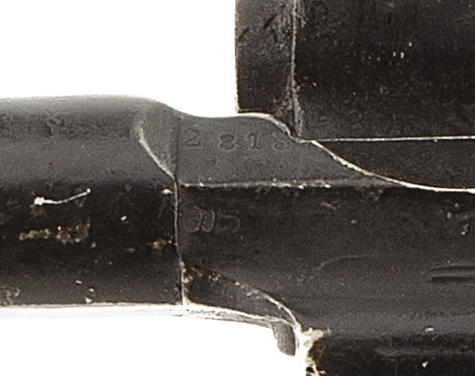
Has anyone done any CSI business on the images of the ANH hero gun and determined what the proper stamped numbers were?
It is shown very faint in this image...but Im having a hard time making out the numbers. Looks like there are 4 of them for starts though....
Thank you in advance for any insight.
Nice work on those etchings, Jason!
The last 4 remaining digits of the serial number are 2813. Their placement and such can be seen better in photos of the ESB/ROTJ stunt blasters, which were cast from the same Mauser as the ANH Hero.
http://i1235.photobucket.com/albums/ff432/deadbolt55/ESBstunts_zps466lnhhf.png~original
-Carson
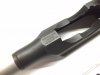
I'm about to start tackling the process of increasing the accuracy of my Denix. Has anyone created a template for milling out the extractor feature? I've been searching for the specs and or dimensions of this but to no avail... The only thing I have been able to source is technical exploded views of the C-96 and it's parts. I'd like to reference a template that's been created, before I go and try to guess at making it the right size.

Scottjua has some great photos that I saw somewhere that compares the real C96 and a denix. I downloaded them for reference. I hope he doesn't mind if I repost it here.
http://uploads.tapatalk-cdn.com/20160206/2ab09cf2f9780f8c91ddab326b306102.jpg
as long as you say it came from me I'm good. ^_^
When I mill the extractors, I just reference my real mausers. I don't use a template, just measure and cut.
for a denix, you could simply make a template from clear acrylic, like from a new shirt collar, Krazy glue it down lightly and scribe a line on top of the bolt.
file/scrape off the glue...unlike the HERO builders... ; )
Use a darker/more color on the extractor and buff/sand the bolt head and viola... done.