gt350pony66
Master Member
deleted
Last edited:
I'll be forever grateful to Robiwon for all the info he passed along as far as this build is concerned and I'm glad that I had the chance to thank him before he left us. what a loss for us all, the guy knew A LOT of stuff.
Thanks, though I don't feel like I've done much considering what lay ahead. I was talking to Guns Akimbo about those bells...I guess I need to look at that a bit more.


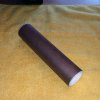
Yeah, lol...I ordered a set. Gotta do these right since it's in honor of our "gone but not forgotten". I've been quite lucky with drill bits so far. I think I've drilled over 200 holes so far and only broke one bit on like hole #10. I did kinda screw up with the first trench wall though. I was notching the upper and lower to make room for the FO, and I trimmed down flush which made a gap light could come through. easily fixed with evergreen stock so there is only 8 places to fix. Good thing I noticed it now. I'm also doing .25mm for the most of the holes. I did a test with the first hole I drilled and the FO lights really well. So I figured I could make a lot more with smaller FO, thus being able to stuff more FO in the gathering tubes on the end of the LED's. I'll do some .50mm in the spots where it should be larger (looking at reference pics). I'm also using some .75mm and 1mm in the places where the "windows" look to be a long rectangle. taking the larger FO and mash it with flat, smooth jaw pliers. It worked well on the Falcons in a few places in the cockpit lighting that there were "bar" shapes.

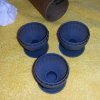
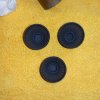
I was planning to get those for my build but it was mentioned on another forum that those particular engine bells are prone to warping unless stored carefully until they are painted. I think they look wonderful but that is some cause for concern for me. If they can warp just by being placed on a tavle, how long with they hold up mounted sideways with only primer and paint to stabilize them?nice start, my ISD is still waiting its turn in the line-up. I have the falcon3d engine bells and they were well worth the money compared to the kit parts. subscribed
I was planning to get those for my build but it was mentioned on another forum that those particular engine bells are prone to warping unless stored carefully until they are painted. I think they look wonderful but that is some cause for concern for me. If they can warp just by being placed on a tavle, how long with they hold up mounted sideways with only primer and paint to stabilize them?

say dude, did you see where Invar is adding greeblies to his trenches? looks great but I don't think I'm gonna try to tackle that this time around.