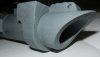
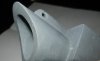
Are there no photos of the back end of this saber?Yup. I've been meaning to mention that, but was waiting to receive my own Strobonar ( still in the mail). Also I dont thing there is a screw on the top. there doesnt seem to be a reference point as to how much to trim from the top. However from the back it looks like they removed the slanted portion. Here are the only reference pictures I've gotten so far.
View attachment 675084View attachment 675085View attachment 675086
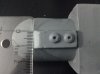
View attachment 675087
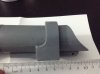
View attachment 675088View attachment 675089
View attachment 675090
( My apologies for the lack of credits on the pics. I cant remember who posted each of them)
It also seems like only one of the grips has an ESB style notch cut into it. Weird.
In some of the shots, the "plate" covering the underside where the two flashes join looks thin enough that it could be aluminum tape, in other shots it looks like it may be a little thicker. I'll probably use aluminum tape for mine.
I may also use plain old black gaff tape wrapped around the strobonar to mimic the "clamp". I'll probably scratch build the control box, wiper part and d ring holder using aluminum and sheet styrene. Looks like some aluminum U channel could possibly be used for the circuit board holder. I'll check Ace hardware for some of that, or maybe a hobby store.
Definitely want some saber freak T track, and will probably use tiny rivets on the grips. I can't wait to get started, the only bummer is my strobonar has a couple nasty scars on it.

Last edited: