Carved Nordic Armor from Skyrim

LadyDeadpool

New Member
I hate starting threads, becasue introductions are always the most awkward thing....so I guess I'll let my work speak for itself. This is a big project, and I'm very happy so far.
If you're unfamiliar with the armor, it's from Skyrim, only one of the best games ever! :D
b3d5c3fdadff7ec42552b3488563c972.jpg
It's basically a bear suit thing. Or at least I feel like one clomping around in it!
2959649-1365006531.jpg
This is a mod'd high rez render of the suit, but you get the idea.

This first post will be soft parts and I'll get to the armor next time.
IMG_20160623_150909.jpg
Pants - quilting fabric and leather stripes. Went with the lighter color quilt becasue the darker color looked black. Not great when I have a lot of black fur to add.
IMG_20160701_190418.jpgIMG_20160701_190425.jpgIMG_20160708_174142.jpg
Fuzzy butt rug!! (or fur kama, whatever)
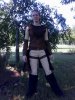
I'm pretty proud of how this one turned out. Those leg straps are awesome and don't actually impede movement too much....but they're a pain to make.
The kama actually zips in the front with a baby zipper (a whole 2 inches of zipper) that is hidden by the codplate when mounted. I'm especially happy with the pockets (non game actuate, but hey, pockets are pockets at cons) I've added and the fur edging on the kama. If you look closely at the game armor, you can see the fur around the edge of the kama is running a different direction then the rest of the fur, and I've managed to do that with my kama by adding an extra row of fur around the edges. It sadly does not show up well in pictures :p...but hey, I know it's there!! It actually sits just below my hip bones and slightly above the groin - for some reason, the game designers decided to elongate the torso armor to reach down past the navel, so this sits pretty low.

34996-1-1366385341.jpg
On this awesome shot you can see those leather shoulder pauldrens a little better...argh. I mean, just kidding. They look awesome and were LOTS of fun to hand sew. :p
(Too thick for my sewing machine)

IMG_20160711_151657.jpg
Basic layout of the sleeves.

IMG_20160712_171525.jpg in process.
IMG_20160712_211452.jpg
finished thingies!
IMG_20160718_212828.jpg
And in process of hand stitching to my sleeves.


IMG_20160722_112923.jpg
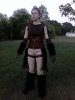
Shirt is upholstery suade with a stretch panel in the center for movement and breathe-ability. Yes, it's very hot!

IMG_20160803_173519.jpg
And probably my favorite part - fuzzy boots!! (my little cousin has to snuggle them every time he comes over, so I'm not alone!)
These started ad off brand ugg boots and have been carefully furred by hand. They are fuzzy and quite warm and comfy. I like.

IMG_20160803_173649.jpgIMG_20160803_173655.jpgIMG_20160803_173645.jpg

and I haven't gotten the pictures off my phone of my bracers and gloves, so more in the next few days on those, I guess.
 

Attachments

  • IMG_20160803_173643.jpg
    IMG_20160803_173643.jpg
    857 KB · Views: 189
Thanks all! :)

Picking up where we left off.
IMG_20160815_183614.jpgIMG_20160815_183619.jpg
Fluffy bracers and gloves. Gloves are separate from the bracers for ease of movement. I'm pretty happy with how these turned out - I have good range of movement with my hands and can actually still use my phone. Proprieties, right?

But pictures are more exciting then words, so here's the first full (soft part) kit try on.

IMG_20160817_205158 - Copy.jpgIMG_20160817_205202.jpgIMG_20160817_205206.jpgIMG_20160817_205210.jpg
Eh, I still have to do something about the wrinkles on the back of the shirt, but that will be addressed before con time.

And now...the moment you've actually been waiting for: ARMOR! :lol

IMG_20160826_110941.jpgIMG_20160826_182801.jpg

These are the "Hip plates" - the ones that go on either side of the hips, naturally - pre and post finish work. 3mm Sintra, bondo, some spot putty, a lot of sanding and some battle damage. They attach via industrial sticky back velcro to my kama.

IMG_20160829_150546.jpgIMG_20160829_150553.jpgIMG_20160829_165302.jpgIMG_20160830_130432.jpg

Welcome the ridiculously over-sized codplate. :p It's pretty cool though, I'm very happy with how it turned out. This is 3mm&6mm sintra and Terraflex. Some of the terraflex (on the "wings") has double layers, but they're not very visible right now. Painting will help that.
Again, it velcros to my kama. Very easy to take on and off, which is great becasue I cannot sit with it on. I tried. :facepalm

IMG_20160830_142910.jpg
Try on with what was done at that point. The Whippi (Cat) approves this build. She especially loves the fuzzy boots to rub her nose on....

IMG_20160831_110925.jpgIMG_20160831_134838.jpg
Cut bitty boot plates! Still a lot to go on them, but they've been put on hold for a week or so while I work on torso armor. I'm very happy with the crisp lines on them though.

I've got a couple of the belly plates done, so I'll up date with those again soon.
 

Attachments

  • IMG_20160817_205158.jpg
    IMG_20160817_205158.jpg
    529.8 KB · Views: 198
Awesome work! You're quite gifted.
Thank you! :) I think I just have a lot of practice.

Alright, here we go. Butt plate thing.

IMG_20160901_115157.jpgIMG_20160901_130639.jpg
The Terraflex got a little stretched out when I affixed it...(ok, actually it got stuck to the pan I use to heat things), but the great thing about Terraflex is that you can mold it while it's hot. So I squished it back together and hid the damage with battle damage. It's a cute little plate.

IMG_20160902_120148.jpgIMG_20160902_120538.jpg
This silly plate is like, the bridge between the codplate and the belly plates.


IMG_20160903_202910.jpgIMG_20160903_203900.jpgIMG_20160903_204253.jpgIMG_20160903_204258.jpgIMG_20160903_211206.jpgIMG_20160903_211238.jpg
First belly plate....This was such a difficult plate to make. For no apparent reason, every time I cut it out, it was warped. I made like, 3 plates and finally trimmed one down to work for me. The Terraflex was also warped, but I cut some more in and hid the seem with battle damage. (I love battle damage)
There's a slight gap that can between between plates when I turn sideways, but that's game accurate so I can live with it.

IMG_20160904_181403.jpgIMG_20160904_192725.jpgIMG_20160904_205236.jpgIMG_20160904_205321.jpgIMG_20160904_215316.jpg
First step of the three step plate. I'm pretty happy with how it turned out. It fits nice, sits nice and the detailing is very accurate. (I acquired some high rez pictures from my brother's PC copy of Skyrim)

IMG_20160905_120518.jpgIMG_20160906_155938.jpg
Step two...Crazy Nordic armor.

IMG_20160906_190412.jpgIMG_20160906_201310.jpgIMG_20160906_204355.jpgIMG_20160906_204904.jpg
Step three! Crazy plates.
 
I am absolutely amazed when I see scratch builds! Since Skyrim was and is one of my all time favourites, I can't wait to see the finished armour. Fantastic work so far, keep the pictures coming!
 
Looking great so far!

First belly plate....This was such a difficult plate to make. For no apparent reason, every time I cut it out, it was warped.

The Sintra that I've been using seems to distort a little bit when I heat-form it - as I work it, it stretches in one direction and shrinks along the other direction. This is based on the direction that the Sintra sheet was originally formed/extruded. So, when making a piece that needs to stay symmetrical as it's heat-formed, I've begun making sure that my template lines up with one of the original edges of the material.


As an example, these five little brackets were all exactly the same when I cut them, simple 1x2" rectangles - but I cut them out of a larger scrap, and one was cut from a different direction than all the rest. When I formed them, the last one changed shape differently than the rest, it distorted to be taller and skinny where the rest changed shape to be shorter and wider.

th_FDB7A624-27A8-454D-A4A9-7288319747EC.jpg


th_EE7F451A-2C2E-41FD-9689-4D20A39809A8.jpg
 
I am absolutely amazed when I see scratch builds! Since Skyrim was and is one of my all time favourites, I can't wait to see the finished armour. Fantastic work so far, keep the pictures coming!
Thank you! :) I really hope it turns out well!!

Looks great, I'm currently building this costume myself. Working on the armor parts first.
Cool! You'll have to let me know how yours turns out!!

Looking great so far!
The Sintra that I've been using seems to distort a little bit when I heat-form it - as I work it, it stretches in one direction and shrinks along the other direction. This is based on the direction that the Sintra sheet was originally formed/extruded. So, when making a piece that needs to stay symmetrical as it's heat-formed, I've begun making sure that my template lines up with one of the original edges of the material.
Huh....that might have been part of the problem. I guess it makes sense, being plastics, so thank you! Less headaches in the future! lol

Alright. Where did we leave off??

Oh yeah, backplate.
Well, I did up this plate, the second belly plate. I really like how it turned out!
IMG_20160908_121345.jpg
And did a full kit try on...

14302375_10207421868125475_2050030540_n.jpg14328897_10207421866285429_716111408_n.jpg14329051_10207421862445333_1985122568_n.jpg

Since then, I've also done more on my boot plates and did the final belly plate, which sits just above the spirals on the second plate. Somehow, though...I have neglected to take pictures of them. I will change this tomorrow and get some pics up. They look very sharp.

In the meantime, I've been working on my collar plate:
This one sits under the chest armor. I'll be adding some more to it to make it more stable, but I've decided to use only Terraflex for this plate so it will be flexible enough to spread it to get around my neck repeatedly.
IMG_20160914_195047.jpgIMG_20160914_210230.jpgIMG_20160914_210235.jpgIMG_20160914_210241.jpg

Anyhow, that's it for tonight. Most of the last week was spent on a Whiterun Guard (maybe well get that thread up and going here too in a bit. :) ) But I'll be working more steadily on this one for a while now.
 
Well. Ok, this has been a really long time since I posted any updates here.

Let's start with the collar plate:
IMG_20160915_210924.jpgIMG_20160916_114440 - Copy.jpg
So I ended up using wool felt as the base to keep it in place. It works great! It's also very comfortable and adds a little padding between my shoulders and the chest plates.

IMG_20160919_192800.jpgSo you know what they say about plates...right? Well, these ones ended up being too big on me so I remade them all. Sigh.
IMG_20160916_171034.jpg
The original plates are on the left there. You can see how much larger they were then the ones I have now. It's like I sized them for my 6'5" brother! lol

So that's a small update. I have actually finished this build now, so I will have more updates shortly including finished kit pics. I just may have to go back and get some pics to show how I put everything together!
 
Wow this is fantastic. I attempted this armor at the end of last year and was not happy with how it turned out. I only liked the helmet. You're making me want to retry!

Fantastic work.
 
Wow this is fantastic. I attempted this armor at the end of last year and was not happy with how it turned out. I only liked the helmet. You're making me want to retry!

Fantastic work.
Thank you! It's crazy armor but if you do one plate at a time it's not as hard as it looks like it will be! :)

Ok. Where did I leave off?
I think the next thing I worked on was the chest plate(s). This is a pretty complex piece and gave me a fair amount of stress while I was building it, but I think it turned out really well.


IMG_20160920_203555.jpg
Step 1: Pretty simple. Cut and shaped the center piece and the bottom layer. Attached and bondo'd.

IMG_20160921_174426.jpgIMG_20160921_174432.jpg
Step 2: Attached 3rd later to the stop of the other two and bondo'd. There ended up being a lot of extra lines for spacing on this plate then there needed to be, but they all got covered with paint.

IMG_20160921_203905 - Copy.jpgIMG_20160921_204011.jpg
Step 4: Shaped and attached top layer of chest plates/start of shoulder plates. We ended up filling the big gap there with expanding foam, and then I bondo'd over it to make it sturdy and secure.

IMG_20160923_130305.jpg
Step 5: Terraflex details were added....They actually helped with the whole look of the plate a LOT!

IMG_20160928_140232.jpg
Step 6: Add Authentic Nord penguin duct tape!! (No, ok, I kid) Added the finally layer to the chest plate, which shape over the shoulders and attach to the backplate.
You can also see the bondo in the big crack on this picture.
I did add the "fangs" that go down off the bottom of the chest plate and overlap with the waist plates, but I do not have good photos of those. Sorry!

This is the weirdest backplate I have ever made, I will have you know.
IMG_20161004_123218.jpg
I don't have any pictures of construction, but it turned out with quite a nice shape to it. The terraflex edging really makes quite a difference on a lot of these plates.
The backplate screws into the chest plate with Chicago screws on both the shoulders and the sides. It's actually very comfortable.

Final update for the night: Boot plates!!

IMG_20160926_162831.jpg
Finished version. They are removable from the boots and I'm very happy with the crisp lines on them.
 
Let's see.
IMG_20160927_200201.jpgIMG_20160927_212702.jpgIMG_20160928_141700.jpg Hand plates!! They're 3mm sintra with terraflex detailing. They were actually a lot of fun to make. They attach with leather straps around my arms. I really like how these turned out. :)

IMG_20161004_151615.jpgIMG_20161004_163631.jpgIMG_20161011_181801.jpgIMG_20161012_194003.jpg14689024_10207692563852699_1281141584_o.jpg
Shoulders, showing most of the steps. The last picture is pre-weathering. They're a base of 3mm SIntra, with terraflex and 6mm sintra and bondo. I think they turned out rather well.
I also opted to keep the shoulder bolts level, instead of making them uneven like they are in the male version of the armor in the game. It didn't really make any sense to me.

So...Paint steps: (Note, my armor was painted by my partner in crime, who shares my cosplay page. He's the painter, I'm the builder). We decided to go with the Guided look for the carved nordic armor. It's a mod, but it looks sweet as anything.
35495-1-1367433182.jpg35495-3-1367433183.jpg

I don't have pictures of the paint steps, but first everything was primed and painted aluminum. Then everything was shaded with airbrush and airbrushed chrome. The gold was then hand painted on everything, then it was top shaded with black and everything was weathered down (Also with black). Finally we went back and splattered black across all the plates. It looks wicked cool.

First set of pictures is from the first time out. I've since changed the makeup and warpaint (I think I was channeling too much Fable in the first go round) And the only major issue I had was the little back plates not wanting to stay down completely on my back. I've addressed that and it's much better now.
14804793_10207769424214160_589951465_n.jpg14805354_10207769424014155_137977564_n.jpg14793833_10207769424094157_537221132_n.jpg14800675_10207769424374164_1637839699_n.jpg
14800796_10207769422854126_1027153419_n.jpgDETAIL PICTURE, LOOK AT IT. We have since weathered down the soft parts to match the dirt on the armor. :)

safe_image (1).jpg
From our latest outing.

And a few of the photo we've gotten back from our photoshoot.
15002509_1678691895775515_8930208603547947542_o.jpg14915354_1678691845775520_6906420121656557867_n.jpg

Did I miss or not explain anything anyone wants me to hit up?
 
Man. I'm only just now seeing the thread, but it's very impressive work, start to finish. You did a great job taking it one step at a time and getting all that detail in. The face paint change looks better than the first and compliments the look a lot better. Incredible job.
 
Thanks! :D I'm glad you like it so much, it was a lot of fun (and frustration) to build.

And we finally got back all the photos from the photoshoots we did...so here are a few more so you can see my carved nordic armor (And his whiterun guard) in a little better details.


SWEETROLLLLLLLLLL :love
AAA_7007.jpg

15025635_1525321434161113_101029523407132112_o.jpgAAA_7014.jpg

"I want it...."
15025282_1525321657494424_17628277531472245_o.jpg

Anyway, thanks for watching this build and contributing everyone! I'll probably update again when I get going on my glass axe. :)
 
This thread is more than 7 years old.

Your message may be considered spam for the following reasons:

  1. This thread hasn't been active in some time. A new post in this thread might not contribute constructively to this discussion after so long.
If you wish to reply despite these issues, check the box below before replying.
Be aware that malicious compliance may result in more severe penalties.
Back
Top