ChickenHaunt
Sr Member
Like everyone else here, I'm sure, one of my favorite props has always been the golden statue from the beginning of Raiders of the Lost Arc. The stumbling points that have kept me from it are acquiring a decent casting of the real deal (they are out there), and figuring out a solution to gold plating it. But I think I got a satisfactory solution to both, so here's my process.
First problem solved: Someone appears to have scanned a (perhaps modified) copy of the stunt version of the idol on Thingiverse. So that's handy. The only thing is the stunt version has a different expression, and this one has some other quirks. If I were more of a digital whiz, I'd have fixed it in the 3D model, but I printed it as is and modified it after.

I like to give my PLA prints a rough sanding right off the bat.

Then a coat of filler primer
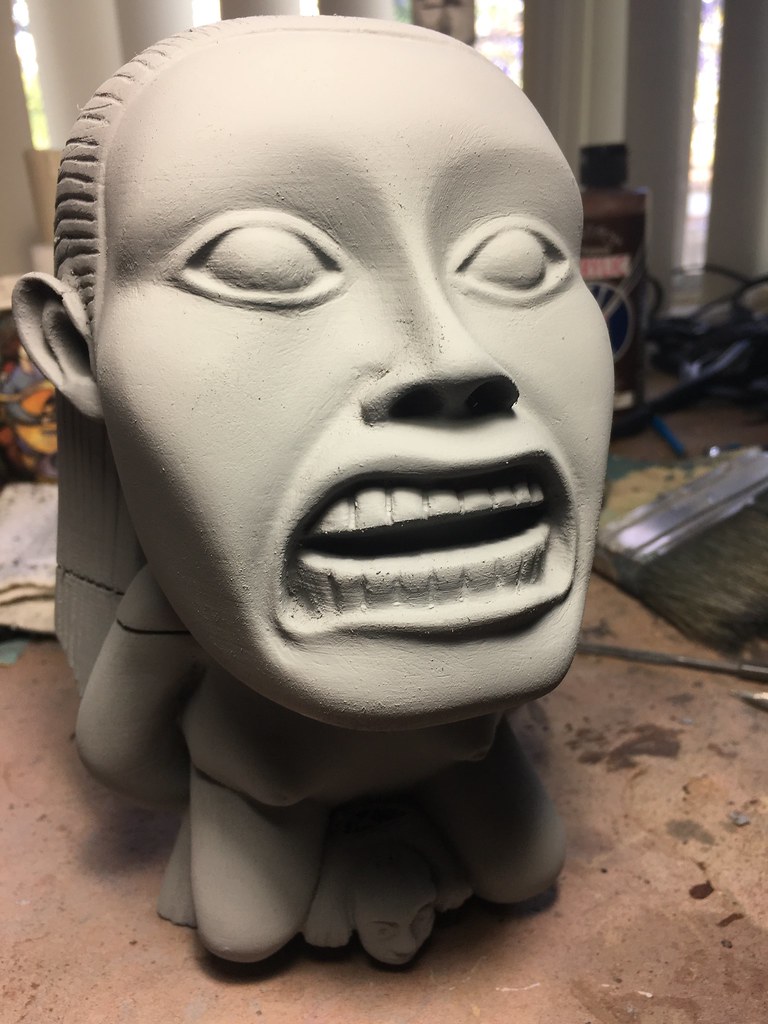
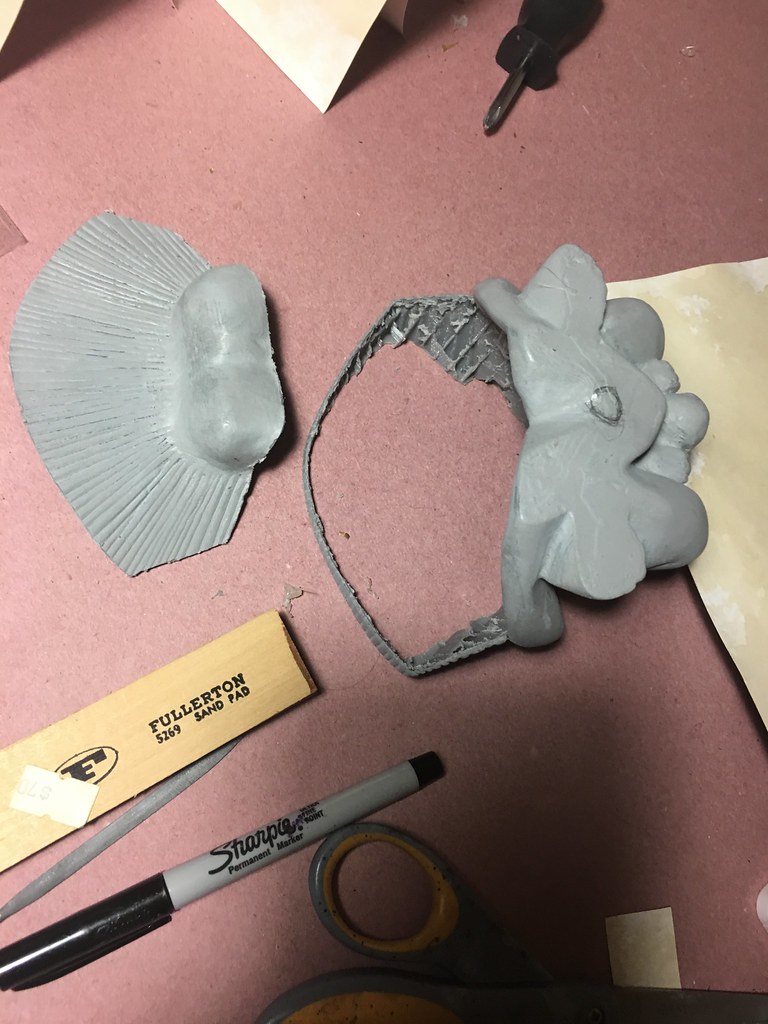
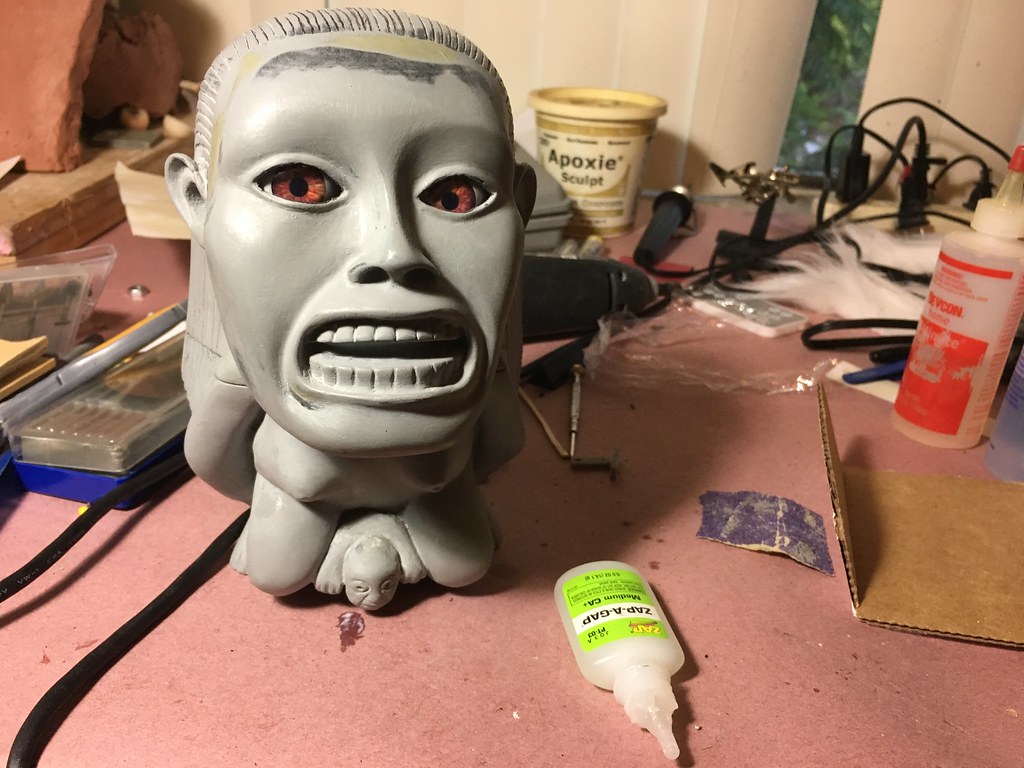
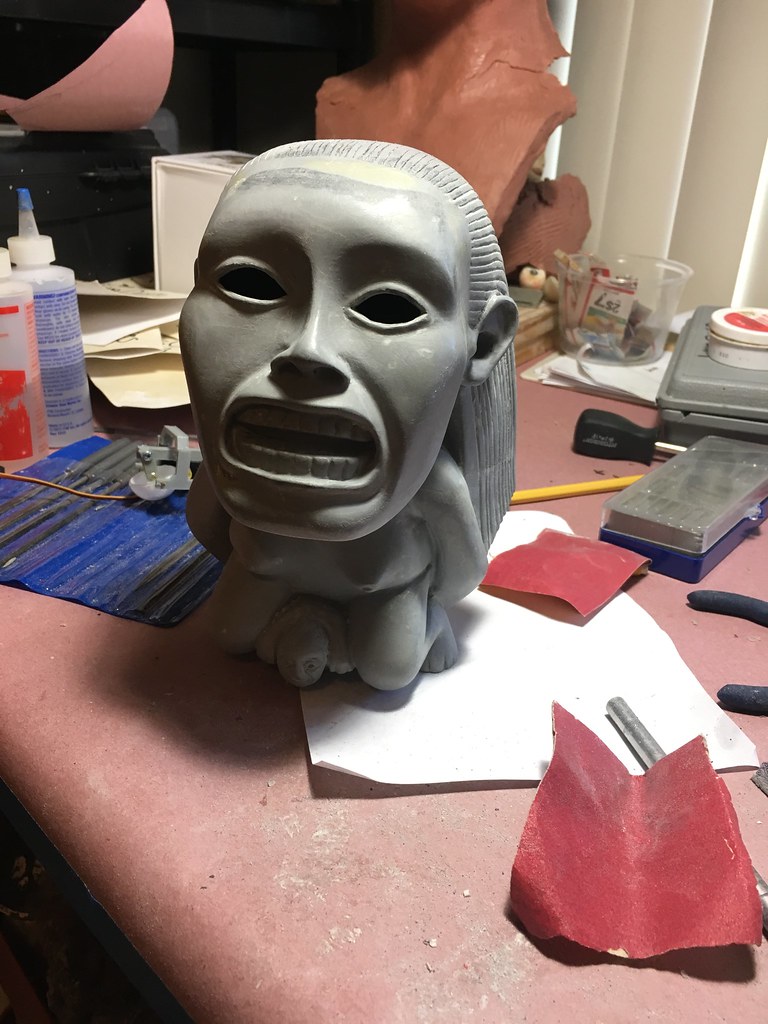
The primary issued here are the downturned corners of the mouth, the face of the baby, and the hairline.
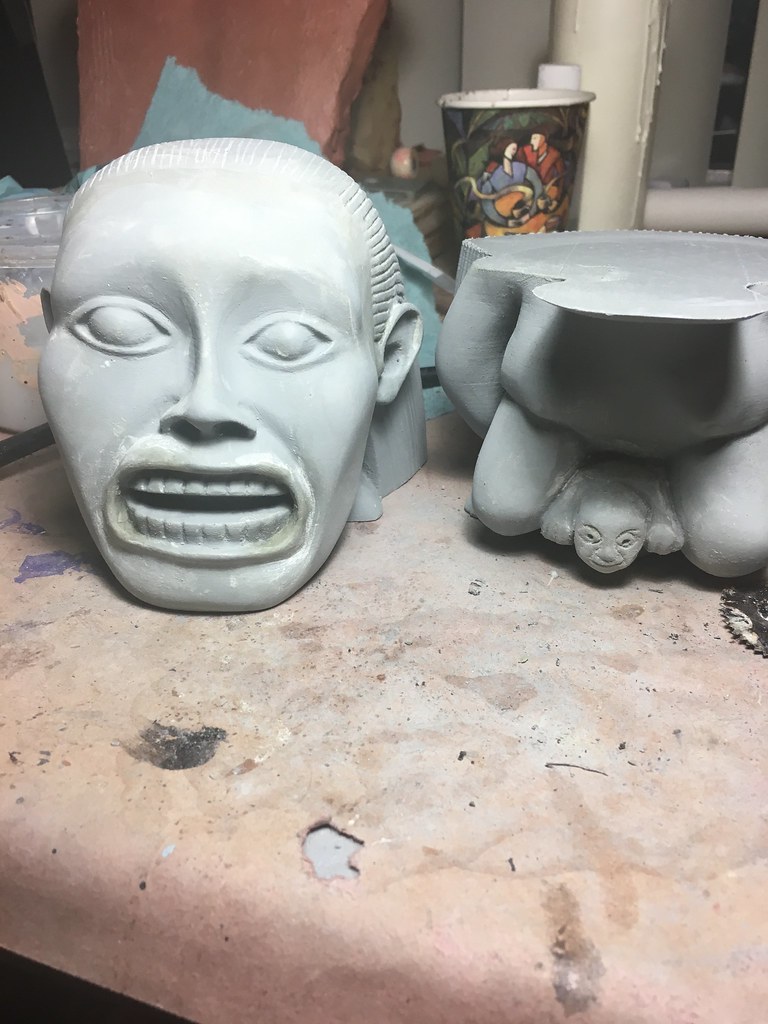
After a few passes of primer and sanding, I corrected those with Apoxie Sculpt, which is an epoxy putty that sets up in a few hours and is nicely sandable.
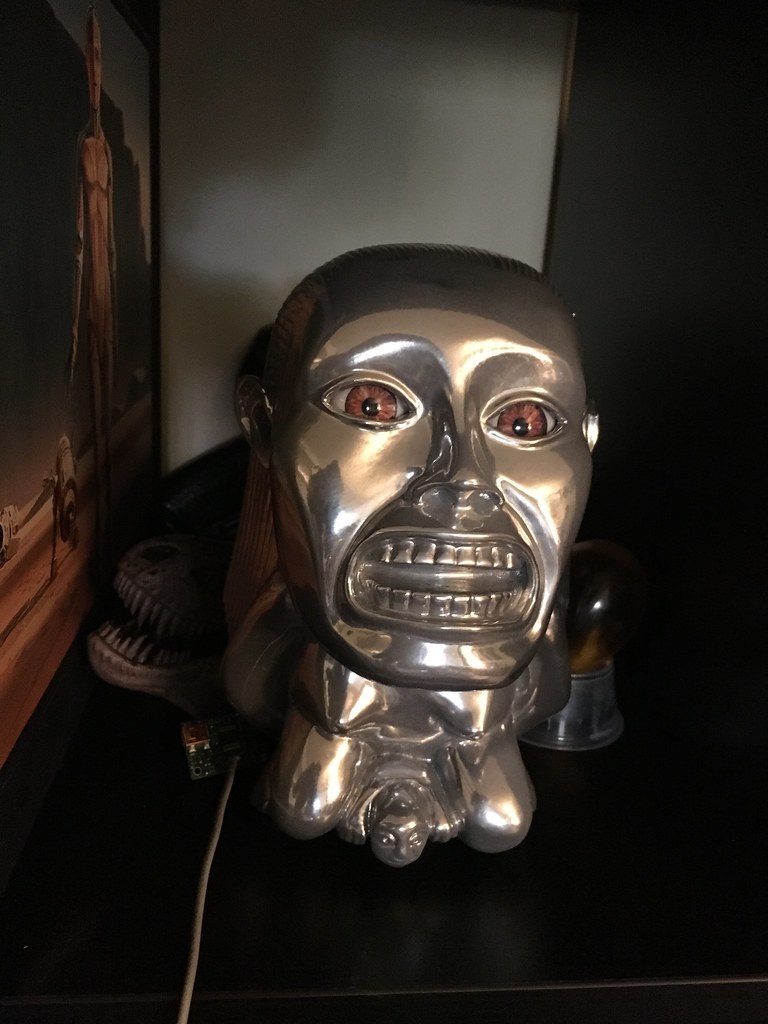
Now once I got this far, I figured the project might actually turn out all right, so I started thinking I might as well take it one step further and tackle the moving eyes.
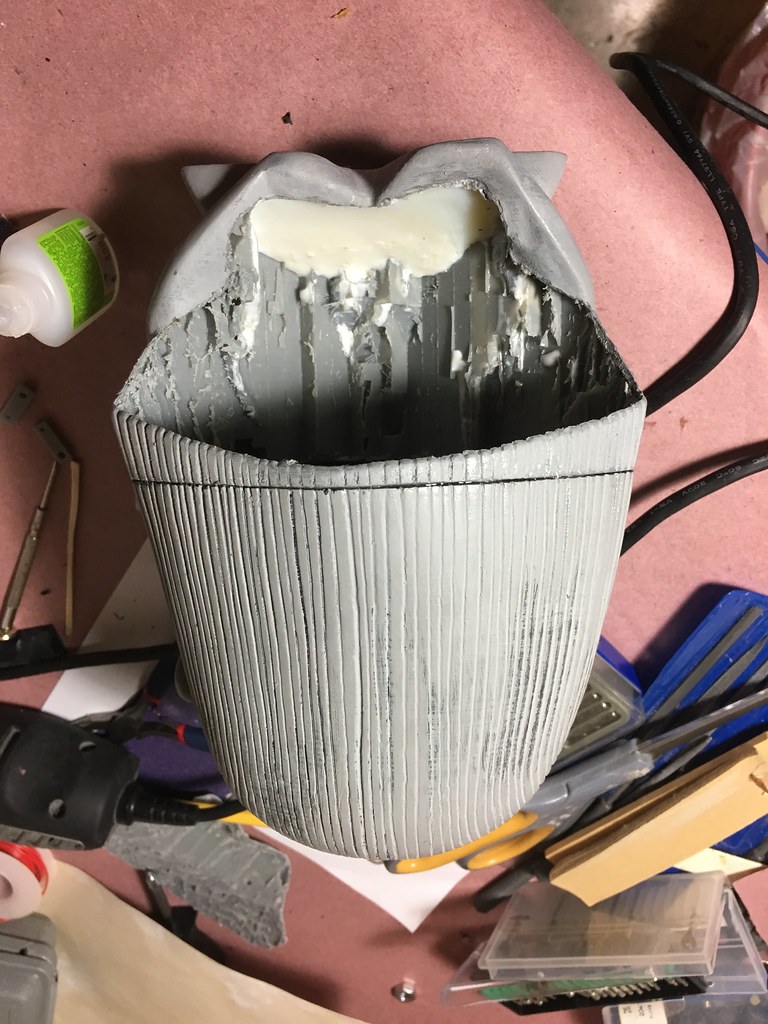
If I had planned it this way from the beginning, it might have been easier, but I didn't, so it wasn't. I had to dremel out all the support material from the inside to fit an eye mechanism.
I ordered several different plastic eyes to decide what would work best. The one you see below was my favorite looking, but I ultimately decided to use another pairwithout a corneal bulge, because a totally spherical eye would be able to fit tighter to the rigid eyelids while they're moving.
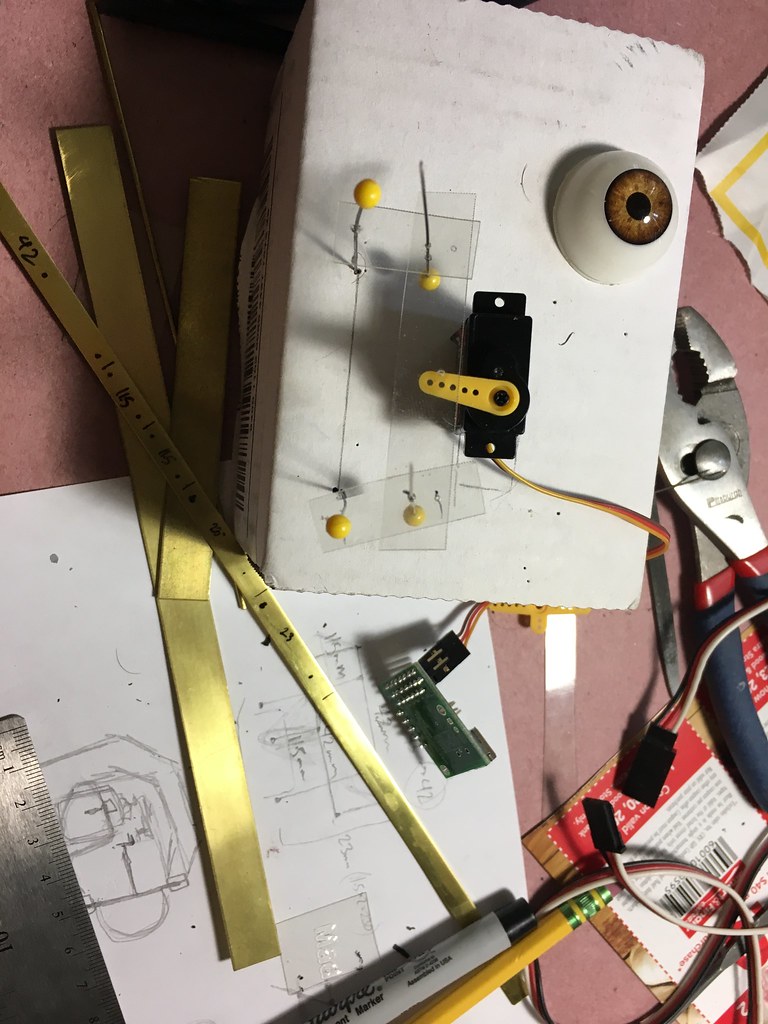
I prototyped out the mechanics with some pins and scrap plastic. The actual design had the servo on the other side.
One of the puzzles I wanted to solve was the hatch to access the mechanics. The original had that somewhat awkward cut across the top of the head so the whole back of the head could come off. I wanted to avoid anything conspicuous, so I devised a door on the underside of the hair. This is where having the model in two pieces worked to my advantage, because I could have easier access to the back of the eyes to set things up initially.
I had originally planned to build the eye mech out of brass stock, but I was inspired by the mechanical designers I've been working with at the ol' 9 to 5, and I ended up modeling the eye mech in Fusion 360 for 3D printing. The first time I built it, the eyes were just a hair too far apart to seat correctly, so I had to redo it, which is fairly trivial when the computer is doing most of the work.
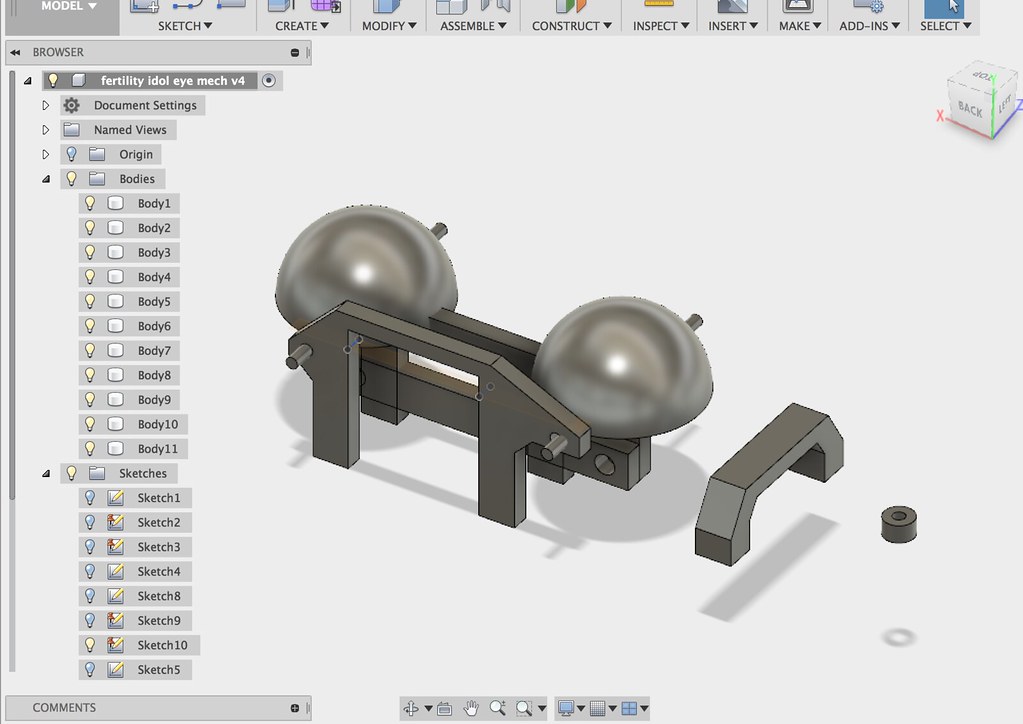
When I got it how I liked it, I mounted the whole mech inside the head with magnets. There were two reasons for this. 1) I wanted to be able to easily remove the mech if needed, and 2) I wouldn't be able to get any conventional tools up there once the body was sealed up. Okay, 3 reasons. 3) I like magnets.
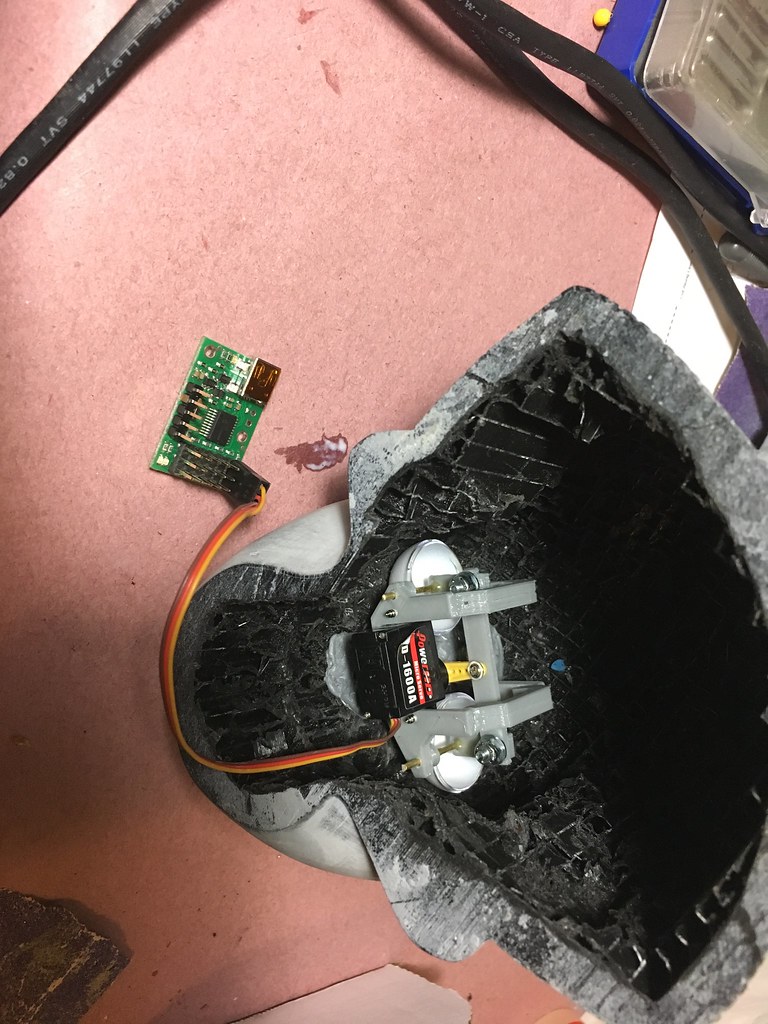
I 5-minute epoxied the magnets to the mechanism, and then used propoxy to mount the ones in the head, using a bit of plastic wrap as a barrier. You can see the controller board here. It's a Pololu Micro Maestro. I've become fond of these for this sort of simple animatronics control. It's small and, unlike and Arduino, is designed for smooth servo movements. The software is not as easy to program as VSA (another option entirely), but that's the tradeoff for being self-contained.
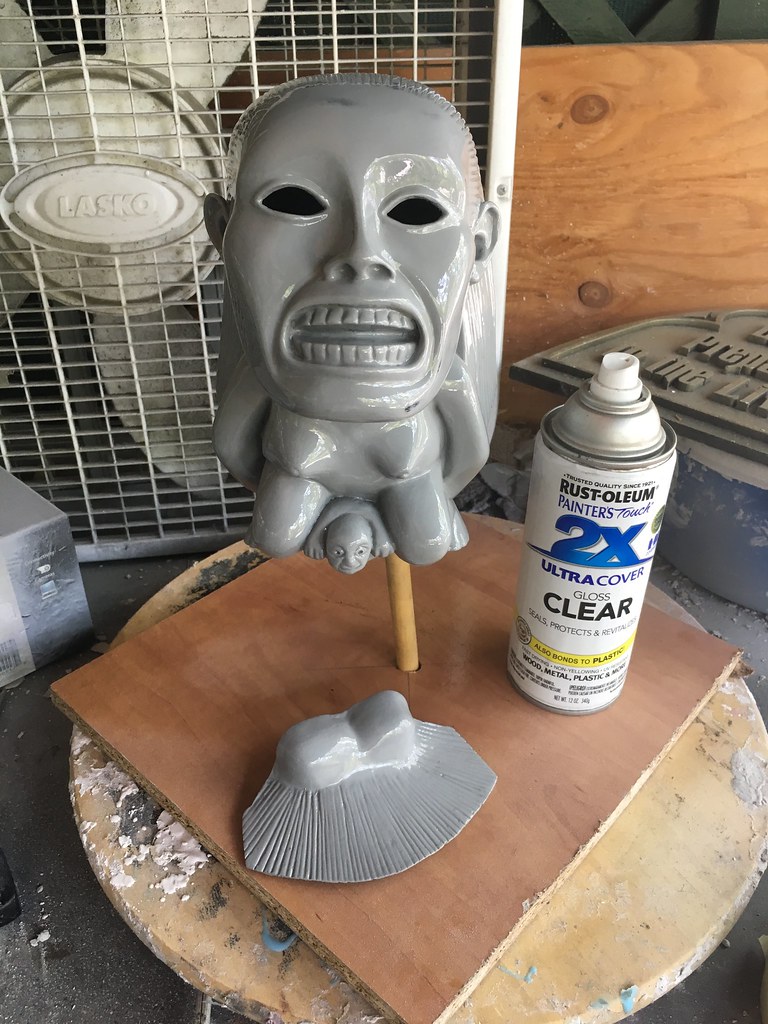
At this point I could superglue the two halves together.
I poured some resin in the feet to weight the bottom so it would be a little less top heavy.
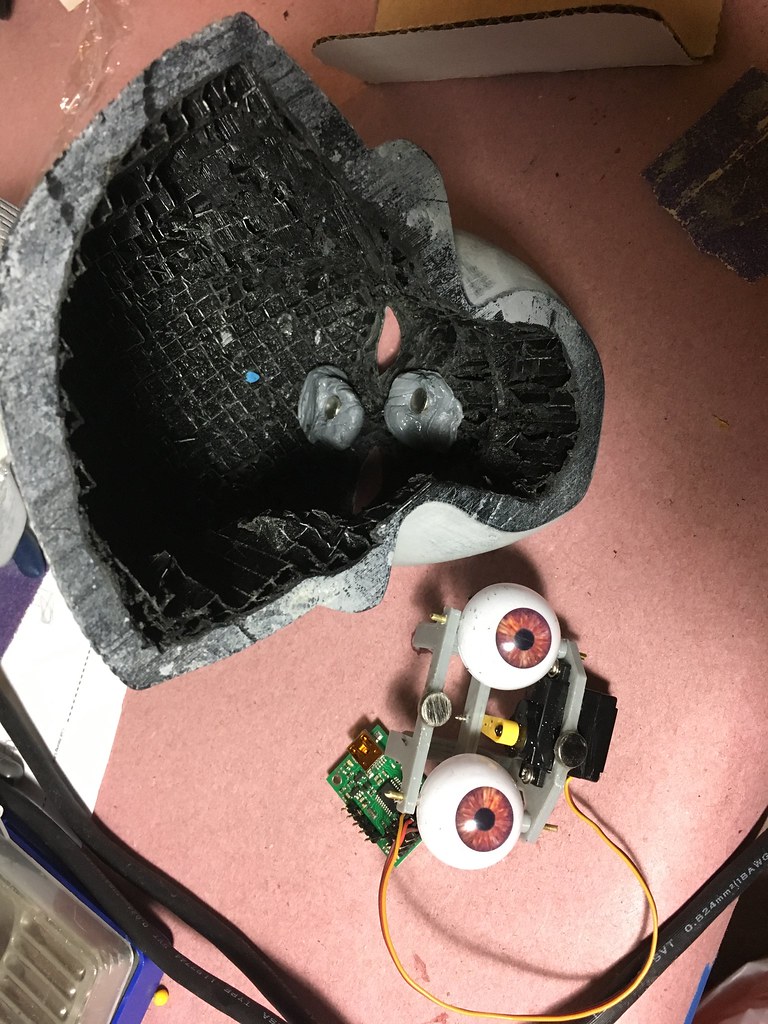
Now there's just enough room to guide the eye mech until it snaps into place. The system works pretty well.

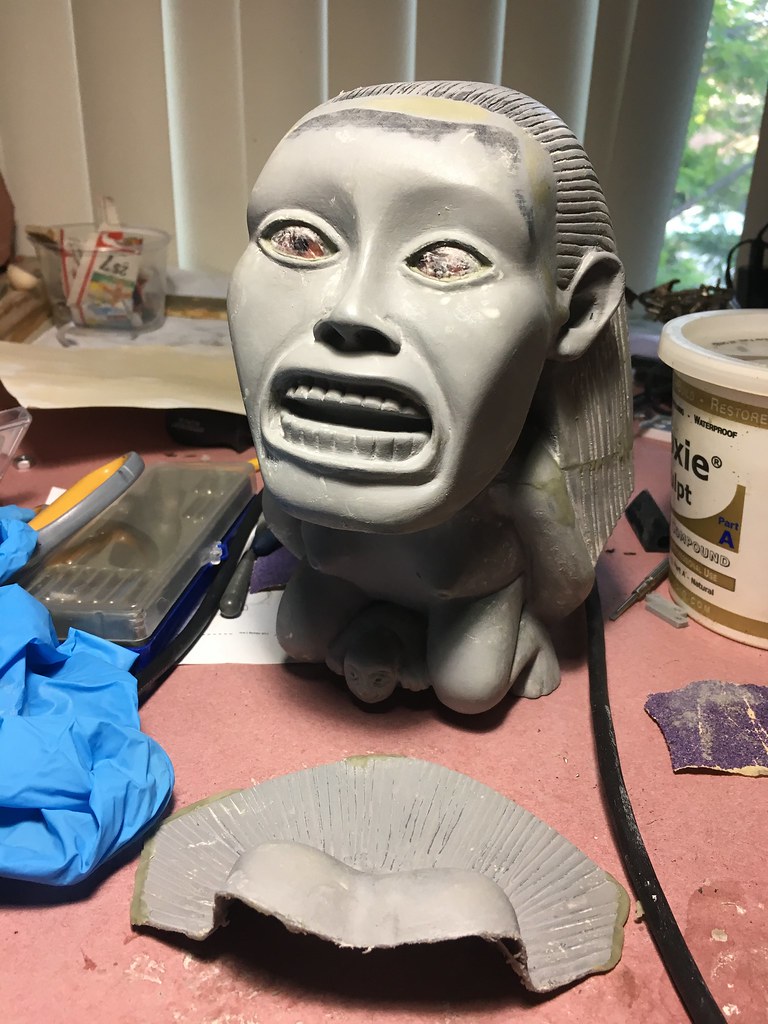
The eyelids needed a little resculpting to fit cleanly around the eyeballs. I wrapped them in plastic wrap before inserting them back into the head, and using Apoxie Sculpt to fix them up.
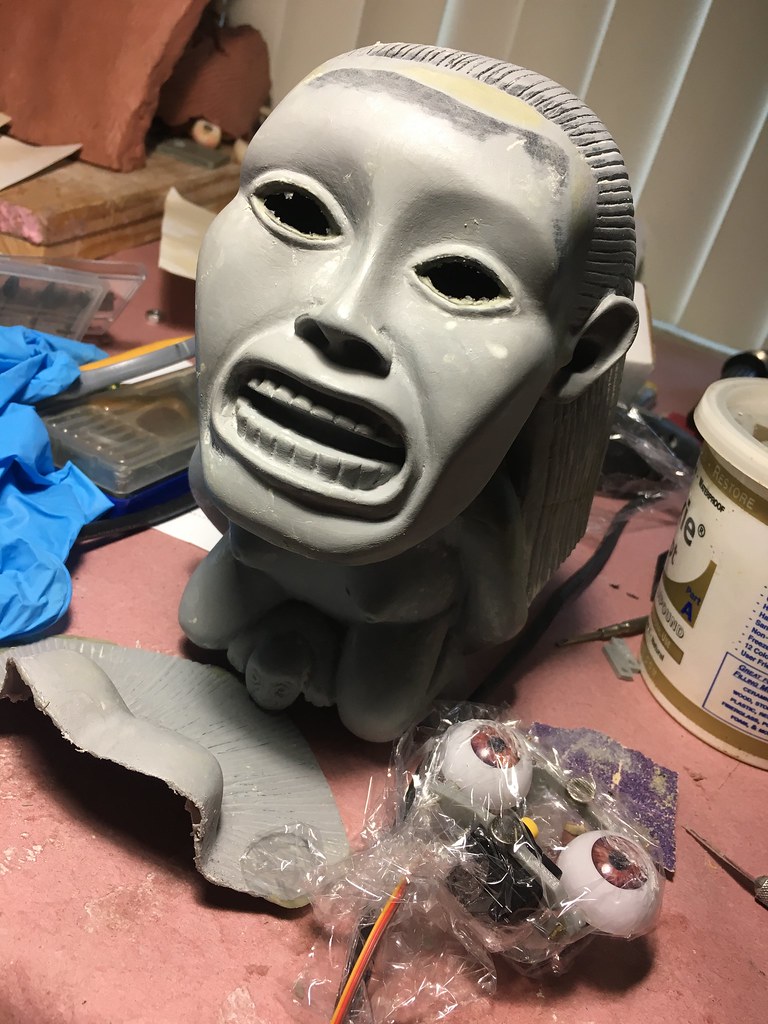
I also worked on the seam between the two parts, and the join on the trap door.

Nothing's a one step process. You can see even here there are print layers that can be seen and seams that need another pass of patching.
That hair took a lot of going over with a small, triangular file (thanks, Harbor Freight).

More to come soon...
First problem solved: Someone appears to have scanned a (perhaps modified) copy of the stunt version of the idol on Thingiverse. So that's handy. The only thing is the stunt version has a different expression, and this one has some other quirks. If I were more of a digital whiz, I'd have fixed it in the 3D model, but I printed it as is and modified it after.
I like to give my PLA prints a rough sanding right off the bat.
Then a coat of filler primer
The primary issued here are the downturned corners of the mouth, the face of the baby, and the hairline.
After a few passes of primer and sanding, I corrected those with Apoxie Sculpt, which is an epoxy putty that sets up in a few hours and is nicely sandable.
Now once I got this far, I figured the project might actually turn out all right, so I started thinking I might as well take it one step further and tackle the moving eyes.
If I had planned it this way from the beginning, it might have been easier, but I didn't, so it wasn't. I had to dremel out all the support material from the inside to fit an eye mechanism.
I ordered several different plastic eyes to decide what would work best. The one you see below was my favorite looking, but I ultimately decided to use another pairwithout a corneal bulge, because a totally spherical eye would be able to fit tighter to the rigid eyelids while they're moving.
I prototyped out the mechanics with some pins and scrap plastic. The actual design had the servo on the other side.
One of the puzzles I wanted to solve was the hatch to access the mechanics. The original had that somewhat awkward cut across the top of the head so the whole back of the head could come off. I wanted to avoid anything conspicuous, so I devised a door on the underside of the hair. This is where having the model in two pieces worked to my advantage, because I could have easier access to the back of the eyes to set things up initially.
I had originally planned to build the eye mech out of brass stock, but I was inspired by the mechanical designers I've been working with at the ol' 9 to 5, and I ended up modeling the eye mech in Fusion 360 for 3D printing. The first time I built it, the eyes were just a hair too far apart to seat correctly, so I had to redo it, which is fairly trivial when the computer is doing most of the work.
When I got it how I liked it, I mounted the whole mech inside the head with magnets. There were two reasons for this. 1) I wanted to be able to easily remove the mech if needed, and 2) I wouldn't be able to get any conventional tools up there once the body was sealed up. Okay, 3 reasons. 3) I like magnets.
I 5-minute epoxied the magnets to the mechanism, and then used propoxy to mount the ones in the head, using a bit of plastic wrap as a barrier. You can see the controller board here. It's a Pololu Micro Maestro. I've become fond of these for this sort of simple animatronics control. It's small and, unlike and Arduino, is designed for smooth servo movements. The software is not as easy to program as VSA (another option entirely), but that's the tradeoff for being self-contained.
At this point I could superglue the two halves together.
I poured some resin in the feet to weight the bottom so it would be a little less top heavy.
Now there's just enough room to guide the eye mech until it snaps into place. The system works pretty well.
The eyelids needed a little resculpting to fit cleanly around the eyeballs. I wrapped them in plastic wrap before inserting them back into the head, and using Apoxie Sculpt to fix them up.
I also worked on the seam between the two parts, and the join on the trap door.
Nothing's a one step process. You can see even here there are print layers that can be seen and seams that need another pass of patching.
That hair took a lot of going over with a small, triangular file (thanks, Harbor Freight).
More to come soon...
Last edited: