Definitive Harley Quinn suicide squad thread

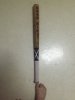
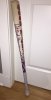
For those who need something that can be taken into weapons-restrictive cons, I made mine out of a foam yoga roll I got for $5 at Five Below. It is 6" in diameter and cut down to 12" long; I made it for a girl who's only 5', so the slightly smaller size actually looks correct on her. I used a soldering iron to melt the scarring into the faces and make the torn pieces look more like chipped wood. I sealed the foam with a light pass of a heat gun and a light coat of wood glue, then painted it with acrylics. The whole thing was sealed against chipping by a matte lacquer spray. I used a simple wooden dowel from the craft store for the handle. I see now I made the diamonds too big (and too few) so I'll probably repaint it. This was a last minute addition to the costume when I spotted the foam roll on a shopping trip, and it only took me about two hours to make, using a heat gun to help dry glue and paint between layers.
View attachment 653067View attachment 653068View attachment 653069

Dang, you need to make me one of these:)
 
Regarding the boots: My daughter wore hers for at least 8 straight hours, and they seem to have held up well. She wasn't complaining about them, at least. I stretched them out with a shoe stretcher and put thin gel inserts in there for her, so that may have helped.

I also made a con-safe bat from a cheap foam bat I got off Amazon for $6 (someone previously on this thread suggested it). The label came off super easy just rubbing it, and it looks really good for a non-wood replica. I made the stencils for the diamonds and print myself and eyeballed where the lines started and stopped when I wrote in the cursive. I referenced the movie prop to get the shapes of the letters, especially the Ys. When everything was on, I sprayed it over with some gloss lacquer to fix the ink so it wouldn't smear if it got wet. It isn't a regulation-size bat, but the person carrying this one is only 5'1", so it's to scale. :p
2016-08-20 23.37.51.jpg2016-08-20 23.37.57.jpg2016-08-20 23.38.12.jpg

The next thing I'm working on is hand-embroidered jacket. I got a screen cap of the movie jacket and used photoshop to make an iron-on stencil that I'm putting on interfacing to make an applique that I'll attach to the jacket with the final edge stitching.

And can someone tell me how to get rid of the attached thumbnail? I accidentally posted the one with my ugly toes holding the bat still to take it's picture. :facepalm
 

Attachments

  • 2016-08-20 23.38.12.jpg
    2016-08-20 23.38.12.jpg
    900.8 KB · Views: 243
Last edited:
Thanks for the info on the shoes! I got the leather cosplay shoes, and they are so comfortable.
I couldn't be happier. Your bat looks great! Can't wait to see how you do the jacket.


unnamed-3.jpg unnamed-2.jpg

~
I Athena I

P.S. I'm not sure how to erase photos on here.
:(
But if I figure it out I'll let you know.


unnamed-3.jpg


unnamed-2.jpg
 
Last edited by a moderator:
My daughter has gone crazy with this Harley stuff
And I would like to say , being a very very Acurate builder of props
That the work you all have done is incredible
This isn't just a few items of clothing , a true credit to all of you for the immense work !!
Whoever says otherwise has simply no idea what replicas are !!
Mars
 
I had a question about the belt and buckle. The belt appears to be a standard 1-1/4" width from what I can tell from the studs used, but the diamond has be confused. Is that the actual buckle, or is it just clipped on? I have seen it done both ways on Etsy, etc. The pics taken from the exhibit don't help because I see no prong though the belt. I am making this for my petite 10yr old daughter, So I am left having to make a lot of the stuff or modify it to her size. Any help would be greatly appreciated.
 
It appears to me that it is a working belt buckle, where the prong that clips it in place is in the wearer's leftmost point. The body of the buckle part (the non-adjustable piece that attches to the belt) attaches to the diamond at the back of the upper and lower legs of the diamond. Here's how I think it works, with a top and side view:

HQ-BeltBuckleSketch.jpg
For my daughter's, I just printed up a diamond with two prongs on the back, and used it to hold the belt in place through the grommets. It isn't holding anything up, so it just had to resist popping out. I think I'll try to print up a basic design like the one I just sketched, tho... nothing like taking a second look at something to inspire new ideas.

ETA: I am now running a test print of a buckle with the above configuration. I'll let you guys know if it works.:cool
 
Last edited:
Hi everyone! I've been a bit of a lurker on here for the past few months and finally decided to come out of the shadows and share my experience. I decided to start small and easy with my Harley Quinn cosplay and make the bat. Here are the details of the bat as researched through this thread & online and how I created it:
- I bought a 33" Maple "blem bat" off of eBay - it was unfinished and ends still attached.
View attachment 657123
- I sawed the ends off and then used sandpaper to sand it down & even out the grain. I started with 100 grit, then 120, and finished it with 220.
- I then sprayed it with 2 coats of Satin Gloss spray laquer, let it sit overnight, and hit it again with the 120 & then 220 sandpaper. In the future, I will probably only use 1 coat of Satin Gloss first, you will see why later on in this post.
View attachment 657140
- I used MS Publisher to create my own stencils on cardstock for the "Good Night" - the font I used is Bernard MT Condensed. I know that it doesn't match the original prop exactly, but it's really close and I was happy with the way the end product turned out. I cut out the stencils with an exacto knife - this was pretty time consuming. The total length, including the space between the words, comes to 14" from the top of the bat.
View attachment 657152
- I used red acrylic paint for the letters and then outlined them with a black sharpie by hand once it was dry.
View attachment 657149
- Next step was to create the diamonds. Fun fact, the type of diamonds used are actually called "Harlequin Diamonds"! Again, I used publisher to create the design, printed on cardstock, and cut out the stencil with an exacto-knife. Taking the tape at the base of the bat into consideration, and being sure to leave enough space between the "Night" and the top of the Diamond design, I made the total length, including the two black stripes on the top and bottom, a total of 4" long. There are 3 diamonds that wrap around the bat and two black stripes (which I made 3/4" high) on the top & bottom. I used blue, black, & red acrylic paint for the design. I have seen some bats have the white outer diamond, however when looking at pictures of the bat used in the movie, it looks to be the actual wood grain (ie: not painted), so I left that blank.
IMG_8993.JPG
- After that, it was time to write the poem. I had already found the poem on an earlier post within this thread, then I matched it up against screenshots taken from the Tested video on YouTube (also referenced in this thread) and did a test run on some drawing paper.
IMG_8880.JPG
-I discovered that the satin laquer was a bit too waxy for the sharpies, so I had to sand off the area where I would be writing. I will admit, that I started too far away from the "Good Night" letters and made my words too small (out of worry that I would make them too big and run out of space). On my next attempt, I will be taking that into consideration & adjusting spacing and size. I used black, blue, & red sharpies and wrote out the poem by hand.
IMG_8994.JPG IMG_8995.JPG IMG_8996.JPG
- The second to last step, was to seal the bat. I covered the area that would be wrapped in sports tape with blue painters tape, then used spray semi-gloss laquer to seal the bat. Hindsight, I will probably take some dirt/tire grime and dirty up the bat before I seal the bat next time. After spraying it, I let that sit overnight to dry.
-Last step was to use white grip tape to cover the base/grip of the bat, a total of 9" with a 3/4" gap between the tape and the bottom black line of the diamond outline. Then I went out to my car, rubbed my hands on one of the tires, and got the grip tape dirty.
Grip tape can be found here: https://www.amazon.com/gp/product/B0167CX9E8/ref=oh_aui_detailpage_o00_s00?ie=UTF8&psc=1
I used cotton grip tape instead of regular tape, because that's what it looked like in the video. :)

And...drum roll please...here is the finished product! The far left picture is the prop from the movie, the other three pictures are my replica:
IMG_8998.JPG

I just want to say thank you for everyone who has posted on this thread - I love the collaboration and feeling of community I have found on here! I hope this post was helpful or inspiring for someone. :)
I am considering starting an Etsy store and selling these as I had a lot of fun making it.


IMG_8993.JPG


IMG_8880.JPG


IMG_8994.JPG


IMG_8995.JPG


IMG_8996.JPG


IMG_8998.JPG
 
Last edited by a moderator:
Hi everyone! I've been a bit of a lurker on here for the past few months and finally decided to come out of the shadows and share my experience. I decided to start small and easy with my Harley Quinn cosplay and make the bat. Here are the details of the bat as researched through this thread & online and how I created it:

.....


I just want to say thank you for everyone who has posted on this thread - I love the collaboration and feeling of community I have found on here! I hope this post was helpful or inspiring for someone. :)
I am considering starting an Etsy store and selling these as I had a lot of fun making it.


Your bat looks awesome! Looks like you had a ton of fun making it too.

If you do end up selling replica's on Etsy, I have a couple recommendations to make it more authentic.

1) The diamond part is slightly too big on yours. Try to make it 3.5" instead of 4". You can see in the original prop that the diamond shapes are a little more "fat" and squished vertically. Great job leaving the wood grain in between, too many people here are painting it white.

2) I would use sharpie for the whole thing. The red acrylic "GOOD NIGHT" looks too perfect. In the original prop its colored with sharpie, and you can see the streaks of the pen marks, both in the black outline and the red inside.


I'm working on mine right now, and will post up pictures when I finish too!
 
Last edited by a moderator:
I had a question about the belt and buckle. The belt appears to be a standard 1-1/4" width from what I can tell from the studs used, but the diamond has be confused. Is that the actual buckle, or is it just clipped on? I have seen it done both ways on Etsy, etc. The pics taken from the exhibit don't help because I see no prong though the belt. I am making this for my petite 10yr old daughter, So I am left having to make a lot of the stuff or modify it to her size. Any help would be greatly appreciated.

Hi there, I know that EvilEmpryss has already helped with your question, but the belt I got off eBay from Singapore is a buckle and it works perfect.

unnamed-4.jpg unnamed-5.jpg
I can't wait to see your daughter's costume! Here is my progress, so far without the belt on.

My Haley Quinn 1.jpg My Haley Quinn 2.jpg My Haley Quinn 3.jpg My Haley Quinn 4.jpg My Haley Quinn 5.jpg My Haley Quinn 6.jpg

~​I Athena I


unnamed-4.jpg


unnamed-5.jpg


My Haley Quinn 1.jpg


My Haley Quinn 2.jpg


My Haley Quinn 3.jpg


My Haley Quinn 4.jpg


My Haley Quinn 5.jpg


My Haley Quinn 6.jpg
 
Last edited by a moderator:
We are trying to figure out how many spikes are on her cuffs.
I think there are eight spikes what do you guys think?
:confused

My dad is going to post up some doctored photos.

harley_quinn_suicide_squad___transparent__2_by_natan_ferri-da74wt2 copy.png

~ I Athena I

harley_quinn_suicide_squad___transparent__2_by_natan_ferri-da74wt2 copy.png
 
Last edited by a moderator:
Ok, the pretest for the belt buckle was a solid design, but the measurements were a little off and for some reason my printer decided to not print part of the facing of the buckle {insert cussing that accompanied the two hours of futzing with the electronic demon in order to fix that problem and another that cropped up while I was repairing the first}. I'm printing the final now.

And I made the spike bracelet using worbla and eight 40mm screwback cones, and the spikes were waaay too long. I need to remake it with 26mm spikes. It was also my first worbla piece, so was a learning experience: it didn't come out as smooth as I had hoped. It is definitely eight spikes, though.

By the way, can anyone identify the type of material the movie jacket is made of? Everyone is making it with satin, but it's a knit of some sort, with a little sparkle in the weave. If I'm going thru the trouble of hand embroidering the text, I'm want to get it all right.
 
Your bat looks awesome! Looks like you had a ton of fun making it too.

If you do end up selling replica's on Etsy, I have a couple recommendations to make it more authentic.

1) The diamond part is slightly too big on yours. Try to make it 3.5" instead of 4". You can see in the original prop that the diamond shapes are a little more "fat" and squished vertically. Great job leaving the wood grain in between, too many people here are painting it white.

2) I would use sharpie for the whole thing. The red acrylic "GOOD NIGHT" looks too perfect. In the original prop its colored with sharpie, and you can see the streaks of the pen marks, both in the black outline and the red inside.


I'm working on mine right now, and will post up pictures when I finish too!

Great tips, thank you!! Will definitely take these into consideration on my first attempt.
Can't wait to see yours!
 
And I made the spike bracelet using worbla and eight 40mm screwback cones, and the spikes were waaay too long. I need to remake it with 26mm spikes. It was also my first worbla piece, so was a learning experience: it didn't come out as smooth as I had hoped. It is definitely eight spikes, though.
Someone found a perfect picture of the bracelet, at the exhibit, and it for sure has eight spikes! So mystery solved.
Thanks for responding!!
:love

~I Athena I
 
Last edited by a moderator:
This thread is more than 6 years old.

Your message may be considered spam for the following reasons:

  1. This thread hasn't been active in some time. A new post in this thread might not contribute constructively to this discussion after so long.
If you wish to reply despite these issues, check the box below before replying.
Be aware that malicious compliance may result in more severe penalties.
Back
Top