Hello! I was just wondering if anyone could tell me their experience working with Alumilite Clear Resin and if it is any better than Smooth-on Crystal clear? I can't make up my mind on which to get. Also if anyone has pics of their results I would love to see them! Also does anyone have any advice on tinting the resin, has anyone tried and had good results? Thank you!
You are using an out of date browser. It may not display this or other websites correctly.
You should upgrade or use an alternative browser.
You should upgrade or use an alternative browser.
Alumilite Clear Resin VS Smooth on, questions?
- Thread starter NSStudios
- Start date
Gixxerfool
Well-Known Member
I have bought the Alumilite. I haven't had a chance to use it yet. I got it at micheal's with a 60% off coupon. I picked up the alumilite dye from Hobby Lobby with a 40% off coupon. I grabbed the pourable silicon mold kit from Alumilite at Micheal's with a 60% off coupon. So all in I'm at $25 or so. If it turns out to be no good, it wasn't breaking the bank.
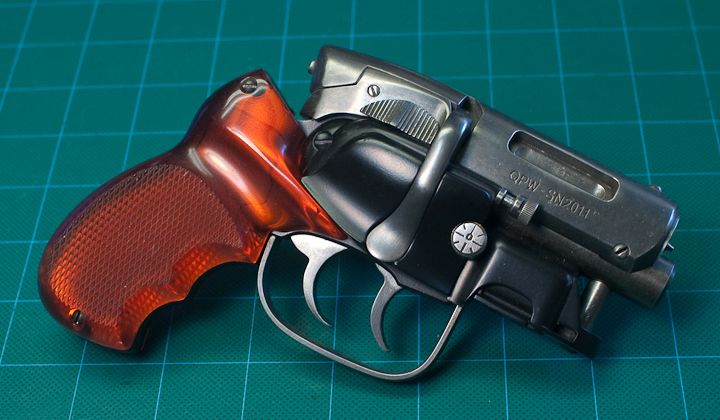
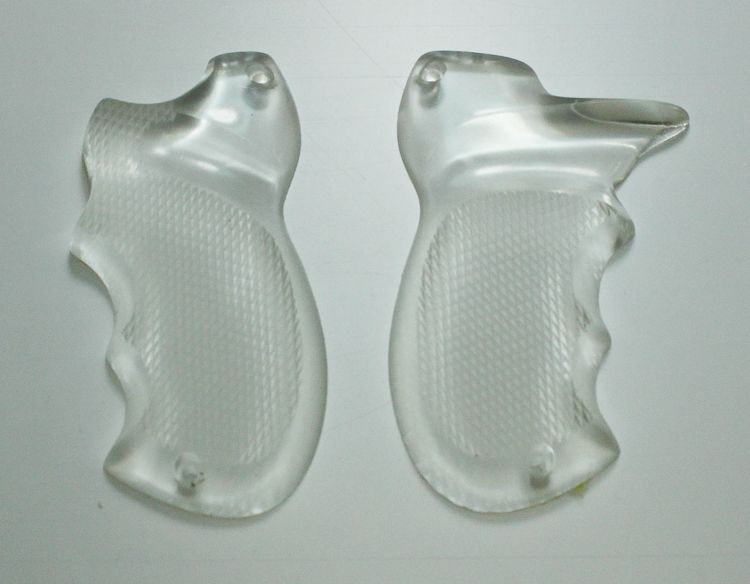
While I've not used Smooth-On's product I have used the Alumilite clear and Sil-Pak's clear. I like the Alumilite a lot. I used it to do clear grips for my Snub Nose Blade Runner Blaster. To get good crystal clear bubble free castings you'll need to first degass the mixed resin in a vacuum chamber, pour it into the mold, then put the mold in a pressure tank under about 60psi and let it fully cure. You can pour without this equipment but the results won't be as good. Most clear urethane resins benefit from a "post cure". Pull the parts out of the mold when fully cured and then post cure at 125 to 150 degrees for a couple of hours.
Although not a requirement, clear resins usually work better in platinum based silicone molds rather than tin based ones.
Build up tint slowly, usually the dyes are very concentrated. Keep in mind that the depth of color will be based on the thickness of the casting so the color will likely look different in the mixing cup than in the final part. Good luck!


Last edited:
cavx
Master Member
DaveG That is some really nice work.
I agree, mixing and pouring clear will be disappointing unless you have the tools to pull the bubbles first. I don't have a pressure pot yet, but always degas all my resins and silicones (pot life pending of course). You can learn to pour bubble free but curing under pressure would guarantee bubble free parts because sometimes, a bubble can be formed or trapped during the pour. I bought a clear PU once that, even though it was degassed and poured bubble free, made bubbles over night and that is so disappointing to find that in the morning.
I agree, mixing and pouring clear will be disappointing unless you have the tools to pull the bubbles first. I don't have a pressure pot yet, but always degas all my resins and silicones (pot life pending of course). You can learn to pour bubble free but curing under pressure would guarantee bubble free parts because sometimes, a bubble can be formed or trapped during the pour. I bought a clear PU once that, even though it was degassed and poured bubble free, made bubbles over night and that is so disappointing to find that in the morning.
Last edited by a moderator:
While I've not used Smooth-On's product I have used the Alumilite clear and Sil-Pak's clear. I like the Alumilite a lot. I used it to do clear grips for my Snub Nose Blade Runner Blaster. To get good crystal clear bubble free castings you'll need to first degass the mixed resin in a vacuum chamber, pour it into the mold, then put the mold in a pressure tank under about 60psi and let it fully cure. You can pour without this equipment but the results won't be as good. Most clear urethane resins benefit from a "post cure". Pull the parts out of the mold when fully cured and then post cure at 125 to 150 degrees for a couple of hours.
Although not a requirement, clear resins usually work better in platinum based silicone molds rather than tin based ones.
Build up tint slowly, usually the dyes are very concentrated. Keep in mind that the depth of color will be based on the thickness of the casting so the color will likely look different in the mixing cup than in the final part. Good luck!
http://i1053.photobucket.com/albums/s480/GoldbergArts/Snub Nose Blaster/CRW_5062_zpsd5220e9b.jpg
http://i1053.photobucket.com/albums/s480/GoldbergArts/Snub Nose Blaster/IMG_1869_zpspanzozqw.jpg
Wow! Amazing work! I take it this is Alumilite? How bubble free would you say cures are with just vacuum degassing, and not curing in a pressure pot? Also what color pigments do you use to tint them? That amber color is PERFECT for one of my upcoming products. Also, do you have any explanation for the post curing process? Thank you! Great post!
- - - Updated - - -
@DaveG That is some really nice work.
I agree, mixing and pouring clear will be disappointing unless you have the tools to pull the bubbles first. I don't have a pressure pot yet, but always degas all my resins and silicones (pot life pending of course). You can learn to pour bubble free but curing under pressure would guarantee bubble free parts because sometimes, a bubble can be formed or trapped during the pour. I bought a clear PU once that, even though it was degassed and poured bubble free, made bubbles over night and that is so disappointing to find that in the morning.
I do have a vacuum chamber, but no pressure pot.
Yes, Alumilite Clear for the grips. They have two versions, I like the longer setting one as it give more pot life for the degassing.
The vacuum degassing will remove all the big bubbles. Bubbles expand, can exert enough force to rise to the serface and pop. But what can be left are really tiny bubbles that didn't expand enough to rise up. These bubbles might be so tiny so as not to be really visible to the naked eye, but the effect they have is to make the casting look ever so slightly cloudy. So the vacuum/pressure process helps to get crystal clear castings. Depending on what you are doing, that might not be important. For the grips, they were.
Also, the casting will only appear as clear and the original pattern (an therefore mold surface) was glossy. High gloss mold equals clear surface, matte mold equals frosted surface. Clear urethane castings are nowhere as easy to polish to a high clear surface finish as polyesters or solid acrylic. So it's a good idea to get your mold as glossy as possible if clarity is important.
Post curing is basically "baking" the cured part out of the mold for a few hours at very low temperature. When the part first comes out of the mold, even after a full cure, it might feel a little tacky. Not really sticky of soft but not rock hard either. Post curing will fix that. Just at around 150 degrees for a few hours. When I was casting the grips (in the middle of summer) my process would be to mix the resin in the evening after I got home from work, degass it in the vacuum chamber in the mixing pot for five minutes or so, they pour it into the silicone mold and put the mold into the pressure tank and leave it to cure at 60psi all night, 8 hours or so. Then in the morning, after I'd had my coffee, demold the part and put it on the back seat of my car. The car would be parked in the sun all day while I was at work and the interior would get up to around 140 degrees (yes, I measured it once!). That worked perfectly to post cure the resin. Then pour another one when I got home and repeat (I had to make a couple dozen sets).
I don't recommend using your kitchen over or a toaster oven, it's too easy to overheat the resin. When the weather is cold I have made a "hot box" out of a large cardboard box with a light bulb inside. Just make sure it's not a fire hazard.
The amber color was a PITA to get just right. It's a mixture of yellow dye and a tiny, tiny bit of red. The red dyes tend to be super concentrated and I had a lot of batchs turn out more of a salmon color! Unfortunately I was unable to find an amber dye.
Yes, Alumilite Clear for the grips. They have two versions, I like the longer setting one as it give more pot life for the degassing.
The vacuum degassing will remove all the big bubbles. Bubbles expand, can exert enough force to rise to the serface and pop. But what can be left are really tiny bubbles that didn't expand enough to rise up. These bubbles might be so tiny so as not to be really visible to the naked eye, but the effect they have is to make the casting look ever so slightly cloudy. So the vacuum/pressure process helps to get crystal clear castings. Depending on what you are doing, that might not be important. For the grips, they were.
Also, the casting will only appear as clear and the original pattern (an therefore mold surface) was glossy. High gloss mold equals clear surface, matte mold equals frosted surface. Clear urethane castings are nowhere as easy to polish to a high clear surface finish as polyesters or solid acrylic. So it's a good idea to get your mold as glossy as possible if clarity is important.
Post curing is basically "baking" the cured part out of the mold for a few hours at very low temperature. When the part first comes out of the mold, even after a full cure, it might feel a little tacky. Not really sticky of soft but not rock hard either. Post curing will fix that. Just at around 150 degrees for a few hours. When I was casting the grips (in the middle of summer) my process would be to mix the resin in the evening after I got home from work, degass it in the vacuum chamber in the mixing pot for five minutes or so, they pour it into the silicone mold and put the mold into the pressure tank and leave it to cure at 60psi all night, 8 hours or so. Then in the morning, after I'd had my coffee, demold the part and put it on the back seat of my car. The car would be parked in the sun all day while I was at work and the interior would get up to around 140 degrees (yes, I measured it once!). That worked perfectly to post cure the resin. Then pour another one when I got home and repeat (I had to make a couple dozen sets).
I don't recommend using your kitchen over or a toaster oven, it's too easy to overheat the resin. When the weather is cold I have made a "hot box" out of a large cardboard box with a light bulb inside. Just make sure it's not a fire hazard.
The amber color was a PITA to get just right. It's a mixture of yellow dye and a tiny, tiny bit of red. The red dyes tend to be super concentrated and I had a lot of batchs turn out more of a salmon color! Unfortunately I was unable to find an amber dye.
Again, Great informative post! Thank you! The casting will be of a gemstone, so it does need to be pretty clear. And thank you for the amber tip. I found translucent amber dye made my castin' crafts after posting on here. Do you think it would be possible to convert my vacuum chamber to be a pressure pot also, by adding some lip straps and a second gauge? I love your effect very much! I will try both.
Without knowing the specifics of what you are using for a vacuum chamber I would say, in general, it's probably not a good idea to try to use a vacuum chamber as a pressure pot. Usually the lid on a vacuum chamber is held tight by the vacuum, no other mechanical fasteners are needed. While on the other hand the lid to a pressure pot needs a lot of very strong, very even clamping force. For example, if your pot is 10 inches in diameter the lid will have a surface area of approximately 78 square inches. Pressurized to 60 psi the lid will have 4,680 pounds of force pressing against it! That's over 2 1/4 tons! If your lucky, the seal will spring a leak before the lid suffers a catastrophic failure!
A better, and pretty inexpensive solution, is to purchase a 2 1/2 gallon paint pressure pot and convert it for use as a casting chamber. Harbor Freight has one for $100. It'll work well for this purpose, just don't over pressurize it!
Good luck.
A better, and pretty inexpensive solution, is to purchase a 2 1/2 gallon paint pressure pot and convert it for use as a casting chamber. Harbor Freight has one for $100. It'll work well for this purpose, just don't over pressurize it!
Good luck.
cavx
Master Member
I do have a vacuum chamber, but no pressure pot.
OK so then it becomes a case of how careful you are when you pour. Deep molds are harder to keep bubble free. Shallow open backs are easy.
Here is a video I did a while back. The pour is about 3min mark.
You can see I also painted the inside the mold and degassed that as well. This is ensures I have no air trapped before I even pour and gives 100% detail. The resin seems to flow better onto a surface already wet with product than it does onto a dry mold. If I pour "dry", the resin (polyurethane rubber) tends to fold over itself and create really small bubbles on the surface. Pressure would eliminate these, but as I don't yet have a pressure pot, this seems to be a work around.
Last edited by a moderator:
cavx
Master Member
Ok I have a question for the experts. My degassing system worked perfectly for over 18 months. Today I changed the oil as it was looking a little yellow. Souring oil - what an oddity that has been. Another story for another day.
The issue I am having is that whilst it seems to pull 30 inches, it is just not pulling all the bubbles.
When I made the Video above, 2min under vacuum would pretty much suck all the bubbles out and the surface of the resin would be boiling away like water.
Today after changing the oil and running a seal test, this is the best it can do.
Is my pump failing?
Note that the Guage is not quite at 30 inches.
At 2min the bubbles are just sitting there not doing anything.


Sent from my SM-G900I using Tapatalk
The issue I am having is that whilst it seems to pull 30 inches, it is just not pulling all the bubbles.
When I made the Video above, 2min under vacuum would pretty much suck all the bubbles out and the surface of the resin would be boiling away like water.
Today after changing the oil and running a seal test, this is the best it can do.
Is my pump failing?
Note that the Guage is not quite at 30 inches.
At 2min the bubbles are just sitting there not doing anything.
Sent from my SM-G900I using Tapatalk
cavx
Master Member
I have completely pulled apart all the fitting. The thread tape had perished so I cleaned off all the remains, replaced the tape and reassembled the parts.
This time I got a full 30 inches.
Yet this is still NOT degassing properly. It am at a loss here.
Sent from my SM-G900I using Tapatalk
This time I got a full 30 inches.
Yet this is still NOT degassing properly. It am at a loss here.
Sent from my SM-G900I using Tapatalk
cavx
Master Member
Yes absolutely. And that above is the biggest cause of upset. I have a box of bits that I have done prior that are 100% bubble free. Now I can't duplicate that using the same gear and product.I have no idea why the resin would be acting differently if the level of vacuum is the same. Is the the same resin you have had success with before?
Sent from my SM-G900I using Tapatalk
cavx
Master Member
I was having success after success but about 6 months ago, my chamber was damaged. I had the crack welded up and I wasn't really doing much molding or casting work, so I guess I never really noticed the issue. Now that I am back into clears, I am totally aware and driven to the find the issue..
I ran a couple of seal tests today and I seem to have found leak that I think is happening under the lid.
Normally, under vacuum the air heats up. But what I have noticed is that my chamber feels cold. And during the last tests, I think I felt the draft where the air is being sucked in. I might be up for a new chamber.
Last edited:
cavx
Master Member
I spoke with my plastics guy about getting him to make a new chamber but before I do that I have mixed some flexible and made a new seal around the top of the existing chamber. I also let's it some of resin drip around the hose fitting where they go into the chamber.
If this works I have saved myself a couple of hundred dollars.

Sent from my SM-G900I using Tapatalk
If this works I have saved myself a couple of hundred dollars.
Sent from my SM-G900I using Tapatalk
cavx
Master Member
Actually you run vacuum pump oil around the seals. That way if it gets sucked in, you haven't added water to the pump's oil. Remember this is suction so it won't bubble out like testing a tyre tube under water.Try brushing some soapy water around the seal when the tank is under vacuum. You might be able to see bubbles where the leak is
Sent from my SM-G900I using Tapatalk