Tomenosuke blaster assembly kit tips and tricks, help the new builders

So how difficult would you say it is to remove the plastic barrel?

I’ve blued metal parts before so I’m confident in that bit.

I mainly keep psyching myself out with disassembling the lot of it. Not to mention cutting off the barrel, lol.
 
Excuse the crappy photo, it's very hard to get a good shot of (and the fact I've only used 2 wires, 4 can still easily fit). Basically the wires can be run up between the trigger guard and magazine housing (towards the barrel) and then fed in between the small gap between the MH and barrel.

EDIT: Also ignore the wire in the magazine hole, I only put it there to keep the excess wire out of the photo

View attachment 796865

That looks like it works perfectly! Thanks for posting the photo :thumbsup
 
So how difficult would you say it is to remove the plastic barrel?

I’ve blued metal parts before so I’m confident in that bit.

I mainly keep psyching myself out with disassembling the lot of it. Not to mention cutting off the barrel, lol.

Hey,
it's not that difficult if you go calmly and slowly. you can see my step by step 2 pages earlier on that thread. I did everything with hand tool and the hardest was the metal part that reinforce the barrel. You can also cut it with a dremel of course, just go very carefully and everything should go smoothly :)
 
Slow and steady wins the race. Thanks eethan, just that little tip gives me a boost in confidence when the time comes.
 
Last edited by a moderator:
I'm surprised that Alu. Black was a disaster. I used that. Did you experience that PB was much easier to work with?
 
The aluminium black was difficult to work with and rubbed right off after dry. Perma Blue was so easy I ended up using my finger to rub it in (after having wiped with acetone) and then continued a series of long wipes as it dried. It was the easiest bluing I've done, but then again prep is 95% of the effort.

Coming from you eethan, that means a lot - thanks sir!
 
Wanted to get some quick Glamour shots of my Tomenosuke kit before it gets sent off to scottjua to be converted into a live fire! (Also got a real Steyr coming in for this.)

6c5f86725990d1b3603742e1c1eebdc2.jpg
d0c50495195c768239413476497ce104.jpg
1a07bf541a0ad8bae2b31b1ad41bae87.jpg
73705a6ade75df5dd4b253760b871ea4.jpg


Mods made:

- Painted and weathered as accurately as possible. I’ve opted for a more natural weathering on my side plates, thus the lack of weathering on them
- Blued anything gun-relates (terrible lighting makes the bluing come up much darker than it actually is)
- real Weaver Knob, Phone Binding Post, and S&W K Frame Trigger added onto blaster
- Wires added (this includes the notch into the cover to accurately run them.)
- added SD Studios Steel Barrel and Don Parks Steel Cylinder
- cut the crack into the Tomen Grips

Some things I might have Scott do once it is live fire is adjust the grips (as there is about a 1mm gap between one of them and the butt plate) as well as strip the anodization off some of the screws and accurately blue them. Maybe a new trigger guard as well, just little things to further improve it. But this thread definitely helped a tremendous amount with this build!


Sent from my iPhone using Tapatalk
 
Last edited by a moderator:
your result is really great. the color is perfect. congrats.
I read your thread and don't hesitate to do the barrel swap, you just need a metal saw, sand paper and some patience to do it as I did it ;)
 
Very nice man what did you use on the grips?

I haven't touched the grips yet since I'm waiting on Tomenosuke to replace them (they're not the right size so they've committed to re-doing them.) I believe the thing to use is Brasso, right? I haven't touched Brasso in at least 15 years and I can't remember what I used it for back then.
 
I haven't touched the grips yet since I'm waiting on Tomenosuke to replace them (they're not the right size so they've committed to re-doing them.) I believe the thing to use is Brasso, right? I haven't touched Brasso in at least 15 years and I can't remember what I used it for back then.

Brasso works very well indeed and I used it on my build years ago.
That said, the colour needs to be changed a little because Brasso in its natural state is a cream colour whereas the hero blaster grips have a slight tinge of dirty green in them.

PKD001.JPG
 
What acid free oil do you reccoemnd for soaking? Thanks!

Looks like nobody ever answered this for you. Did you ever figure it out for yourself? If not: I used Birchwood Casey Barricade (check out step 8 on my thread for details on how I applied it), but I'm sure there are others you could use too!

By the way, for anyone who's been following my thread: I gave the instructions a pretty thorough overhaul last night! Should help out a lot of folks who are as afraid of ruining their blaster as I was before I dove in. It's really not that difficult, so check it out if you want and have fun! Can't wait to see all the new owners' builds :)
 
Last edited:
Hey guys, here is another quick "how I did it" for the real weaver knob swap.

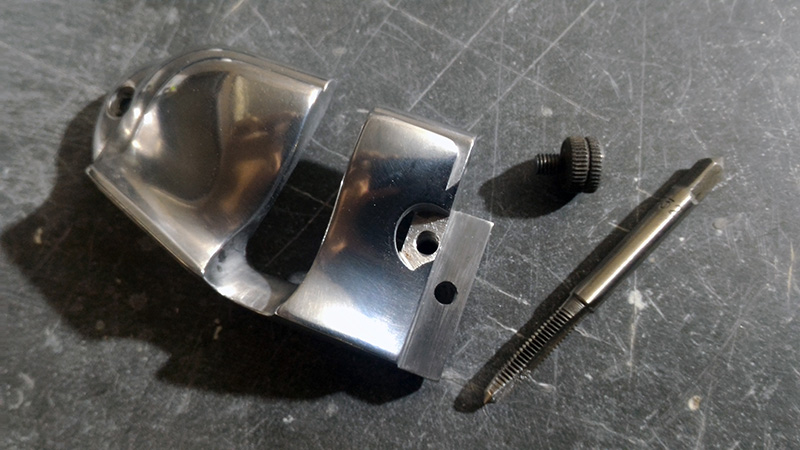
the Tomen weaver is a M4 thread, my real knob is fitting a tap hole I did with a 10/32 tap. so, you have to rethread the tomen hole.
for that, I drilled the hole with a 3.5mm bit. I think a 3.8 would be better but I didn't have it on hand. the 3.5 didn't remove all the threading and was a little bit small for the new tap bit.
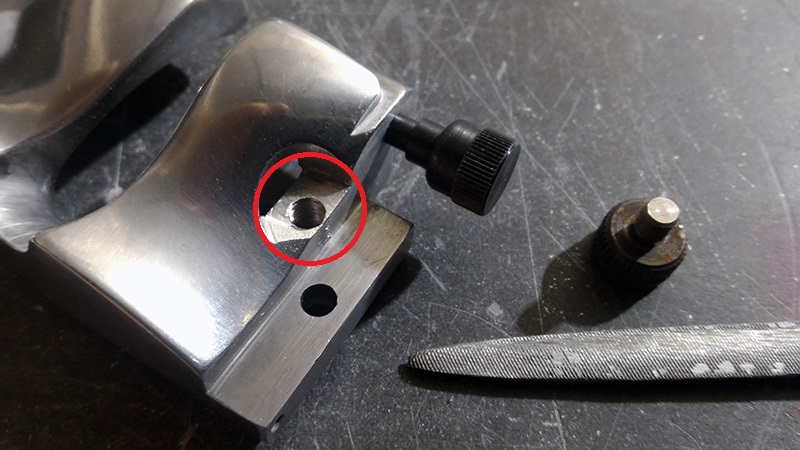
then, tap the hole with the 10/32 bit. The hole is really close to the side of the plate, in my case the new threading is visible from the outside. I don't think it can really be avoided as if you drill too much to the inside of the piece, the knob will not fit its recess anymore.
weaver_01.jpg


here is the result after the threading
weaver_02.jpg


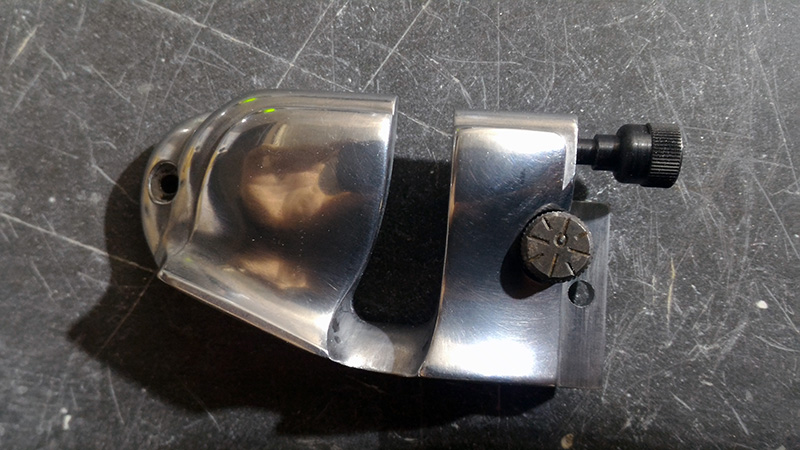
as I'm a real OCD person, I filed a tiny bit the bottom of the knob recess until the knob was threading exactly as the world con version. It really wasn't much, the threading is really fine so just a bit of filling and the knob does a half more turn
weaver_03.jpg


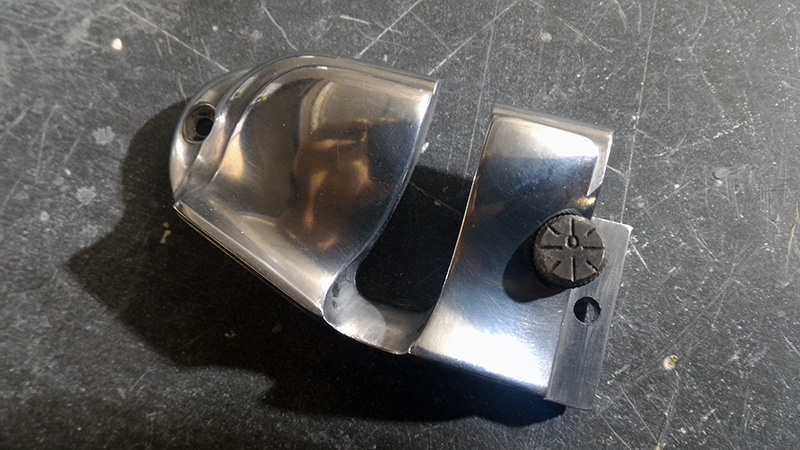
and here is the final result. really happy how it turned out.
weaver_04.jpg


I hope this can help.
As you can see, I'm really enjoying my kit build and are doing it really slowly, working on it from time to time (I got it last summer). I really enjoy working on it, so I just don't want to rush it.
cheers guys :)
 

Your message may be considered spam for the following reasons:

If you wish to reply despite these issues, check the box below before replying.
Be aware that malicious compliance may result in more severe penalties.
Back
Top