T5H
Active Member
Hi RPF,
Here's my take on this cool, but quite expensive in the end, little prop from The last Jedi. This side project went fairly quick really. In fact the only real difficulty would have been to figure out the iris diaphragm but luckily it is a "found-part".
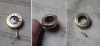
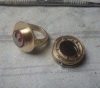
So, first step was to source that "found-part" around which this ring is built. Here you can see the specific opening/closing motion of this zero aperture iris diaphragm, and also the dual sets of fins composing it.


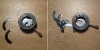
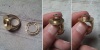
First off was to remove the inner set of fins to make room for the alliance crest. The easiest way for me to do so was to carefully drill out each of the pegs maintaining the fins in place.

Once done I removed the black coating to reveal the brass underneath. After that, I shortened the actuator to its final size.

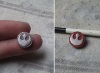
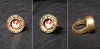
The alliance crest on the orignal prop appears to be white vinyl to me, but I chose to differ from that for my replica. It's not that I don't like the idea, but I don't have a vinyl cutter and this crest being quite small I knew cutting it by hand would yeld bad result; curves not perfectly continuous, lack of symmetry, etc... So instead I decided to make it in stainless steel because I assumed the finish would look okay. The red around the crest was painted and weathered after.

The ring and disc parts are made from brass. The crest appears slightly crooked on the original prop, so to make sure I would align it the way I wanted I built an interlock between the two parts.

The brass disc is glued on top of the zero aperture iris, which is then glued to the ring.

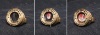
Finally, the whole ring was weathered.

Quick versus.

Cons:
- The biggest con for me is the alliance crest. I chose to use different material and construction, but on top of that I did it too big and the design isn't perfectly identical either.
- The red is too vibrant. I could probably tune it down with more weathering though.
- The part of the ring that goes around the finger seems too narrow and not angled enough.
- You don't see it here, but I couldn't resist the stupid and egocentric idea to engrave a small "T5H" inside the ring!
- The actuator channel has sharp corners instead of rounded. Not quite my fault here, the iris was advertised with rounded corners but when I received it they were sharp instead.
Pros:
- built around an accurate zero aperture iris diaphragm.
- Nice heft and finish thanks to the brass construction.
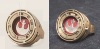
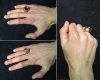
Finished ring.


Overall that was an interesting prop to create. I've always wondered how those iris diaphragms worked before, and this project gave me the opportunity to understand it. So ingenious and simple really! Perhaps I'll do a v2 someday, but not before the Blu-Ray has come out first.
Thanks for reading,
T5H.
Here's my take on this cool, but quite expensive in the end, little prop from The last Jedi. This side project went fairly quick really. In fact the only real difficulty would have been to figure out the iris diaphragm but luckily it is a "found-part".
So, first step was to source that "found-part" around which this ring is built. Here you can see the specific opening/closing motion of this zero aperture iris diaphragm, and also the dual sets of fins composing it.
First off was to remove the inner set of fins to make room for the alliance crest. The easiest way for me to do so was to carefully drill out each of the pegs maintaining the fins in place.
Once done I removed the black coating to reveal the brass underneath. After that, I shortened the actuator to its final size.
The alliance crest on the orignal prop appears to be white vinyl to me, but I chose to differ from that for my replica. It's not that I don't like the idea, but I don't have a vinyl cutter and this crest being quite small I knew cutting it by hand would yeld bad result; curves not perfectly continuous, lack of symmetry, etc... So instead I decided to make it in stainless steel because I assumed the finish would look okay. The red around the crest was painted and weathered after.
The ring and disc parts are made from brass. The crest appears slightly crooked on the original prop, so to make sure I would align it the way I wanted I built an interlock between the two parts.
The brass disc is glued on top of the zero aperture iris, which is then glued to the ring.
Finally, the whole ring was weathered.
Quick versus.
Cons:
- The biggest con for me is the alliance crest. I chose to use different material and construction, but on top of that I did it too big and the design isn't perfectly identical either.
- The red is too vibrant. I could probably tune it down with more weathering though.
- The part of the ring that goes around the finger seems too narrow and not angled enough.
- You don't see it here, but I couldn't resist the stupid and egocentric idea to engrave a small "T5H" inside the ring!
- The actuator channel has sharp corners instead of rounded. Not quite my fault here, the iris was advertised with rounded corners but when I received it they were sharp instead.
Pros:
- built around an accurate zero aperture iris diaphragm.
- Nice heft and finish thanks to the brass construction.
Finished ring.
Overall that was an interesting prop to create. I've always wondered how those iris diaphragms worked before, and this project gave me the opportunity to understand it. So ingenious and simple really! Perhaps I'll do a v2 someday, but not before the Blu-Ray has come out first.
Thanks for reading,
T5H.
Attachments
-
 39983252601_5dcda0781a_o.jpg146.8 KB · Views: 94
 -
 39085611975_14760989f7_o.jpg244.1 KB · Views: 109
 -
 39085611055_5c43c213b7_o.jpg258.5 KB · Views: 124
 -
 39085609935_64065f8a97_o.jpg183.8 KB · Views: 92
 -
 39085609135_7a4a8fca36_o.jpg248.3 KB · Views: 98
 -
 39983257471_d8a860e803_o.jpg186.9 KB · Views: 96
 -
 39983256631_36bf28fcb2_o.jpg176.7 KB · Views: 103
 -
 39983251991_9a1c835e33_o.jpg97.3 KB · Views: 111
 -
 39983256191_b0656dd9bf_o.jpg209.2 KB · Views: 114
 -
 39983255361_a76213cdef_o.jpg304.3 KB · Views: 229
 -
 39983254211_fe5c8a09d0_o.jpg261.5 KB · Views: 107
 -
 39983252601_5dcda0781a_o.jpg146.8 KB · Views: 86
 -
 39983252601_5dcda0781a_o.jpg146.8 KB · Views: 100
 -
 39085611975_14760989f7_o.jpg244.1 KB · Views: 88
 -
 39983252601_5dcda0781a_o.jpg146.8 KB · Views: 92
 -
 39085611975_14760989f7_o.jpg244.1 KB · Views: 95
 -
 39085611055_5c43c213b7_o.jpg258.5 KB · Views: 112
 -
 39085611975_14760989f7_o.jpg244.1 KB · Views: 96
 -
 39085611055_5c43c213b7_o.jpg258.5 KB · Views: 95
 -
 39085609935_64065f8a97_o.jpg183.8 KB · Views: 113
 -
 39085611055_5c43c213b7_o.jpg258.5 KB · Views: 97
 -
 39085609935_64065f8a97_o.jpg183.8 KB · Views: 104
 -
 39085609135_7a4a8fca36_o.jpg248.3 KB · Views: 102
 -
 39085609935_64065f8a97_o.jpg183.8 KB · Views: 100
 -
 39085609135_7a4a8fca36_o.jpg248.3 KB · Views: 84
 -
 39983257471_d8a860e803_o.jpg186.9 KB · Views: 97
 -
 39983257471_d8a860e803_o.jpg186.9 KB · Views: 92
 -
 39085609135_7a4a8fca36_o.jpg248.3 KB · Views: 96
 -
 39983256631_36bf28fcb2_o.jpg176.7 KB · Views: 97
 -
 39983257471_d8a860e803_o.jpg186.9 KB · Views: 80
 -
 39983256631_36bf28fcb2_o.jpg176.7 KB · Views: 97
 -
 39983251991_9a1c835e33_o.jpg97.3 KB · Views: 128
 -
 39983251991_9a1c835e33_o.jpg97.3 KB · Views: 99
 -
 39983256631_36bf28fcb2_o.jpg176.7 KB · Views: 85
 -
 39983256191_b0656dd9bf_o.jpg209.2 KB · Views: 90
 -
 39983256191_b0656dd9bf_o.jpg209.2 KB · Views: 95
 -
 39983251991_9a1c835e33_o.jpg97.3 KB · Views: 102
 -
 39983255361_a76213cdef_o.jpg304.3 KB · Views: 95
 -
 39983256191_b0656dd9bf_o.jpg209.2 KB · Views: 91
 -
 39983255361_a76213cdef_o.jpg304.3 KB · Views: 92
 -
 39983254211_fe5c8a09d0_o.jpg261.5 KB · Views: 95
 -
 39983255361_a76213cdef_o.jpg304.3 KB · Views: 100
 -
 39983254211_fe5c8a09d0_o.jpg261.5 KB · Views: 85
 -
 39983254211_fe5c8a09d0_o.jpg261.5 KB · Views: 99
Last edited by a moderator:
")