Flixen! Did you have that lying around? Or did you whip that up this morning? Either way, that was fast!
You are using an out of date browser. It may not display this or other websites correctly.
You should upgrade or use an alternative browser.
You should upgrade or use an alternative browser.
Studio Scale (:p) AT-AT
- Thread starter MonsieurTox
- Start date
Flixen
Well-Known Member
Wow !! You don't miss a thing! I was working with a non-CNC lathe that had a lot of slop in it unfortunately, so it was hard to keep it as consistent as I would have liked. It's pretty darn close - just a hair's width here and there.
Thanks.
Mine is manual too but I have digital caliber on it that helps quite a lot with things like that.
Something like this.
http://www.dropros.com/DRO_PROS_Lathe_Digital_Readouts.htm
Ah and buy the way thank you a lot for all the info u are providing us.
That really helped.
Last edited:
MonsieurTox
Master Member
Thank you John, this is great info !
Great job Matt and Felix, you do not lose any time haha")
Great job Matt and Felix, you do not lose any time haha
dragnink
Well-Known Member
It's what Felix did that counts though, that's a useable part and not just 1's and 0's. Looks great Felix.
If we had measurements to go by from the start, the armature would've been done a long time ago.. but that would've saved me from all the fun.
I'm thinking the originals may have had some shrinkage, so after they're cast they may be between 1mm and 1/32". Comparing a kit part to
the master should help with that.
Thanks John, maybe we should go with 1 1/16". Ours will be cast in flexible PU, that should let the armature squeeze against the walls and provide a little "give" I'm guessing.
Last edited:
MonsieurTox
Master Member
That would be great if they were a tad smaller after shrinking lol, 0.5 mm smaller would fit the head I made better ! Happy to know I was pretty close though
Happy to know I was pretty close though Flixen
Well-Known Member
Thanks guys.
Matt don't put your self down. U have done some outstanding work!
This project wouldn't be possible without you.
J
If you want I can make the master a bit small.
Now it's exactly 57,15mm.
If we make it 57 or 56,9mm that should be fine including the shrinkage.
Matt don't put your self down. U have done some outstanding work!
This project wouldn't be possible without you.
J
If you want I can make the master a bit small.
Now it's exactly 57,15mm.
If we make it 57 or 56,9mm that should be fine including the shrinkage.
dragnink
Well-Known Member
Thanks Felix,
I think this is too much project for anyone to handle alone (well besides north3
so we'll rely on each other to get it done.
I'm throwing some extra tubing into the package I'm fwd'ing to Quincy in case
you want to cut them even more precise than I did. I started cutting a notch in the side of one piston but
don't have the right equipment or trust in my skills to do it right so I included a diagram with measurements.
There should be enough extra round rod stock incl. to use for the top section of the foot/ankle damper too when
we get to that.
Last edited:
MonsieurTox
Master Member
Thanks guys !
Oops missed your post Jon !
Thank you ! Yeah there are a lot of parts, mainly on the Harrier, that have been found some weeks ago.
The bumpy lump is scratched (I think it was too on the original).
Cant speak about the legs myself, but I know Matt is cooking something awesome and that Felix is ready to mill some aluminium !
Some more pics.
Cheek gun master :
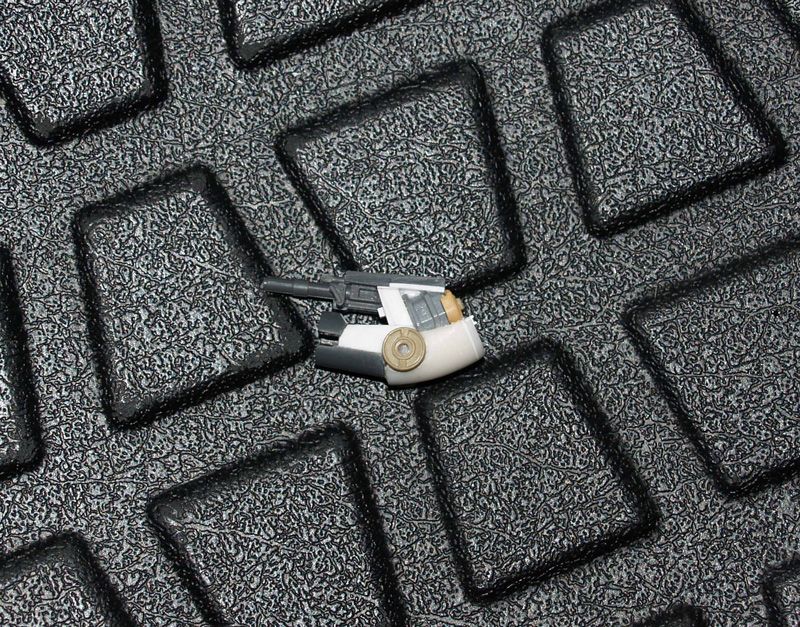
In place on the model (I drill the hole for the pivot on the right side too low will have to correct that !)
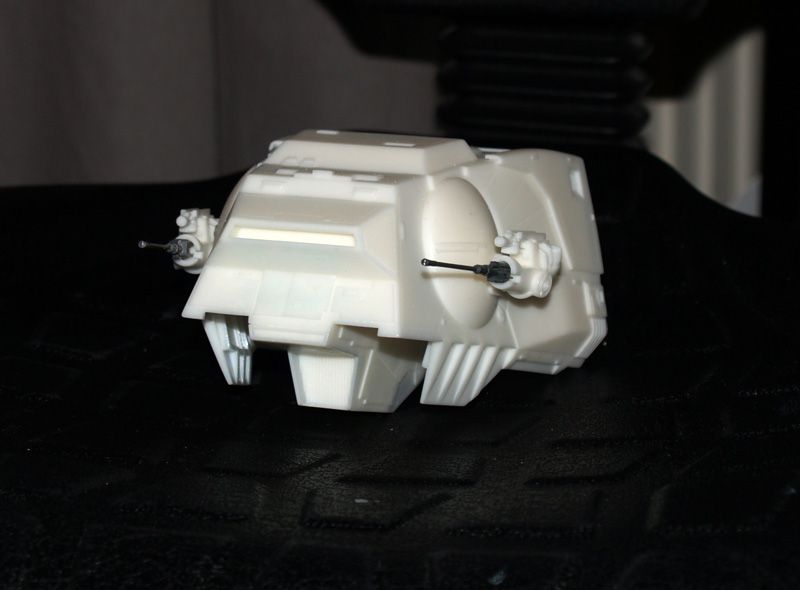

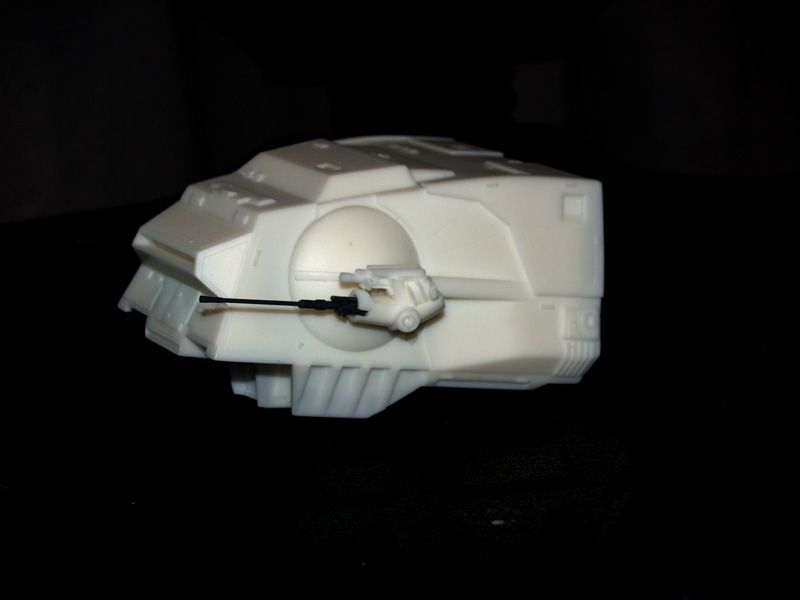
Much more accurate than the crappy MR guns !
looking really good ! im especially looking forward to watching you paint it , so i can pick up some tips !!
everytime i catch up with your work , i see all the parts ive never seen / noticed before , particularly on the harrier parts !
is the bumpy lump along the top made by yourself or a kit part ? i could never figure it out so just made it
how are the legs coming along ?
i still think you will finish before me !!!!!!
http://www.therpf.com/f11/atat-w-i-p-107841/
Oops missed your post Jon !
Thank you ! Yeah there are a lot of parts, mainly on the Harrier, that have been found some weeks ago.
The bumpy lump is scratched (I think it was too on the original).
Cant speak about the legs myself, but I know Matt is cooking something awesome and that Felix is ready to mill some aluminium !
Some more pics.
Cheek gun master :

In place on the model (I drill the hole for the pivot on the right side too low
will have to correct that !)


Much more accurate than the crappy MR guns !
Those guns really liven it up. Sexy stuff!!
Have the gun parts been ID'd yet? Can you share what parts make them up? Just out of curiosity I'd like to know. That's an awesome assembly.
Have the gun parts been ID'd yet? Can you share what parts make them up? Just out of curiosity I'd like to know. That's an awesome assembly.
MonsieurTox
Master Member
Thanks Scott,
Flakvierling38, Nelson, Mobelwagen, nothing new... except the rear which is from the Entex Porsche. The rest was scratchbuilt on the original using tubing and stock styrene.
I miss one small part though, but there is no good pic of it, I tried to take some but they dont help. And on the MR it's covered with snow.
Thanks Scott,
Flakvierling38, Nelson, Mobelwagen, nothing new... except the rear which is from the Entex Porsche. The rest was scratchbuilt on the original using tubing and stock styrene.
I miss one small part though, but there is no good pic of it, I tried to take some but they dont help. And on the MR it's covered with snow.
Send me a pic of what your missing if you can, I've some AT=AT shots and an none snowed up MR
MonsieurTox
Master Member
Send me a pic of what your missing if you can, I've some AT=AT shots and an none snowed up MR
Guy, this is this part :

Came out great!
That small plate on the forward area of the flakvierling you're looking for reminds me of the one that sits under the front of the harrier engine. Too bad
it's such a crusty mess now that almost all the surface details are hidden.
Yes but it is way smaller
I found a part from the Marder 1A2 that could be the part, but there is no way to tell if that's correct or not. Telepathic
Active Member
Hey Julien, great work on the AT-AT. Do you think the part you are looking for is this one?

MonsieurTox
Master Member
Hey Julien, great work on the AT-AT. Do you think the part you are looking for is this one?View attachment 306058
Thanks Don and Helio
Helio, I dont think that's the part, but actually I dont know what Im looking for !
Nice little greebly, never seen it, how big is that ?
Telepathic
Active Member
Hey Julien, that part is actually used on the snowspeeder, it's from the mobelwagon and it is about 15 X 8 mm.
Similar threads
- Replies
- 11
- Views
- 1,186
- Replies
- 0
- Views
- 326