JeffZugale
New Member
Hi everyone! Now that it's done and I've given this gift to my father-in-law, I can finally show this Oscillation Overthruster! This is my first completed prop replica build, though not the first one I started - I had to put a couple of game prop guns on hold to get this done for Xmas. ")
Before anything else, I'd like to first extend my most sincere thanks to morganthirteen for sharing his amazing OO build, which I referenced very very heavily, and also to docatomic whose design orthos really helped me get started with basic shape and size info. Having these guys blaze the trail was a tremendous gift, and I am deeply indebted to their generosity. Now, the pix!
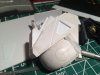
"Beauty" side shots:


Top view:

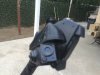
Back view:

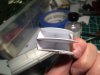
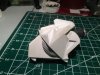
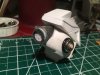
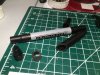
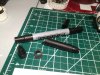
I built this mostly out of sheet styrene of various thicknesses from .010" thru 1/8", with a few metal washers, M2 screws, wood dowels and acrylic rod for the pins, assorted wire bits and some stick-on rubber "feet". It took about 120 hours to complete, because I was learning as I went... the next one will be a LOT quicker!
My father-in-law is a huge BB fan, and my wife and I both gave him BB gifts - here's the happy recipient!

Hope you like it! I had a lot of fun building it and I'm really happy with how it turned out. Stay tuned to this thread, as I photographed the entire process and I'll be posting everything unless you all yell at me to cut it out.
Before anything else, I'd like to first extend my most sincere thanks to morganthirteen for sharing his amazing OO build, which I referenced very very heavily, and also to docatomic whose design orthos really helped me get started with basic shape and size info. Having these guys blaze the trail was a tremendous gift, and I am deeply indebted to their generosity. Now, the pix!
"Beauty" side shots:
Top view:
Back view:
I built this mostly out of sheet styrene of various thicknesses from .010" thru 1/8", with a few metal washers, M2 screws, wood dowels and acrylic rod for the pins, assorted wire bits and some stick-on rubber "feet". It took about 120 hours to complete, because I was learning as I went... the next one will be a LOT quicker!
My father-in-law is a huge BB fan, and my wife and I both gave him BB gifts - here's the happy recipient!
Hope you like it! I had a lot of fun building it and I'm really happy with how it turned out. Stay tuned to this thread, as I photographed the entire process and I'll be posting everything unless you all yell at me to cut it out.
Last edited by a moderator: