STAR WARS (Samurai Boba Fett)

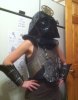
What a long and tedious weekend, Mostly because me and my wife started making some of the waist panels on Fett and Vader. Its very time consuming and repetitive so we drove ourselves a little crazy, but we managed to finish some.

photo 1.JPGphoto 2.JPGphoto 3.JPG
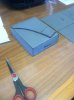
So we made them out of 1mm foam sheets and used one of those leather hole punchers to make the holes, coated it with mod podge hardener and painted then notching. I honestly thought notching the 550 cord through would be hard, but it was quite relaxing compared to the 480 holes that we had to punch, Vader's panels are even worse in total they come to about 1720 holes. In the last frame you can see some of the pieces for that monster using 6mm foam sheets for that one, and please give condolences to my wife's hands as she already has blisters after the first 420 holes lol...
 
awesome to see your progress on your boba and your vader. the chestbox i saw on your instagram looks really cool. i am looking forward to see how everything suits you. :)
 
Worked on some of the decals this weekend. Sorry for the long overdue update hopefully I get my flight suit in this weekend and some leather we have been trying to order for the flaps on the thighs, and before you know it the final strapping and fitting of everything cant wait!!!
Hope these pics can hold you guys over till then...
photo 2 (1).JPGphoto 3.JPGphoto.jpg
 
So another thing I let go for too long... But I finally finished the bucket and attached the Range finder. For the rod that flips up and down I used laser cut acrylic and the range finder itself I used some foam that I detailed and the glass eye is a from a cheap monocle I found at Michaels Craft Store.

photo 1.JPGphoto 2.JPGphoto 3.JPGphoto 4 (1).JPGphoto 5.JPGphoto.JPG
Also used some googley eyes for the extra red dots he had on there. Overall I'm satisfied, the only thing that sucks is its manual so it loses its shock factor when I move the range finder by hand... One day I will sit down at my computer and 3D model the hell out of this and come up with electrical moving parts... But since I'm on a schedule it will have to wait (sigh). Still I'd say I did a rather okay job with foam.
 

Attachments

  • photo 4.JPG
    photo 4.JPG
    120.5 KB · Views: 71
So I didn't have much time this weekend for my Boba but I didn't want to come out empty handed either haha no pun intended because I finished the gloves and hand armor this weekend! I also managed to work on the panels that are attached to the skirts around his hips. I'll definitely have pics of those up by tomorrow, but for now here are the gloves and gauntlets complete.
photo 1 (2).JPGphoto 2 (2).JPGphoto 3 (1).JPGphoto 4 (2).JPG
 
Here's the waist panels as promised cant wait for my wife to finish the leather skirts that hang from the waist belt, this Thursday I'm hoping she has them done because my girth belt and cape come in!!! followed by the pouch belt next week hopefully.
photo 1 (3).JPGphoto 2 (3).JPG There cut from 6mm foam and mod podged glued back together leveled differently to give it that layered look and then 550 cord strung thru. It was very tedious but over all Im satisfied with the work.
 
Not much of an update been kinda running around trying to get little pieces done here and there, but I was able to fabricate the utility pouches. There is a big difference from the ROTJ Boba fett's and Ronin Boba Fett. On the action figure they look like they are some type of thick leather instead of cloth and so I made them out of 1mm foam sheets and will try to add texture to them during the paint process to give them a worn leather look.

photo 1.JPGphoto 2.JPGphoto 3.JPGphoto 4 (1).JPG

Also just received in the mail my Girth Belt and Cape from Man of War studios. These are by far the best replications and materials out there I was able to buy both on Ebay for about $40 for the cape and $70 for the belt, and they are so worth it if you are thinking of doing a Boba Fett or Boba variant like myself. Now I know I'm probably going to have to go look this up on the dented helmet, but does anyone have any advice for weathering the girth belt because while it is such a awesome prop it is to red and brand new so I definitely have to weather it, any advice? The cape is a little easier so I'm not to worried about that but if you want to lend your advice Please comment!
 

Attachments

  • photo 2.JPG
    photo 2.JPG
    46.5 KB · Views: 43
  • photo 4.JPG
    photo 4.JPG
    120.5 KB · Views: 50
Flight suit came in last night and looks and fits perfect!!! Obtained by chiefsupply.com took awhile for shipping but well worth the wait.
photo 1.JPGphoto 2.JPG
 

Attachments

  • photo 2.JPG
    photo 2.JPG
    58.4 KB · Views: 40
So what a weekend only 5 more days until East Coast Comicon and hopefully this will debut, unfortunately it will be the bare minimum until I can get the jet pack and feet finished but for now it will just be the armor and helmet and weapons. Hoping to have it complete by may for other cons, but as I was stating, what a Weekend was finally able to finish off all the waist components and weather them and will be assembling them tonight when my wife finished sewing the leather skirts.
photo 2 (2).JPGphoto 1 (2).JPGphoto 4 (2).JPGphoto 3 (3).JPGphoto 3 (2).JPG
Also finished the paint job for the E-33 flint lock blaster, I think that's the official name they are calling it so that is what I'm using I guess...
photo 4 (1).JPGphoto 5 (1).JPGphoto 1 (3).JPGphoto 2 (3).JPG
I'm not a professional painter so I may have to revisit the paint job, or possibly commission someone for the job, but since I'm pressed for time I think its okay for a speed job.
And stay tuned this afternoon, pics for the upper body test fit are en-route ;).
 
Got some more done last 2 nights just putting the last finishing touch ups on everything and strapping. My wife just finished the pleated leather skirts that fall from the waist so I was able to attach the armor and pouches to them, and I almost forgot to weather some of the armor around the waist haha luckily I noticed before I started assembling things. but here is some picks of one of the skirts assembled, we'll most likely trim them down before we sew them on to the belt so they hang at perfect length. But great thanks to my awesome wife who has become quite the seamstress, couldn't have done this without her!
photo 1 (2).JPGphoto 1 (4).JPGphoto 2.JPGphoto 4 (2).JPG
Tonight we are hoping to have everything sewn together and my cape weathered and my ammo belt in so who knows, tomorrow you may see the first full body fit test ;) cross your fingers cause I sure will haha.
 
Alright so yesterday my wife was able to sew the skirts on to the belt and I assembled pretty much everything.
photo.JPG

I was also able to take the cape and girth belt that I had purchased form Man Of War Studios and I painted and weathered them I think I may have to redo the girth Belt but for now it will have to do I'm actually really pleased with the cape. Since this is the first body test fit and technically the first weekend I will be debuting this project I felt a little rushed so I will most likely go back redo some things, and obviously as you can see a lot of things are missing like the shoes, jetpack, sword, and some other pouches but over the course of the next 1-2 months I'm hoping to finish these Items. So for now lets just call this Ronin Boba Fett version 1 ;).

photo 2 (1).JPGphoto 2 (2).JPGphoto 3 (1).JPGphoto 5.JPGphoto 2.JPG
 
That looks so cool. I couldn't bring myself to spend $100 on the figure, but I thought it was such a clever spin on the franchise. Your costume captures the wow factor of the figure perfectly.
 
This thread is more than 7 years old.

Your message may be considered spam for the following reasons:

  1. This thread hasn't been active in some time. A new post in this thread might not contribute constructively to this discussion after so long.
If you wish to reply despite these issues, check the box below before replying.
Be aware that malicious compliance may result in more severe penalties.
Back
Top