Tom's Resin Obi Wan Prequel Saber

thd9791

Master Member
RPF PREMIUM MEMBER
Hi guys!

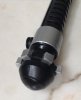
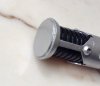
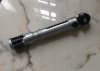
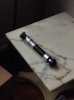
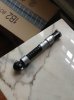
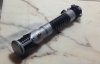
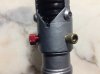
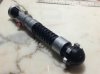
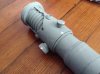
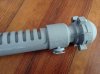
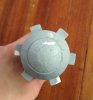
I picked this up off the bay from a guy who said he just never got around to doing more than a coat of primer - does anyone recognize the maker of the original?

I plan on cutting off any buttons I can replace wth real parts (covertech knob, a blanking cap right?) and wet sanding this thing. Does anyone recommend hand brushing the black parts over the chrome? Or will painters tape not affect the chrome paint if I wait long enough? I'm excited for this one!
 

Attachments

  • image.jpg
    image.jpg
    688.7 KB · Views: 202
  • image.jpg
    image.jpg
    1.2 MB · Views: 206
  • image.jpg
    image.jpg
    1.1 MB · Views: 188
  • image.jpg
    image.jpg
    347.5 KB · Views: 165
Last edited:
Nice catch. Add a layer of black gloss paint before chroming ... perhaps then cover the black bits with tape ... chrome and after a long time drying ... brush paint the gloss black parts into a matt or satin black? Although mine is not chrome but a satin metal finish :


Chaim
 
mmm, thats beautiful! Thanks for the tips, I'll do gloss black first, then chrome and try to make the other parts a bit satin. I'll have to find some set photos of these buttons too, i hope we know what they are lol
 
I'm looking into this saber again, I chopped off the flash on the emitter and spent an afternoon smoothing out the emitter plate. I may score a circle in the center with a compass.

do we have good photos of the original prop? Thinking of adding metal buttons!
 
Update, thanks to Chaim, I did exactly this.

I sprayed the entire thing with satin black, because we had it lying around. Then after a day or two hit the whole thing with a gloss clear coat.

This took 4-5 days to really cure. maybe dry in a day. Weird, still haven't worked everything out, but...

I was able to tape up the black parts and use chrome rustoleum to get a shinier metallic finish.
silentZ94 and I used brushes to add silver in the grip recesses and brush satin black on all the exposed black areas. currently drying, sorry for the lack of photo evidence.


I plan on cutting off both buttons once things are dry and adding a Roman knob and a brass tire valve.

pics to come shortly.

Nice catch. Add a layer of black gloss paint before chroming ... perhaps then cover the black bits with tape ... chrome and after a long time drying ... brush paint the gloss black parts into a matt or satin black? Although mine is not chrome but a satin metal finish :

http://i833.photobucket.com/albums/zz258/Sym-Cha/TPM-OB1-05_zpscdaeb1e8.jpg

Chaim

- - - Updated - - -

I may do exactly this. Missing the funds, I still want to buy a resin blaster and make my own muppet blaster, adding this saber to the list of planned projects...
Wow that's a rough casting. You could practice on that one and then buy one of my castings:D

View attachment 659622
 
Last edited by a moderator:
I should add, the trick was the cured clear gloss coat. The tape would not pull it off, since clear coats are very hard once they cure
 
So the primer that was originally on this thing kept falling off if I tried sanding. So I limited my sanding job to big areas, scribed a rough circle in the top and then began the painting process I noted above..

this is made the emitter plate basically feel like glass. Tried to get a picture of the reflective surface...the rest of the saber is a bit rough, but it's a resin prop and only my second resin lightsaber!

- - - Updated - - -

Also, really I try to remember the 5 foot rule for props. This one did its job! (With a little zoom for fun) it looks like metal!
 

Attachments

  • image.jpeg
    image.jpeg
    442.9 KB · Views: 120
  • image.jpeg
    image.jpeg
    613.8 KB · Views: 128
  • image.jpeg
    image.jpeg
    425.8 KB · Views: 130
  • image.jpeg
    image.jpeg
    455.8 KB · Views: 114
  • image.jpeg
    image.jpeg
    526.9 KB · Views: 130
  • image.jpeg
    image.jpeg
    308.2 KB · Views: 132
  • image.jpeg
    image.jpeg
    409.6 KB · Views: 121
Got my red buttons from China! I decided to countersink that extra lip and it worked out! Ended up chipping some paint in doing so. I tried re-sanding and painting troublesome areas and places where paint didn't work out, ended up cutting my losses and buffing some johnsons over the finished paint job. Not an awful prop, but this casting and its poor primer job just beat me to the punch. It looks decent and can definitely say it looks better than the stunt pictured above :)
 

Attachments

  • image.jpeg
    image.jpeg
    578.7 KB · Views: 121
  • image.jpeg
    image.jpeg
    278.7 KB · Views: 108
  • image.jpeg
    image.jpeg
    1.4 MB · Views: 121
  • image.jpeg
    image.jpeg
    1 MB · Views: 123
Yes they are! I got more than I needed for a very cheap price. They are hollow so you can technically see white inside there but nobody looks inside their lightsaber buttons lol
 
This thread is more than 7 years old.

Your message may be considered spam for the following reasons:

  1. This thread hasn't been active in some time. A new post in this thread might not contribute constructively to this discussion after so long.
If you wish to reply despite these issues, check the box below before replying.
Be aware that malicious compliance may result in more severe penalties.
Back
Top