Alien Nostromo Flamethrower build

VioletSun

Member
Hi everyone of the RPF,

I've been popping on here for years and thought it was about time I shared a build I've been working on lately. I've just recently started cosplaying at cons in the UK and decided I needed a flamethrower for my Ripley cosplay. This isn't going to be the most accurate build but I'm going to try and get the details as right as I can whilst still making this a practical prop that I can carry around all day and not get too tired out doing so.

13900351_955201624605297_6324663505410638480_n.jpg
Initial materials. A nice pine board for the core that everything else is going to be attached to and some bits of PVC and aluminium pipe.


13882670_957552337703559_7141713908988969932_n.jpg
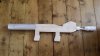
Basic shape cut and front and rear end attached, I ended up getting some thinner aluminium pipe for the front end as the PVC I'd got was too wide and too wobbly.

13876538_958391350952991_715191557602177590_n.jpg
Foamcore structure of the body starting to be built.

13932666_958873767571416_117348768441422431_n.jpg
Foamcore all on

13880320_960575414067918_7810592140632447875_n.jpg
Next on was sheet styrene over the top of the foamcore. I wanted a prop that was going to be lightweight, tough and still look good. The foamcore gives a nice sturdy base and the sheet plastic helps protect the foamcore. I could have just built up the styrene on its own but I hate how obviously hollow that feels.I think this construction is going to give me something that's going to look nice and be sturdy enough for me to carry around all day and get a bit thrown around in transport.

13902535_962881180504008_4021526768855286022_n.jpg
Starting to finish up some of the detail parts. I'm not entirely happy with the way this front emitter is looking right now but I'll wait until I've got some milliput in there to smooth things out before I decide I want to re-do it.

14051821_962881210504005_2589568212445500441_n.jpg
A shot of the cut out of the side and the upper box. I'm currently waiting on payday before I get more materials. Managed to find some square cross-stitch mesh that looks nearly exactly what the grill pattern of this box has. Also found some water pistol tanks that look like they'll be approximately the right size to make the two hanging tanks out of.

More to come of course!
 

Attachments

  • 13902793_955871987871594_3307468213794872113_n.jpg
    13902793_955871987871594_3307468213794872113_n.jpg
    105.4 KB · Views: 301
Just a little update. Funds have run a little dry for hobby projects but I've managed to snag a couple of water pistols who's tanks are about the right size for my flamethrower build. The tops are unfortunately a little squared off so I think trip to my local supermarket with a pair of calipers is going to be in order!

2016-09-01-18-00-48.jpg
 
I decided the top of the tanks was too squared off to bare. I bought some cheap 500ml bottles of lemonade that had approximately the right curve to be spliced on to the end of the water pistol tanks I'd bought. Added bonus being that I'm going to use the lids to the bottle as the attachment to the main body of the flamethrower so I'll be able to unscrew them for transport.

14163958_10100498058725166_847319788_o.jpg

I've made a little progress with some of the rest of the hardware. Added the rear sling mounting point. This is firmly screwed in to the wooden core so should easily be able to take the weight of this prop.

14163926_10100498058805006_176152096_o.jpg

Also got the mesh cut for the front part of the weapon. I've still got to add the edging and such but I feel like its getting there slowly.

14215318_10100498058814986_543092040_o.jpg
 
Another little update. Some more detailing going on.

Made the side plate for the left side and stuck a few of the larger details on. You can also see the edging on the meshed section.
14233748_10100500946004036_375592458_o.jpg

Right hand side plate. I've since adjusted the height of where the pipe sits as I thought it was too high. I've actually managed to obtain the found greeblies from the hornby raised pillars set on ebay so they'll be going on once I've got them.
14182289_10100498179762606_1151069053_n.jpg
 
Time for another little update.

14233132_983476598444466_5678000625447369223_n.jpg

The right of the gun is getting a bit of love this time. Added the old Hornby railway pieces to the side. Still need to find a 45 degree piece to finish the thicker pipe on this side but its starting to come along.

20160909_021001.jpg

20160909_021029.jpg

This is my solution for the 'red' tank's attachment. The shape isn't 100% accurate to the screen prop but will make it nice and easy to remove it for transport. The copper pipe T-joint is going to be attached to the main body of the weapon with an aluminium bracket that I've yet to make.
 
Yep, there's a lot of greeblies on that flame-thrower, but so far it's getting there for sure. How heavy do you think it's going to be?
 
Yep, there's a lot of greeblies on that flame-thrower, but so far it's getting there for sure. How heavy do you think it's going to be?

So many details but it'll be worth it. Currently its incredibly light, less than 1.5kg. Intentionally making it as light as I can so I don't break my back carrying it around at conventions.

2016-09-11-21-56-12.jpg

Finally starting to make progress. I think getting the tanks on has made a huge difference. Definitely forgot to put on one of the loose plates on the front in this shot. D'oh!

20160911_154710.jpg

This is the bracket I made to attach the copper T-joint to the wooden core of this prop.
 
This is looking great!

If you don't mind me asking - How did you manage to cut the small rings of pipe on the barrel and still keep them a consistent width?
 
Tiny update. Things are moving along with this prop but in very un-spectacular fashion. A lot of filling and sanding and not a lot of bit noticeable changes. I've ordered a few more bits I need to add some details though so we'll see how it goes.

Couple of places I've made some progress:

20160922_193004.jpg

Added the smaller tube to the right hand side. Gods be praised for copper plumbing parts in the multitude of sizes.

20160922_193117.jpg

Starting to build up some of the valve detail too. All sheet styrene along with a knob from a radiator that I noticed sticking out of a skip.


This is looking great!

If you don't mind me asking - How did you manage to cut the small rings of pipe on the barrel and still keep them a consistent width?

Thanks! They're not as accurate as you might think. There was no real trick to it. They're were just cut with a hacksaw and then sanded down by hand.
 
Looking good! Keep up the great work.

Thanks very much!

Had a really busy week last week so didn't really get much done. This week is going to be hard going to so prop work is going to slow even more.

Having said that I managed to get some plumbing olives and I've slid them on to the pipes to try and emulate the detail on the original. Not at all the same but definitely adds some of the same sort of look. What do people think? I'm not entirely happy with either pipe. I might try and cut some thin plastic disks to mix in with them to try and break up the detail even more.

14463132_999353193523473_5370326235473177084_n.jpg
 
It's true that the "ribbing" of the pipes seems too thick, but it goes with the overall look of the weapon...I mean it's you who has to decide if you're happy with the effect or not.:)
 
Thanks! They're not as accurate as you might think. There was no real trick to it. They're were just cut with a hacksaw and then sanded down by hand.

Thanks, they def look the part.

The ribbing, I can see your point - For the thicker pipe you could go with a few less in the middle if they're bothering you, but I think they'll look fine once you get it into primer.

Looks good!
 
Fantastic work! Very clean looking and good use of parts. I've been considering trying this build from scratch as well, but I have yet to start anything. This is rather inspiring! :)
 
This thread is more than 4 years old.

Your message may be considered spam for the following reasons:

  1. This thread hasn't been active in some time. A new post in this thread might not contribute constructively to this discussion after so long.
If you wish to reply despite these issues, check the box below before replying.
Be aware that malicious compliance may result in more severe penalties.
Back
Top