HALF-LIFE 2 - Gravity Gun - Realistic Replica - 18.12. - VALVE HIT ME UP!

Re: HALF - LIFE 2 - Gravity Gun Replica - 20.07. - Rusting and painting! Ton o'Pics!

How's everybody doing?
Just passing by, leaving progress here... :)

Finally I manged to get started working on the rear and main handle of the gun. I wasn't sure which material to use first but then I remembered I had this layered and glued piece of wood lying around somewhere. I quickly measured out all the dimensions and it was PERFECT!

This piece constists of 46 layers of ash-tree wood which were glued together and used as somekind of base for an industrial hydraulic pump.
Finally I found good use for it! ;)

_MG_5331.jpg


Haven't really done some progress pictures while carving...
The half round milling has been done by mounting the plain wood vertically first and drilling with a forstner bit from top to bottom.

_MG_5302.jpg


I wasn't really quite sure about the shape of it so I tried to improve it by creating some kind of molds for your fingers to rest in.
Unfortunately this didn't turn out quite well in my opinion so I had to redo it again...
For those of you who wonder: the reddish bondo kinda looking stuff is wood filler to cover and fill all the areas I grinded too hollow. Urgh...

_MG_5303.jpg


_MG_5299.jpg


_MG_5305.jpg


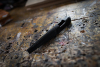
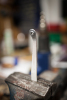
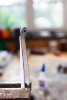
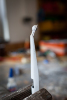
I've been frustrated quite a bit as the handle didn't turn out quite as good as I expected it to be so I've began working on the little metal shaft which gets inserted in the milled part.
Since I do not own a lathe I had to figure out a way how to create this little groove in the upper part of it. Finally it was much simpler as I thought it would be :)
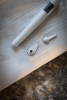
I cut two shafts from a 25mm aluminium rod and connected them by inserting a washer between and with a little help of Loctite 638; this stuff is AMAZING!

_MG_5313.jpg


Et voila! :p Lathing grooves poor people style!

_MG_5326.jpg


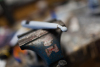
While I was working on the new handle my friend Michael passed by and handed me some pretty neat aluminum parts of pure amazingness! Thank you buddy, so frickin' much!!
This shots has been done later on so don't mind all the scratches :)

_MG_5342.jpg


I was also searching for some rubber motorcycle handles for the side attachment. To find the perfect one (in terms of look and size) it took me nearly two days until I found a girl in Lithuania via e*ay who sold one of them of her old BMW motorcylce :)

_MG_5351.jpg


In the meantime I tried the caps on the side barrels and yeah... I was in love. It's taking shape! :)
The only thing which is missing is the little round part between the end cap and the rubber handle. I will hopefully receive that by this or next week! :)

_MG_5361.jpg


_MG_5365.jpg


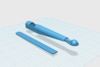
I did stop working on the handle for a few days, then went back onto it and I got it right! Finally!
This thime I chose to get rid of the molds for the fingers and make it plain and a little bit curved. I covered some areas with wood filler again since there were some indents here and there from hitting the floor when it slipped out of my hand while grinding :D

_MG_5367.jpg


_MG_5371.jpg


_MG_5374.jpg


As I'm uploading this images I see that the profile of the handle isn't nearly as perfect as I imagined it to be. Guess I have to redo some of the areas :)

And now for some overall shots what the Gravity Gun looks like now.

_MG_5378.jpg


_MG_5379.jpg


CROWBAR TIME! :p

_MG_5381.jpg


Cheer and thanks a lot for spending your time reading and looking through my built! Take care all of you! :)
Updates should follow next week!
 
Re: HALF - LIFE 2 - Gravity Gun Replica - 20.07. - Rusting and painting! Ton o'Pics!

Very good, it's looking more and more like a pro-job. Love the look and the grittiness of it all;) As for shaping handle/grip with places for your fingers to rest, I usually put 4 half tubes on a wooden base (secured with Crazy Glue and touching each other), pour Bondo on them and put that straight handle on top of the whole thing (I put 2 nails into that handle, as to make sure that the Bondo will be "sticking" to the wood). Let it dry and voilà! You have the perfect shaped grip.
 
Re: HALF - LIFE 2 - Gravity Gun Replica - 20.07. - Rusting and painting! Ton o'Pics!

:)

The idea with using half tubes is awesome, never even thought of that! Maybe in the future if I ever redo this gun :)
I also chose not having finger rests since the overall shape of the handle would be too bulky then. There are also those thin plates on the left and the right which would need to be redone to fit the rounded shape on the underside.
Maybe I will do a leather insert in the underside of the handle :)
 
Re: HALF - LIFE 2 - Gravity Gun Replica - 20.07. - Rusting and painting! Ton o'Pics!

Suprisingly I had more time than I thought first to work on my Gravity Gun :)

And I'm really happy to present you the nearly finished backside of it. First of all the handle got a nice subtle black-greyish coat and it's distressed treatment which I'm going to improve a little bit in the upcoming week since I've run out of time for this weekend. Anyway I wanted to show you the progress I've come up with so far.
The only two things left to be done are mounting the gauge on the right side which will have to wait until the end since there's plenty of electronics stuffed into it. And temporarely installing some circuit board or Arduinos is going to cause more trouble than good :)

Let's get on quickly with the update itself.
First of all I ordered some black/grey/blue-ish goat leather which I got cut into thinner and thicker stripes. Those stripes get wrapped around the upper part of the handle which is now finally attached to the Xen-canisters in the middle.

_MG_5388.jpg


_MG_5408.jpg


_MG_5411.jpg


_MG_5418.jpg


The little rounded black part on the handle's rear isn't finished yet - weathering is still missing.

_MG_5414.jpg


And now some overall stuff :)

_MG_5422.jpg


_MG_5430.jpg


_MG_5427.jpg


_MG_5432.jpg


Thanks for watching everyone! Have a nice evening! :)
Mario
 
Re: HALF - LIFE 2 - Gravity Gun Replica - 09.08. - Rear Handle Finished!!

Loving it. Seeing this outside of game screen shots makes me think it must defy the laws of physics to actually wield. Great work!
 
Re: HALF - LIFE 2 - Gravity Gun Replica - 27.06. - Huge Update! - It's taking shape!

Hey everyone! :)

Again I moved a huge step forward by finishing the main body with all it's details. Only thing which is missing is the kinda-vent-looking-thingy on the upper left side of the chassis.
You know what I mean when it's done :D
Anyway, let's head straight to the update. I won't look that much of a huge step to most of you but the amount of time I've spent on detailing the body was just rediciulous!


After filling and sanding the main body it was time to bring some textures in the plain, acrylic-plated life of my buddy...
This was done by applying some kind of bondo onto the chassis which got smaller and bigger grains of sand in it. This helps to create a wonderful texture if treated right.
I did this stuff back in my years of casemodding all the time and it's just such an effective way to spice things up quite a bit.

I wanted to create an effect which gives the impression the chassis was casted in metal which a few indents and holes here and there, knocked off areas and so on.
And even though there are seam lines which more likely speak for bent and welded metal rather for casted one I really like the idea and kept it :)

http://www.majoras-mask.com/gravitygun/_MG_4892.jpg

http://www.majoras-mask.com/gravitygun/_MG_4894.jpg


This is hard to sand down again so I was kinda nervous when slushing it all over the chassis.
I covered all threads with some screws to keep the stuff out from there.

http://www.majoras-mask.com/gravitygun/_MG_4896.jpg


I did let dry this for around 24 hours before I started using my belt sander to get most of it off the case again.
Since I applied it quite frequent on some areas I had to flatten them down again to avoid bigger bumps in the end result later on.

One coat of gunmetal sealed the deal for me and I was on to creating more details which helps to make it look distressed and weathered.
You can already see the texture it brings with it... ah i LOVE IT!

http://www.majoras-mask.com/gravitygun/_MG_4900.jpg


After that I started painting the body since I just couldn't wait any longer and it's just such an relaxing tasks between all the sanding and filling.
Notice that this is just a paintjob for testing purposes to give me a feel how it could end up looking.
The rust however won't make it for me... still need to find good techniques to make this really good looking. It's too reddish too...

But see for yourself :)

http://www.majoras-mask.com/gravitygun/_MG_4905.jpg

http://www.majoras-mask.com/gravitygun/_MG_4992.jpg

http://www.majoras-mask.com/gravitygun/_MG_4994.jpg

http://www.majoras-mask.com/gravitygun/_MG_4996.jpg

http://www.majoras-mask.com/gravitygun/_MG_4998.jpg


Please let me know what you think and don't save on criticism! I'm always open for improvement! :)

Cheeeeeers and have a nice evening,
Mario

PLEASE, for the love of god go into more detail about this bondo-sand metal process. I'm going to be working on a heavily weathered / pitted metal looking piece myself, and this is by far the most realistic looking technique I've seen.

What's the sand to bondo ratio? How fine a sand are we talking here? Do you put it on wet, or let it dry a little so it's more of a tick paste? Please, I can't be the only one amazed by this as much as I am, more info please. If you have a link to one of your previous builds with more info or to a fellow builder's build that you got the technique from that will suffice as well. Thanks in advance.
 
Re: HALF - LIFE 2 - Gravity Gun Replica - 27.06. - Huge Update! - It's taking shape!

It's all coming together...it's the little detail, like that leather strip;)
 
Re: HALF - LIFE 2 - Gravity Gun Replica - 27.06. - Huge Update! - It's taking shape!

Loving it. Seeing this outside of game screen shots makes me think it must defy the laws of physics to actually wield. Great work!

Thanks man, any updates on your ASHPD?! :)
Oh yeah, definitely! Would love to know how it would actually work haha. But thing is getting heavy, I can tell you that... 7kg's as you see it on the images.


PLEASE, for the love of god go into more detail about this bondo-sand metal process. I'm going to be working on a heavily weathered / pitted metal looking piece myself, and this is by far the most realistic looking technique I've seen.

What's the sand to bondo ratio? How fine a sand are we talking here? Do you put it on wet, or let it dry a little so it's more of a tick paste? Please, I can't be the only one amazed by this as much as I am, more info please. If you have a link to one of your previous builds with more info or to a fellow builder's build that you got the technique from that will suffice as well. Thanks in advance.

Hey @s0ulger,
Thanks to you for pointing out you like the technique and the outcome!!

This paste I used is a premixed modelling paste from Lascaux. This company has pastes with different styles of grain so you would have to choose which one fits your needs the best. If you want to achieve the look I did on the main body of the gun you're definitely want to choose "Lascaux Modelling Paste B".
There's A, B and C whereas the letters represent the strenght and the amount of grain. I felt B was perfect.

To be honest I've never seen this technique anywhere before so I can't give you any links on :)

Here's a short "how-to" which describes how I used this paste:

1) sanding and then priming the acrylics.
2) sanding the primed surface to get a sublte rough surface.
3) using a scraper to apply the modelling paste on a few areas where I want the effect to happen.
4) having it dried for at least 24h is sufficient. I tried it after a few hours and even it does feel dry and hardened don't get fooled by it. Mostly all of it peeled off when I started sanding it.
5) sanding the coated surfaces to a nearly flat area so all the indents in between the grain will reveal holes and imperfections which (when are painted) will lead you to this, casted-metal-effect.

If you have any further questions just drop me an PM and I will try to help you the best I can! :)
It's all coming together...it's the little detail, like that leather strip;)

It really does! :) Glad you like it man!
Hopefully I will get to it this week and finish the gauge :D


EDIT: barrel in place!
Covered the slots with some plastic primer to prevent the LED-strips from shortening.

_MG_5435.jpg
 
Last edited:
Re: HALF - LIFE 2 - Gravity Gun Replica - 09.08. - Rear Handle Finished!!

Thanks a lot, this got me so excited in many ways. I love Half Life, I've watched your builds in the past and they're great, and now this faux-metal technique is just amazing. The prop helmet of my dreams is really really beat up, and this by far and away will get me the results I was looking for. Painting on nicks and dents to me only goes so far, and I was gonna work on something like this, but these were the results I was looking for and really takes it to another level, the level I need it to be. Sadly that project won't get started for at least a year or so, I've got other things that need finishing, but I assure you I'll name you for this technique and tag you on that thread when I do, cuz I'm sure you'll appreciate it, so long as I get this technique right you will. Thanks again, and I'll be following this one to the end, and your others in the future as well.
 
Re: HALF - LIFE 2 - Gravity Gun Replica - 09.08. - Rear Handle Finished!!

@supermaRiio nothing to note. After many weeks of testing, researching and more testing I concluded I was unable to achieve the effect I wanted with the Barrel. So now I am redesigning a good portion of the barrel from the ground up.
 
Last edited by a moderator:
Re: HALF - LIFE 2 - Gravity Gun Replica - 09.08. - Rear Handle Finished!!

Thanks a lot, this got me so excited in many ways. I love Half Life, I've watched your builds in the past and they're great, and now this faux-metal technique is just amazing. The prop helmet of my dreams is really really beat up, and this by far and away will get me the results I was looking for. Painting on nicks and dents to me only goes so far, and I was gonna work on something like this, but these were the results I was looking for and really takes it to another level, the level I need it to be. Sadly that project won't get started for at least a year or so, I've got other things that need finishing, but I assure you I'll name you for this technique and tag you on that thread when I do, cuz I'm sure you'll appreciate it, so long as I get this technique right you will. Thanks again, and I'll be following this one to the end, and your others in the future as well.

No need to thank me, I'm always happy if I can help a fellow builder out in any way :)
Cannot wait what you're coming up with! The best of luck!!

@supermaRiio nothing to note. After many weeks of testing, researching and more testing I concluded I was unable to achieve the effect I wanted with the Barrel. So now I am redesigning a good portion of the barrel from the ground up.

Oh really?! What kinda effect have you been heading for?
You can drop me a PM, maybe we can figure something out, two brains are better than one!
 
HALF - LIFE 2 - Gravity Gun Replica - 23.08. - 3D printing and illuminating things!

Wohooo, got actually something done :D

As I'm waiting for the last cnc-lathed part to finish up the backside of the gun I managed to get the gauge going, aswell as other parts for the front.

The initial setup of the gauge is quite simple. The face itself was designed in PS, post-painted with acrylics, then printed on some sticker paper and glued onto a special kind of white opaque acrylic which I used to distribute the light of the leds. As the base I used an old manometer I had lying around and teared it apart.
Didn't do much of photographying during this process so you have to be happy with the pictures below :)

_MG_5921.jpg


_MG_5940.jpg


Since I want the whole thing to look like it has been used under the roughest conditions the glass covering the gauge of course wouldn't survive this harsh journey. So I tried to crack it up a little bit :)

_MG_5926.jpg


_MG_5937.jpg


_MG_5932.jpg


I really love how it came out although the glass will be painted a little bit to give it a dirty teint.

Since the backside is now practically finished I went onto the front and started designing the arms which are going to get mounted on the very top of the gun.
As the overall shape of them is quite... hmm I don't want to say complicated but it actually kinda is when it comes to replicating it I decided to draw it in 123D Design of Autodesk and have my buddy Harald 3D-printed them! :)
Each of them will have a RGB-led embedded in them which will be controlled by one of the Arduinos.

prongs.png


Since the printing takes it's time and I definitely wanted to stick my nose into casting this was the perfect first prototype to begin with :p
Here's the finished and raw 3D model fresh from the printer. The whole arm consists of four pieces which got glued together after sanding and filling them.

_MG_5875.jpg


Harald also did film the process of 3D-printing this very arm and the spoon which gets attached in front of it. Thanks a lot man!! :cool


First coat after sandind them...

_MG_5885.jpg


...and then they got glued together. The little spoon at the front is hollow so there's room for the led to fit.

_MG_5890.jpg


_MG_5897.jpg


After more sanding and filling the master for the final mold was ready :)

_MG_5911.jpg


_MG_5912.jpg


Now I need to cast them three times :) I will update you guys as soon as possible!

Thanks for watching and/or reading through!

Cheers,
Mario
 

Attachments

  • _MG_5921.jpg
    _MG_5921.jpg
    220.6 KB · Views: 58
  • _MG_5940.jpg
    _MG_5940.jpg
    215.9 KB · Views: 58
  • _MG_5926.jpg
    _MG_5926.jpg
    189.2 KB · Views: 64
  • _MG_5937.jpg
    _MG_5937.jpg
    184.3 KB · Views: 64
  • _MG_5932.jpg
    _MG_5932.jpg
    209.2 KB · Views: 63
  • prongs.png
    prongs.png
    321.6 KB · Views: 67
  • _MG_5875.jpg
    _MG_5875.jpg
    287.5 KB · Views: 67
  • _MG_5885.jpg
    _MG_5885.jpg
    255.1 KB · Views: 62
  • _MG_5890.jpg
    _MG_5890.jpg
    179.6 KB · Views: 67
  • _MG_5897.jpg
    _MG_5897.jpg
    178.6 KB · Views: 58
  • _MG_5911.jpg
    _MG_5911.jpg
    180.8 KB · Views: 58
  • _MG_5912.jpg
    _MG_5912.jpg
    175 KB · Views: 56
Last edited by a moderator:
Re: HALF - LIFE 2 - Gravity Gun Replica - 23.08. - 3D printing and illuminating thing

Good gauge there! Love the way you cracked the glass face. You're right, it adds to the "went to Hell and back" kinda feel. Also, with that kind of finish, the casting of that piece will be effortless. Keep up the great work:)
 
Re: HALF - LIFE 2 - Gravity Gun Replica - 23.08. - 3D printing and illuminating thing

Wow, this is looking great! Definitely love your workflow there... I'm wondering about the arms, they look like they'd be easy to find parts that existed already. Like a bent sheet metal part used for a wiper blade, and a tierod end put together.
That 6 led disc you used there... Can you share the part number?

Sent from my HTC One using Tapatalk
 
Re: HALF - LIFE 2 - Gravity Gun Replica - 23.08. - 3D printing and illuminating thing

Wow, this is looking great! Definitely love your workflow there... I'm wondering about the arms, they look like they'd be easy to find parts that existed already. Like a bent sheet metal part used for a wiper blade, and a tierod end put together.
That 6 led disc you used there... Can you share the part number?

Thanks a lot man! I did search around a little bit to find anything with a similar shape but couldn't find anything at all.
As far as the LED-disc goes, here: https://www.adafruit.com/products/2226 :)


Good gauge there! Love the way you cracked the glass face. You're right, it adds to the "went to Hell and back" kinda feel. Also, with that kind of finish, the casting of that piece will be effortless. Keep up the great work:)

Haha yeah I had hoped it would break in a nice way which it then thankfully did :)
Hmm I got quite a few issues since they were my first molds and actually all three of them didn't come out quite nice to be honest. I got a lot of bubbles trapped in there.
Unfortunately I don't have anything to pressurize or vac the resin so yeah... :( Hopefully the Xen-crystals won't cause as much trouble as these three...
 
HALF - LIFE 2 - Gravity Gun Replica - 30.08. - more CNC and painting stuff!!

Update time! :D
Altough it's not that much I wanted to show some progress here. My friend Michael passed by in my shop for some coffee to hand me the last needed machined parts I'm going to use in this build. One of the parts is this small end cap thingy which gets mounted between the main cap and the rubber handle on the left side of the gun.

First I had to align it with the bigger cap to drill the mounting holes to connect those two.
Those then were tapped with M5 threads. The little cap needed to be hollow since a switch is going to get mounted in there.
This switch then will be used to cycle between different lighting effects. I want it to be a night light later on too :)

_MG_6128.jpg


_MG_6132.jpg


_MG_6136.jpg


_MG_6138.jpg


First test mount...

_MG_6141.jpg


Then a few grooves were needed to be cut since this wasn't possible on the CNC. Was done in no time!

_MG_6150.jpg


After some good hits with the hammer it started to look used :D

_MG_6152.jpg


Now the fun part began, again ;) Weathering and distressing the whole part.
Before that though a thin layer of stainless-steel-looking paint was applied to give me good base to apply all the acrylics.

_MG_6153.jpg


_MG_6158.jpg


After a few minutes of randomly brushing and swiping different greyish/brownish tones on the cap it started to look like something.

_MG_6169.jpg


_MG_6180.jpg


_MG_6214.jpg


_MG_6185.jpg


I'm quite happy with it although it's not finished yet :)
The next part was to mount the switch in the little cap which was just drilling and tapping a hole and stuffing it in there ;)


_MG_6221.jpg


_MG_6224.jpg


_MG_6227.jpg


The little black cover for the switch needs to be increased in size a little bit, not sure how to though.
Guess I'm going to apply some bondo to it and maybe do a little casting for it. Let's see :)

Hope you guys had/have a great weekend! We had a festival here which got me quite exhausted so that's why the small update!
 
Re: HALF - LIFE 2 - Gravity Gun Replica - 30.08. - more CNC and painting stuff!!

This is... Progress eye candy. It's looking really good, as always. When will it be crystal time?

Sent from my HTC One using Tapatalk
 
Re: HALF - LIFE 2 - Gravity Gun Replica - 30.08. - more CNC and painting stuff!!

Bashing in beautiful new parts is the toughest part of the build sometimes.

Killer work.
 
Re: HALF - LIFE 2 - Gravity Gun Replica - 30.08. - more CNC and painting stuff!!

Well, look at that! Every update is getting better because your skills at painting/weathering are getting killer. Keep up the good work/beating:D
 
Re: HALF - LIFE 2 - Gravity Gun Replica - 30.08. - more CNC and painting stuff!!

This is... Progress eye candy. It's looking really good, as always. When will it be crystal time?

Thanks mate!!
Hopefully next week! :) I'm still searching for a way to make the crystals look realistic.
The way Volpin did his is amazing but I want to inhance the texture even further. Was thinking about putting acrylic stones/gems inside the mold and then fill it up with resin. Guess I will do a few test pieces and then decide what's the way to go :)

Bashing in beautiful new parts is the toughest part of the build sometimes.

Killer work.

It absolutely is. Takes quite some time to get them to the point they "melt" with the already existing gun into one object.
The rest of the gun will be painted when it's completely assembled though :)

Thanks a lot for your words, Nick!

Well, look at that! Every update is getting better because your skills at painting/weathering are getting killer. Keep up the good work/beating:D

Haha thanks man! I was just looking through my old projects when I started developing the affection for creating rusty and withered objects.
My first rusty casemod back in 2008 look so toyish, it's crazy... :D


Great you all like the build so far. I'm trying my best to keep you updated :)
 
Last edited by a moderator:
This thread is more than 8 years old.

Your message may be considered spam for the following reasons:

  1. This thread hasn't been active in some time. A new post in this thread might not contribute constructively to this discussion after so long.
If you wish to reply despite these issues, check the box below before replying.
Be aware that malicious compliance may result in more severe penalties.
Back
Top