3d printed Star Citizen civilian space suit and behring p4sc service rifle

Combust

Member
Hey all, been away from here for a long while but thought i would share something I'm currently working on for PAX Australia.

It's a civilian space suit and behring p4sc service rifle from the game Star Citizen. The model was extracted by a good friend of mine whos name shall remain blank ;) Now the story behind this is that they are releasing a FPS module at PAX and this should be part of it :) Its happening in less than a month too!.

Anyway i used Netfabb to scale it all to (almost) my proportions and then to slice everything up to fit my UP Plus 2 printer.

15224280385_59804e9c87_b.jpg15221196141_6ee5e1329b_b.jpg15223928342_66e650d32a_b.jpg

15192393696_c2158e0443_b.jpg15192389836_e874ce1399_b.jpg15028842897_6685f5cd81_b.jpg15028839217_77f3b987e6_b.jpg15028827617_a9c4caa3d3_b.jpg15210599726_d1056abaa4_b.jpg


Then i got stuck into slicing up the body. Its being printed at 3mm thick.
15037494979_0ab703c4f6_b.jpg15037591110_c5ea3fbbdd_b.jpg15214983322_e2621db02f_b.jpg15215380095_969eea9703_b.jpg15223735882_bb93ed6f61_b.jpg15221019001_6683c13e97_b.jpg15047046078_643aa8e91d_b.jpg15233632445_758ddfeb14_b.jpg15242443071_4a10cf596f_b.jpg

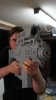
Then the back. That there is the look of "Yeah! It fits! Mostly!"
15058984778_a4b57d3d2d_b.jpg15263844721_fd1bcd64b4_b.jpg15080192909_f636ca6be7_b.jpg15080227020_1c3a6397dd_b.jpg
 

Attachments

  • 15233620505_cff861b63b_b.jpg
    15233620505_cff861b63b_b.jpg
    80.1 KB · Views: 162
And on to the helmet!
15091615780_157c411ef8_b.jpg15109337357_b214e92b4a_b.jpg15308282322_c072104641_b.jpg15296326286_3b7b711f56_b.jpg15319050842_5a7e3de818_b.jpg15132629109_15f3ef9c6d_b.jpg

AH! Ok thats better... No wait, it doesn't fit!! (This is a test fit for the visor forming buck. I made my own vac former for this project over here: https://forums.robertsspaceindustries.com/discussion/161617/my-costume-project )
15329271272_e22890a940_b.jpg15142833349_9c3e4b2952_b.jpg15143032747_57e1d08a02_b.jpg

AHA clipping in the game model! Some resizing and some guesswork later i started printing it solid. Some bondo, spot putty and primer filler later its almost there.
15144573520_9930deff00_b.jpg15169248610_a98087d408_b.jpg15344287696_0377859b87_b.jpg15180613690_30a391df6a_b.jpg

Aww yeah, look at that! So pretty!
15419196515_32a8f78b24_b.jpg15232508540_836d1c4638_b.jpg

The service rifle now got a coat of matte black, masked for silver, then masked for metallic charcoal.
15319368815_f3b1636e13_b.jpg15344291276_56026ae60f_b.jpg15232415819_baba0196ac_b.jpg


Phew! And that is currently where my build is up to.

I'm happy to answer any questions about any of the steps etc.
 
I am just trying to pep a Iron man helmet and maybe a chest reactor for Halloween (I know original right? :p ) and you are going ahead and shrugging off a brand new space suit and rifle nobody has done before. My hat come off to you sir!
Also great work on the Dart gun mod. I love seeing people do that!
Regards, The

Aww thanks man :) It is def something brand new hehe. And should be done for the FPS module being released around the time of PAX AU.

But yes, which dart blaster? I actually started modding Nerf blasters back in the day when i first started building props and things.
 
I peeled the tape off the service rifle and finished its electronics. Needless to say I'm happy with the result :)

15241201240_a65a0bf49a_b.jpg15424742311_6046b4ce89_b.jpg
15241363537_88ba9333a3_b.jpg15241217390_04e688e03c_b.jpg


And a close up of the electronics. The blue LED panel didn't need a resistor as it was already rated for 3v. The 2 red LEDs running in parallel needed just a 26 ohm resistor.
15241299198_a01533d83a_b.jpg15241125119_eab0c3f83e_b.jpg
 
I searched around the forum for a while, but couldn't find a definitive guide on finishing 3D prints. Your project looks great - do you mind posting just a bit more detail on finishing?

- You used Bondo first, before primer? I assume it's the "Automotive Bodyfiller" and not Fiberglass because the latter is too tough to sand?
- What is the product name of putty you used, hopefully it's easy to find on google and buy?
- What is the product name and kind of the primer you used, so that I can find it locally or online?
- What grit of sand paper did you used to polish, or grits if several? Did you use anything else to polish?
- For putty and Bondo, did you use sculpting tools like potter's tools? Curved brackets and such...
- What is the product name/kind of paint you are planning to use? Is it oil or acrylic?

If you can answer I would really appreciate, and I apologize if it's been asked elsewhere before - I could do with a link.

Thank you!
 
OH YEAH! Now it feels like I've made some progress!
Note: I can see through a thin crack in the test visor lol.

View attachment 384718View attachment 384719View attachment 384720View attachment 384721View attachment 384722View attachment 384723View attachment 384724View attachment 384725

More sanding for the visor buck.... ugh!
View attachment 384726

PSA for anyone who needs a heap of LEDs for a costume/project etc. Buy battery powered Christmas lights! $10, 10 LEDs and battery pack all in one. Perfect :)
View attachment 384727
 
I searched around the forum for a while, but couldn't find a definitive guide on finishing 3D prints. Your project looks great - do you mind posting just a bit more detail on finishing?
SNIP
If you can answer I would really appreciate, and I apologize if it's been asked elsewhere before - I could do with a link.

Thank you!

- You used Bondo first, before primer? I assume it's the "Automotive Bodyfiller" and not Fiberglass because the latter is too tough to sand?
Nope, I use a spray primer filler first on thick to fill the print grain. Then when its dry i sand the crap out of it. I use bondo on the large joins or rough print grain.

- What is the product name of putty you used, hopefully it's easy to find on google and buy?
I use Sepatone blade putty for the spots that need filling.

- What is the product name and kind of the primer you used, so that I can find it locally or online?
I couldn't tell you without heading down stairs lol. I'll take a photo of the brands i use and post it up here.

- What grit of sand paper did you used to polish, or grits if several? Did you use anything else to polish?
I start with 100 and end up at about 180. I don't worry so much about polish as printed things are too rough to clean up perfectly and quickly. You can do it but you (I) generally need weeks of sanding.

- For putty and Bondo, did you use sculpting tools like potter's tools? Curved brackets and such...
Nope, just a plastic and metal spatula. The trick is to do small amounts instead of covering it in thick slabs.

- What is the product name/kind of paint you are planning to use? Is it oil or acrylic?
Acrylic but nothing specific. I pick up what i need from my local Bunnings.

My process normally starts with a thick even coat of primer filler. Then when its dry i rough sand with a mouse electric sander to attack the larger areas and little squares of sandpaper to get the detail. Then another coat of primer filler and keep alternating till it looks smooth enough. If there are large areas that need filling i will use bondo, then sand, primer, spot putty, sand, primer etc.

For the vac former buck it needs to be smooth as so i follow the same steps but i keep changing the sandpaper to a higher grit.

Hope this helps :)
 
The articulated knee plates came out really well.
15434548356_914261b6ef_b.jpg15271016908_31ee439783_b.jpg15270901510_451904b658_b.jpg

Hand plates and helmet lights.
15270844529_bc0c54d517_b.jpg

Helmet forming ready to go!
15457631695_da87408607_b.jpg

Which failed (but looks decent from this angle). The joins while feeling hard, were not hard, and collapsed due to the pressure. I also had it miss-aligned so the form stretched too thin and failed so the top section didn't form.
15457627595_df96c42e3b_b.jpg15270912550_f7c8a52f20_b.jpg


For pull number 2 i changed the way the buck was laying so it had a more even area to cover, but then the plastic cooled too quickly and jammed on the buck. If this happens again I'm going to make a plaster cast and use that.

And someone asked what Primer/bog/putty i used.
15270864769_f4c430a76b_b.jpg


*sigh* It was a long day with fails. I'm breaking out the vodka!
giphy.gif
 
Good amount of work there! Thanks a lot for the finishing info. Looks like you made a form for helmet glass and poured melted clear plastic into it?
 
3d time is a charm :) Seam lines are still there, and it picked up some surface texture, though that wasn't from the forming buck.
15285928739_8bf64af0d6_b.jpg15286183408_6a86e737d2_b.jpg
15286107010_64a2f4b7b1_b.jpg


What the form and buck look like.
15285930749_6b32056d28_b.jpg15285930269_1e4eee1e83_b.jpg15285929879_429118609c_b.jpg15472810835_903cdcc84e_b.jpg


Belt detail coming along.
15472469682_cd166790aa_b.jpg15472807895_9d83909662_b.jpg


Shoulder plates primed ready for more sanding.
15472468392_220ff4d4c4_b.jpg

Rifle tip.
15472807305_f2206536d8_b.jpg
 
Shoulder plates complete and strapped.
15480501736_bc2cd85355_b.jpg

I realised my printer was sitting doing nothing so i sliced up the laser pistol (8 hour print) glued it together. I've got a 14 hour print going currently. Anyone guess what is printing this time?
15316738929_fa3aa66b16_b.jpg15316711169_1dda036c49_b.jpg


Inb4 cries of trigger discipline lol. Gonna do this for every prop i make, gun or otherwise.
15480473196_20f60a455d_b.jpg

Helmet has had all the detail (lines and screws) sanded back smooth ready for hand details and real screws.
15503625645_9e3d9aa5da_b.jpg

If anyone is interested in how i did the magnets, they are north/south rare earth. As i had to adjust the sizing everything is out of alignment. More body filler and sanding to fix this.
15500466791_17ed40961f_b.jpg15316965008_5d8aacce81_b.jpg15503267962_ac9db47ac7_b.jpg15316972208_1b354c1a2b_b.jpg15503274692_31c60d6e78_b.jpg
 
Screws done. Next up the detail lines.
15513997812_d3b2e228e6_b.jpg15327804297_c3fdbb1f2a_b.jpg15327712708_f567215eb9_b.jpg

Some good joins if i do say so :D (Top)
15514410115_6b93c2917b_b.jpg15514404665_d8702e4b37_b.jpg

The bottom joins still need some work. They were pretty rough...
15327814187_2e815e1a92_b.jpg

They are multiplying ahahahah *thunder cracks* Ballistic pistol with working mag.
15327776897_6441133c03_b.jpg15327772137_dcef7ae8eb_b.jpg15511194821_20e54efd72_b.jpg

Dat trigger discipline...
15327447709_d4ecb7f43d_b.jpg
 
I know the feeling, but this is an amazing build! I don't have anything of value to throw except my admiration of the skills on display. Definitely impressed with all of the finishing work that you are doing to push these prints over the just off the printer look that some others utilize!
 
I know the feeling, but this is an amazing build! I don't have anything of value to throw except my admiration of the skills on display. Definitely impressed with all of the finishing work that you are doing to push these prints over the just off the printer look that some others utilize!

Thanks man :) Yeah the amount of sanding involved is crazy. I have been thinking i might try skimming the prints in spot filler first and see how that goes.
 
Its looking good chest piece is really dope. I would consider counter sinking the screws on the helmet, and perhaps consider a differ style driver. Phillips/flat combo isn't very futuristic. Maybea torx or some other speciality fastener. Keep cranking away though looks rad!
 
This thread is more than 9 years old.

Your message may be considered spam for the following reasons:

  1. This thread hasn't been active in some time. A new post in this thread might not contribute constructively to this discussion after so long.
If you wish to reply despite these issues, check the box below before replying.
Be aware that malicious compliance may result in more severe penalties.
Back
Top