Deagostini Falcon. Anyone seen this?

I got billed for my second shipment last week for Issues 5 thru 8 and my binder. I got my package today and it is only the binder. There are no magazines or Falcon parts. Should I be concerned or do they ship in separate boxes? Should I be expecting another package next week?

They ship separate.
 
I got billed for my second shipment last week for Issues 5 thru 8 and my binder. I got my package today and it is only the binder. There are no magazines or Falcon parts. Should I be concerned or do they ship in separate boxes? Should I be expecting another package next week?

No worries. My binder came by itself as well.
 
Just and FYI if you are not aware additional binders can now be ordered from DeAgostini.I hope me posting this doesn't violate any rules.If so I will remove it.

Here is the link

http://www.model-space.com/us/millennium-falcon-binders.html

Has anyone here in the US received their binder yet? The one shown on the site in the link I believe is a mockup as it's a 3-ring binder. You can tell by the metal tongue at the top that opens and closes the rings... Did they change the binders for here in the US?

Just wondering...
 
Has anyone here in the US received their binder yet? The one shown on the site in the link I believe is a mockup as it's a 3-ring binder. You can tell by the metal tongue at the top that opens and closes the rings... Did they change the binders for here in the US?

Just wondering...

Yep. They suck. I am just gonna leave it and put mine in clear sleeves in a big three ring binder.
 
I got my binder on Wednesday. I thought it was my next part shipment. Color me disappointed: No parts, and the binder kind of sucks! I think I'll be doing the same as Jameth...
 
I got my binder on Wednesday. I thought it was my next part shipment. Color me disappointed: No parts, and the binder kind of sucks! I think I'll be doing the same as Jameth...


I watched the video of how the binder works, because I sure could not figure it out, and after watching I could tell the mags would get beyond trashed and I want to keep them nice.


Tom
 
My Shapeways order just arrived, including replacement grilles for the interior floor. How are people carving out and removing the old floor sections? I'm considering using a dado blade on a table saw.

I too would be interested to see how people are doing this. I'm a little nervous that after I install the new floor that I'm losing one of my mounting points to the frame on the bottom. I guess I'll tackle that when the time comes.
 
Has anyone here in the US received their binder yet? The one shown on the site in the link I believe is a mockup as it's a 3-ring binder. You can tell by the metal tongue at the top that opens and closes the rings... Did they change the binders for here in the US?

Just wondering...

Yeah I got my binder... it's not too bad and I kinda like how it works... it's a little weird to figure out, but those little pegs go in the top and bottom holes and hole the mags in place in the center of the issue where the staples are. The nice thing about it is that it allows you to look thru the mags individually without having to pull each issue out of a sleeve.
 
I too would be interested to see how people are doing this. I'm a little nervous that after I install the new floor that I'm losing one of my mounting points to the frame on the bottom. I guess I'll tackle that when the time comes.

Kokkari and Necronaut,

I cut my floor out by firstly using a drill bit in a pin vice to drill out a neat line of 5 or 6 holes close together in a row, then used an xacto blade to cut between them to create a small slot. I then used the very small saw blades that xacto make (The ones that fit into the craft knife handles, same size as the small knife blades) to cut around the perimeter of the floor. Then you can run a standard xacto blade along the edges to clean it up. Take your time doing this and do it in small sections at a time. If you start to feel impatient or tired, set it down! I also used jewellers files on the edges to help smooth them.

I would recommend this method over any power tools as a momentary slip with them can potentially cause plenty of damage before you can react. in my opinion however, the plastic is just soft enough that it shouldn't shatter, but I haven't tested that! The only power tool I would consider would be using a dremel and staying a small amount away from the edge so you can finish it by hand.

With regards to the mounting point, if it is required to keep the interior stable when fitted, my plan is to make one myself out of either styrene rod or brass tube Depending on the final weight). This is really easy to do, so don't let that put you off the 3D print floors. Just now when I place my interior on top of the hull, the corridor on the side with the small electronic bay sits on top of the recessed greeblie bay on the underside, and supports it rather well.
 
edited,

do you think these are acceptable blast marks?
 

Attachments

  • damage.JPG
    damage.JPG
    117 KB · Views: 183
Last edited:
i'm not reading any discussion at all on this monstrosity.

they are not even trying.

"indistinguishable from the filming miniature"

Yep, the "damaged" areas are poor. Certainly not indistinguishable from the real model, no one could argue that.

I wouldn't even say that this area is an essential compromise for tooling, I've seen much better on other model kits.

This sort of thing can be fixed much more easily than errors of scale or overall shape, and these areas can be improved with some putty and a lot of time studying reference pictures though, and it is not as bad as the dent on the cockpit tube, that took ages to get as close to pictures of the real thing as I could get.
 
Kokkari and Necronaut,

I cut my floor out by firstly using a drill bit in a pin vice to drill out a neat line of 5 or 6 holes close together in a row, then used an xacto blade to cut between them to create a small slot. I then used the very small saw blades that xacto make (The ones that fit into the craft knife handles, same size as the small knife blades) to cut around the perimeter of the floor. Then you can run a standard xacto blade along the edges to clean it up. Take your time doing this and do it in small sections at a time. If you start to feel impatient or tired, set it down! I also used jewellers files on the edges to help smooth them.

I would recommend this method over any power tools as a momentary slip with them can potentially cause plenty of damage before you can react. in my opinion however, the plastic is just soft enough that it shouldn't shatter, but I haven't tested that! The only power tool I would consider would be using a dremel and staying a small amount away from the edge so you can finish it by hand.

With regards to the mounting point, if it is required to keep the interior stable when fitted, my plan is to make one myself out of either styrene rod or brass tube Depending on the final weight). This is really easy to do, so don't let that put you off the 3D print floors. Just now when I place my interior on top of the hull, the corridor on the side with the small electronic bay sits on top of the recessed greeblie bay on the underside, and supports it rather well.

Any photos to show us how it came out?
 
edited,

do you think these are acceptable blast marks?

They are certainly a good start. With a little work they would come out very good and more than that you would be having fun while doing it. This is a kit to be built, its not an already made replica. Im starting to think that some here would do better just waiting for someone else to build it and then just buy it!

This is not a personal attack on anyone, but one reason I just decided to not post much here is because this excessive, senseless critics plaguing this thread. This is suppose to be a fun experience, not a stressful, obsessive, dreadful one. If the kit is not up to your expectations then just cancel the subscription, its that simple.

You can flame me as much as you wish but I just needed to put this here to try and put things in perspective.

Hell, the MPC didnt had anything in that area and I just to create them the best I could! They came out acceptable since replicating the EXACT marks from the original replice would be almost impossible.

20150222_182939 by nenekinkin, on Flickr

Just have fun guys.
 
They are certainly a good start. With a little work they would come out very good and more than that you would be having fun while doing it. This is a kit to be built, its not an already made replica. Im starting to think that some here would do better just waiting for someone else to build it and then just buy it!

This is not a personal attack on anyone, but one reason I just decided to not post much here is because this excessive, senseless critics plaguing this thread. This is suppose to be a fun experience, not a stressful, obsessive, dreadful one. If the kit is not up to your expectations then just cancel the subscription, its that simple.

You can flame me as much as you wish but I just needed to put this here to try and put things in perspective.

Hell, the MPC didnt had anything in that area and I just to create them the best I could! They came out acceptable since replicating the EXACT marks from the original replice would be almost impossible.

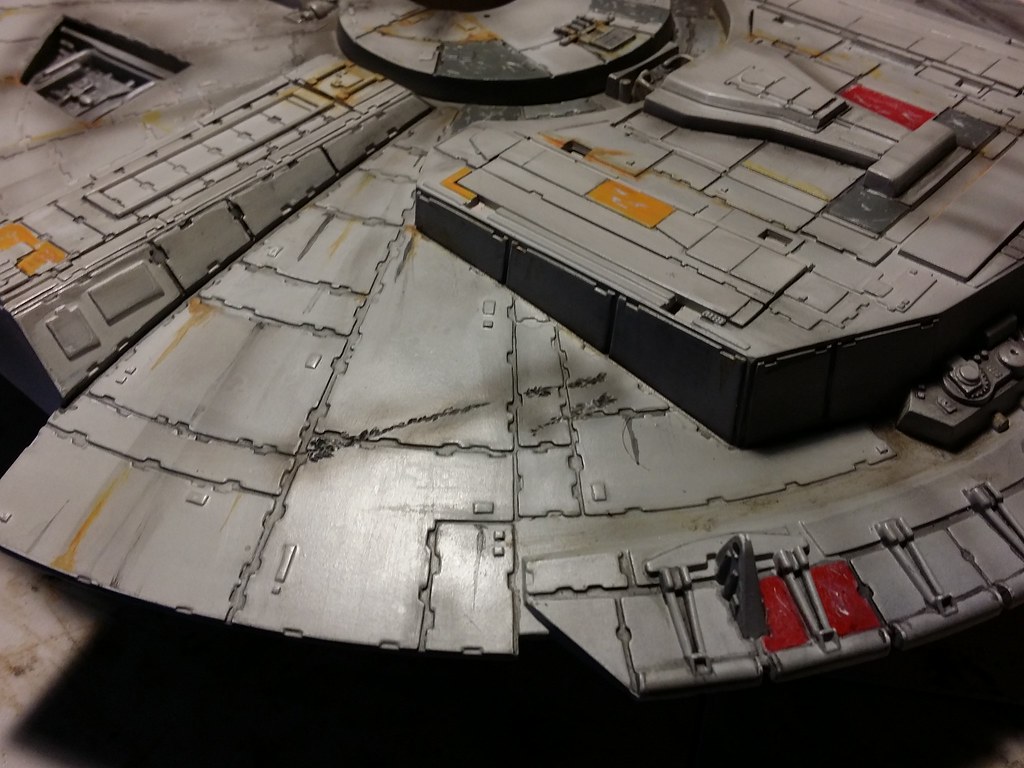
https://farm9.staticflickr.com/8584/15994944494_56b78c1f7a_b.jpg20150222_182939 by nenekinkin, on Flickr

Just have fun guys.


Amen.

Word. (Yep, still trying to bring it back)

Well said.

You da man.

As I have said several times this thing is awesome and anyone who does not think so is crazy.

Perfect,.. no but awesome!!!!!!!!!!!!!!!!!!!!! and any problems can be easily fixed.

Plus these guys are re-doing stuff like the cockpit which honestly,even after studying the real models, I don't think was a big deal and would have probably not re-done it. These guys are dedicated.

Deago rocks!!!!

Tom
 
Last edited:
True. I didn't subscribe to this model to have an exact copy of the studio ship, I subbed because this is my favorite Star Wars ship, and I can make it how I want it to be; not pay thousands of dollars to buy an exact replica. Don't get me wrong; the MR is a fine looking model but is it worth 5 or 6 grand to own? With this one, I can make it my own with my modifications and still have it be a Falcon.. or not. If I wanted, I could m make it any incarnation of this ship, including the Stellar Envoy, if I want to. No limits and no one else can tell me how to do it unless I ask for a specific idea. There is no reason for getting overwhelmed with all the minutia of the build. Just do what you want and it'll turn out good, I promise.
 
Here is a comparison of the damage on the Deago that Zorg shared next to the real deal just for giggles. If you ever look at the MR battle damage it's pretty much identical to the Deago. It personally doesn't bother me. I'm just going to cover up what I don't like with putty anyway and do it up the way I like.
damage.JPGDSC_0107.JPG
 
This thread is more than 3 years old.

Your message may be considered spam for the following reasons:

  1. This thread hasn't been active in some time. A new post in this thread might not contribute constructively to this discussion after so long.
If you wish to reply despite these issues, check the box below before replying.
Be aware that malicious compliance may result in more severe penalties.
Back
Top