FreddySchramm
Active Member


This is a custom scratch built Mando bucket I made as a gift for a Mandalorian Merc Honorary Member. Sorry for the poor quality images, These were taken a year ago when i had an older phone and I had to screenshot the process shots off my Instagram.
I wanted the helmet to be scratched built. This was before I had any 3D-printing skills so I had to think on my feet. ( ideally if I could go back I would 3d print this, but mehh that's less fun). I decided to try making it from 6mm sintra and a bike helmet. I originally traced the helmet template out of an ACE paint bucket just to get the dimensions right but decided to move onto using Sintra since it's more rigid. I transfered the templates over to the sintra sheets I found in my school's material reuse center and heat formed them around the bike helmet, sanded them, then glued with hot melt hot glue.
 .
. 
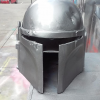
Once the body was all glued together I cut out the T visor. I figured it was best to cut it out once everything was shaped so I wouldn't get any warpage. Now that everything was glued together and I had the basic shape ,I wanted to bang it up a little. The specific look I was going for would be a damaged bumpy worn out helmet. I dented the bike helmet by putting my heat gun right up on the side and pushing the plastic in with a dowel to get the dents. I wanted to warp the sintra a little bit around the T slot as well, so I did the same thing until the plastic started to burn and turn brown, giving it a more rigid texture. After that it was onto Bondo!


I bonded the seams of everything but in certain areas like the eye slot I left a lot of high and low spots to make more scratches and dents when it was completely smoothed out as you can see in the photo of it all sanded and primed. Then Fiberglassed the inside to give it more strength. The back slots are just Bic razor tops I found in the reuse center and a BB-8 eye scanner I found in the 3d- print scrap bin.

I originally wanted to do a similar base paint job that I did on my Dalek where I spray two colors of Rustoleum Hammered paint ( In this case Rustoleum Hammard Burnished Umber and Rustoleum Hammard Rosemary) . then spray a top coat of Rustoleum Metallic rust, then sand it with fine grit sandpaper. This technique Catches the top coat in the low spots and the high spots are sanded away leaving a unique rusty texture. Here are the results:

After several tries to get it just right, I wasn't liking the way it was going and decided to try a different method ( this method is better suited for larger things). So I covered the whole thing in an iron colored paint and covered it in silver Rub N Buff. On it's own, I was really happy with how it looked but had more steps to go. It still had the hammared texture of the paint underneath it. I soaked a cloth in Mineral Spirits and rubbed High spots of Rub n buff away, leaving the rest in the low spots and bringing out that hammered texture even more.( 2 pics down)

Now that I had it looking like metal I brainstoremed the color scheme for the rest of it. I wanted to base it off a crash test dummy so I threw a picture of it into photoshop and started playing around with designs, asking for opinions from my friend who were character designers and animators. I decided in the plain caution stripes and classic arrow on the front.


I masked the helmet off with painters tape and used the old fashion toothpaste method to mask off the battle damage, Here you can see the splotchy texture from the hammared paint and Rub N buff.

Now that It was looking presentable it was time to rust it. I had just recently heard of this product by Sculpt Nouveau called Iron B metal coating. Basically an Iron paint that can rust. I loved It! The patina was so beautiful. But I kind of got carried away ad did little bit too much rust, so I used steel wool and rubbing alcohol to take it back.
Sadly I forgot to seal the rust , so when I went back to work on in about a month later it had all turned mud brown.When I put on a new coat and sealed it, It was much more difficult to get the hues of orange and red that I wanted. After about a month and a half of trying this method I gave up on it.
So if you'd like to try this method out here's my two cents
Pros:
-Looks fantastic and realistic ( Duhh, it's real rust )
Cons
-Can take a while to fully rust
-Is unpredictable in the colors you will get ( However I found it works best when you use this in an enclosed space ( an acrylic box) with a bowl of vinegar, out in direct sunlight)
-Gets darker once it's been sealed.


After sitting on this for a few months I decided to paint the rust in with acrylic paint and Cinnamon. I used a few different rusty shades of brown and red and wide paintbrush and painted over most of the muddy brown rust. I originally was going to use the cinnamon just to mimic color of newer rust that's always found along cracks and crevices, but I found it's a really useful way to mimics the texture of rust. I would dab my paintbrush onto the helmet, sprinkle some cinnamon on the wet paint, and dabb again to work it into the paint. I built it up with the different shades of red and brown and it came out fantastic. I recommend this over the metal coating if you have a specific look of rust in mind. It makes it look pretty close, you have more control of how it turns out.
Whoops almost forgot! The ear caps were3D printed ( around when I first started to figure that stuff out). I used rub n buff for the battle damage. I brought out the shine using a graphite Pencil. I normally do this for smaller models, but it gives it a nice metallic sheen none the less. The Antenna was made of found materials.
The visor is a LV 5 welding visor. I wasn't a big fan of how shiny it was so I took back the shine of it a little bit by rubbing steel wool on it. You could Hardly see anything through it after that but I figured the person I'm making it for will only have it for display purposes anyway.
 .
. 


")