The
5'-Footer project is so big... I can't get my head around it all at once. I need to do like you, and just focus on one section at a time.
I would like to start with the gun turrets, - that would get me "
stoked" on this build.
Your Quad Laser cannons look great by the way!
I also have not contributed to the Falcon builders community as much as i would like too.
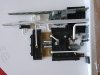
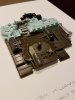
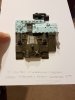
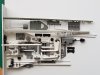
I hope I can give the Falcon builders an acceptable solution to the Kool-Shade issue.
I did make these last February. The test prints worked out great ! ...more durable than I had hoped.
As these have a pass-thru grill they are not cast able but will need to be 3D printed. ..still cheaper than real Kool-Shade.
View attachment 751238View attachment 751239View attachment 751240
Normally the Virtual Kool shade is too "delicate" as an actual "grill" ( the 3D printed material does not have the tensile strength of real metal/brass)
..But because of the ring/frame there is added strength. I was also able to add support from the back side of the grill, which remains hidden quite nicely
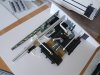
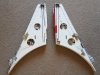
These grills are of course too "perfect". -- I need to go in and bend up the louvers, which won't take too long, got to make 6 unique rings though (each is bent-up a bit different)
I will also make some VKS for the sections along the top of the docking bay ridges.
Those will have "backing" so they will be castable and much cheaper to reproduce than 3D Printing each one.
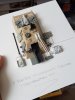
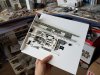
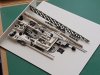
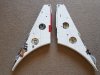
I also did some experimenting with the section of Kool Shade on the Cockpit Tunnel.
I think I can provide a convincing "castable" version of the VKS for this section which will also bring down the cost.
There is the issue of the diameter of the Cockpit Tunnel, some folks are building their's at different diameters.
View attachment 751241View attachment 751242View attachment 751243
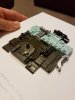
I'm not sure if there would be much interest for an affordable
Kool-Shade substitute.
The modern stuff might look just fine on the Falcon (without the 21 louvers per inch next too it, to compare too)


![20171001_180626[1].jpg](https://therpf-f28a.kxcdn.com/forums/data/attachments/428/428344-8c8edeb386ab62fc137ef38fd745fefe.jpg)
![20171001_180646[1].jpg](https://therpf-f28a.kxcdn.com/forums/data/attachments/428/428345-2054ef0d08b7af25a1d28a40f457ca00.jpg)
![20171001_180845[1].jpg](https://therpf-f28a.kxcdn.com/forums/data/attachments/428/428346-4d20d1e68b3f3902d8602b1d5f482710.jpg)
![20171001_180916[1].jpg](https://therpf-f28a.kxcdn.com/forums/data/attachments/428/428347-70014e4b34f7e95f9de0a9d15dab837a.jpg)
![20171001_183455[1].jpg](https://therpf-f28a.kxcdn.com/forums/data/attachments/428/428348-bb8a4a877dbc186138791dd902764930.jpg)
") )
)