E11 blaster from scratch 2 week build

Update ( not from the dining room table ) I’ve started doing work from the workshop, it’s not kitted out yet but it saves me from cleaning up the table every time I do a little work
i moved all my stuff from the house into the workshop last night and picked up an old computer chair from a friend, that chair you see was only a temporary joke as I couldn’t even reach the bench
6CA059D7-AF16-47CF-BE76-914701381684.jpeg

ive made the cocking lever out of 8mm aluminium and primed it
4D340653-DB27-4D19-BC00-7969968B9B24.jpeg

I’ve fixed a nut to the bottom of the trigger/grip section for the grip cover to fix to
EF495958-C3EB-420A-8B71-47319343BF3C.jpegB05EE165-4C99-426D-9162-B896DDB36EC9.jpeg

I made the pin and lever for the selector switch from aluminium, still needs a little work before it’s ready for fixing
C1864F69-1CBA-4790-8584-78207BDA611B.jpeg53140A3F-9D67-4039-8C05-0E62FB180E41.jpeg

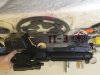
I’ve also been given some communication devices from a friend, so the wife can reach me while I’m in the workshop and see if I want a cup of tea !!! Don’t know why she can’t just shout out the back door ! I’m only 12 yards away
84D128D3-DB22-474D-8BFA-E41AC91780A2.jpeg

Thanks for looking
 
Still loving this. What do you think it will weigh when its done? Just trying to imagine the feel of it.
i will weigh it tomorrow, it’s not that heavy, it will be a great weight for trooping and nowhere near as heavy as a real sterling SMG
 
Update time

I’ve changed the colour of the bolt, originally it had sticky foil wrapped round it but I felt it was to shiny, so I peeled it off and sprayed it a metallic gun metal, slightly dulled with a bit of shine.
83465B21-1D80-4975-8CBD-C3A25156CB4A.jpeg

I also cut a channel on the underside of the bolt and stuck a small U channel of aluminium to the inside, ive done this so the bolt can slide over the 2 wires coming out of trigger into the barrel, I want to be able to slide the bolt out over the wires as it will be my battery holder
9113F94B-C14C-4F0E-9BFA-6067903916F1.jpeg

I’ve painted and fitted the cocking lever, the lever has been fitted into an aluminium tube that’s been glued into the bolt so I can remove the lever, to remove the bolt, to change my batteries ( if you follow ) why didn’t I keep it simple and not bother with electronics :facepalm
A99CFE1C-F2BE-40F0-A9DE-0069EA565ED4.jpeg

I’ve made the selector switch,I’ve finally painted and fixed the handle/trigger
3CB8FFDB-D057-4559-8987-A5C072A6ED3A.jpegB83EBB12-8992-4D2F-BB3F-DAE752A91DE6.jpeg


I’ve fed the wires for the led down the barrel inc the trigger wires, I’ve done a temp wire up and it still works
29E64598-7F1D-4D83-A450-12BEA9D6D35B.jpeg

I’ve fixed the grip with the hex nut so hopefully I should be able to remove the grip and leave the trigger section in place if I ever need to mess with the trigger ( hope not )
74B5A5C4-4C64-4D18-9EE8-65B6B9AD1F52.jpeg


This this is how it’s looking so far
91F4989A-B0B5-4F31-9FD3-D1338AC7B192.jpeg801C137A-CCAC-431C-BA8A-0DC27A147F71.jpeg

Thanks for Looking
 
Update

well its it’s nearly finished, I’ve done a couple of touch ups ( a few mor to do ) and put it all together, still looking for a battery holder to fit inside the bolt, with alterations I’ve done to it the battery holder I had doesn’t fit.
ive now got to design and build a stand, when the stand is done then I will be able to take some better pictures, but for the moment here are a few pics, I’ve still got some touch ups to do but I’m very happy with it and can’t wait to display it.
DDEDE618-CD98-4025-8A28-F5C541F257FD.jpeg4818A142-2B1A-4678-8953-C697FB465607.jpeg909A98B9-1809-447F-BC27-4AD2CBB7D9A9.jpeg177CB89A-D7C1-417E-944C-CE519A107FFE.jpeg
I’ve got a holiday to get organised for, so I’m not sure when the final pics will be posted

Thanks again for looking, your interest and kind words
 
A little update before I go on holiday
this is what I’ve designed for my E-11 stand

this is the base, 6mm aluminium imperial logo that will be painted black ( gloss or matt ) ? What’s your thoughts
94B0C159-46BC-4009-9F42-0224075ACBB7.jpeg

This is the front and back 1.5mm mirror finish stainless steel that will sit on the base.
sandwiched in between will be 8 or 10mm clear Perspex I will also be fitting red LEDs so when it’s turned on the imperial logo and E-11 lettering will illuminate red, when they have been cut I will design some sort of brackets so the blaster sits in but just above the stand, I will try to make it look like it’s floating ( ish )
At the end of the E-11 lettering placed just under the trigger I’m going to have made a blasTech serial number plaque
B18BF80D-F3C4-439E-A5A2-1818C182E6C5.jpeg

What are are your thoughts on my stand ?

thanks for looking

Edit time !!! Oops I’ve just noticed a mistake on the stand front piece, imperial logo !!! If the large outer circle stays in and then cut out, then the rest of the logo will fall away, I will either take it out so it will leave the inner logo still connected or I will draw a secondary circle on the outside about 2mm bigger and leave certain parts connected to the inner parts, when it’s illuminated it will show a 2mm outer circle as per drawing, let’s wait and see how it turns out, trial and error I suppose
 
Last edited:
Ok so I’m back from my jolly holiday, 2 weeks of catching up on the real world stuff ( work )
sooo, last night I finished up working on the drawings for my blaster stand and sent them off to be cut along with some other bits for a forum member, just have to wait for them to come back
I also fitted a battery pack inside the blaster and wired it up to the light and trigger ( no sound card as yet )

anybody got any good leads on a sound card/board supplier ? Preferably in the UK

image.jpg
image.jpg
image.jpg
 
Last edited:
Welcome back ben, hope you had a wonderful time :)

E11 is looking great!
Thanks Markus, I hope your well
I had a fantastic time, Australia’s a big place, I need more than 3 weeks to see more of it.

ive sent the drawings in for the 1.5 and 2.5 pieces to be cut, the 1mm jigsaw piece I will email the company for a quote for photo etching
 
My bits are back for my stand !!!

I’m a prized plumb !! I sent the drawing but forgot to alter the bottom section for it to slot onto the base

the base 8mm steel to be painted black
6B1C54F3-F1B3-42B1-A8A0-F24D51433A6F.jpeg

Mirror finish stainless steel front
039A48A7-E992-4D53-9240-B315FAEA3752.jpeg

The the back section is solid
image.jpg

I will be putting red plastic in between the front and back section ( illuminated)
I will also design some fixing points / brackets for the blaster for it to just sit over the stand
A0D85FB1-96BE-4E31-AB9C-96C7CADAE1E3.jpeg

You can see the stand and base together and see the look I’m going for
065CFCE4-4524-44CA-A23F-20F6AB1D33D6.jpeg

Ive now redrawn the stand so it will slot over the base

ive just taken a picture of the red plastic sandwiched between the front and back section, I think the mirror finish on the inside of the back section really makes the red colour stand out
 
Last edited:
Thanks Markus
i appreciate your kind words, knowing that a craftsman of your calibre likes my work keeps me motivated :thumbsup

Ben
 
I’ve got the recut back
the top one is the recut piece, you can see the lower edge for slotting over the base
AE8D64D2-CCDF-49EA-9D9D-BAE51B30442D.jpeg

I roughly cut some red perspex to place behind the newly cut piece
B8439D05-9575-479E-AF82-DEF040D0F85E.jpeg
6D0FA0DB-13D7-427A-8E96-E7D00192C9B2.jpeg64AFAA59-BD45-4BBD-8A94-F73F9173561A.jpeg

I don’t understand what’s going on with the orientation of some pictures


Temp fitted together
I like the mirror finish ( needs more of a polish ) it gives it a see through look to the base
 

Attachments

  • 767AC8C5-409A-4DBA-9719-83254880814C.jpeg
    767AC8C5-409A-4DBA-9719-83254880814C.jpeg
    1.9 MB · Views: 60
  • EDCAE536-32D7-4F1F-8279-E326CA3BBBBE.jpeg
    EDCAE536-32D7-4F1F-8279-E326CA3BBBBE.jpeg
    2.2 MB · Views: 70
Last edited:
This thread is more than 5 years old.

Your message may be considered spam for the following reasons:

  1. This thread hasn't been active in some time. A new post in this thread might not contribute constructively to this discussion after so long.
If you wish to reply despite these issues, check the box below before replying.
Be aware that malicious compliance may result in more severe penalties.
Back
Top