STAR WARS (Samurai Boba Fett)

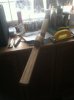
Alright got the rest of the wood beveled and sanded it down to smooth it out. I'm satisfied for now, will be filling in the gaps and grooves that didn't come out the way I waned with bondo tonight, wish me luck. First time working with bondo so hopefully its not a total disaster.
photo 1.JPGphoto 2.JPGphoto 3.JPGphoto 4.JPGphoto 5.JPGphotoDRPTFEF0.JPG
Can't wait to start on the barrel and scope.
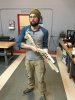
 

Attachments

  • photo 1.JPG
    photo 1.JPG
    39.2 KB · Views: 47
For your first pass if you have an electric orbital or oscillating sander it will help to quickly get your shape down then you can fill any maker low spots with your second pass. If you haven't already pick up some glazing putty to fill smaller holes and scratches. It's sold in a tube and will be right next to the can of Bondo.
 
hi there. you habe done a good job so far. you asked for infos to identify some parts.
i am currently building this boba fett armor too. so here are the infos i have.
the shoes. you were right. they are like sandals. but my thought was that they are very difficult to wear because you can slip out of them. my solution for this "problem" was to wear "tabi" shoes instead. and to modify them so look like they were sandals.
since i have no skills in building shoes, i ordered mine from amazon. unfortunatly this is a traditional shoe. they are only available in black and sometimes white. i choose mine to be black. and this leads me to the one big change on my built. shoes, pants, and......i do not know what its called...."sweatshirt" all of them are going to be black.

the pants: i use a traditional japanese "hakama" the legs of this pants are really wide and look nicely together with all the parts i build so far.
this are all the informations i got.....and these were the most difficult problems to solve in my opinion.
i am pretty new in this forum so i dont know if i should post my progress pictures in here or open my own thread....
 
Hey Radlos first off welcome to the RPF, second thanks that Information, you probably just cut my research time down in half ;). I was getting a little nervous with this build for a sec haha. Also to add to that I've seen your progress pics on your Instagram, and you should absolutely post them here! You had some great ideas when it came to the basis of the suit and to build one of these from scratch is no small feat. By the way also loved the way you did the Knee pads they looked perfect!!!
 
Last edited by a moderator:
Alright so it has been too long since I last posted!!! I hope no one thought I gave up on this haha, Anyways holidays where busy and in-between a huge snow storm, my work space being unavailable to me, and getting married! I'm finally back on track. Anyways started back up with the E-33 Blaster/ Musket here are some pics.

photo 1.JPGphoto 2.JPGphoto 3.JPG
Finally got around to cutting out the barrel and laser cutting some other components, just need to finish the scope and hit it with some more wood filler and this bad boy is ready to get a mold! I'm hoping to have the first 10 copy's made by early April and having it finance the rest of the project.
 
That blaster is looking pretty awesome! Wonderful use of laser cut, classic carving, and PVC.
This makes me want to try Boba Fett's blaster again.
 
Alright so no one has reached out to me on trying to purchase a copy of the blaster, so I will be moving ahead and going to assemble and prep for paint but just a little more sanding after I put on the last bit of filler. Also finally got that flint lock device on there, it was hell trying to design that in correldraw but with some help I finally got it sized perfectly.
photo 1.JPG
Also managed to cut out the lenses for the scope, so that will be fun having a working scope on this bad boy. Anyways hopefully more to come soon starting on the body armor next week so brace yourselves
 

Attachments

  • photo 2.JPG
    photo 2.JPG
    137.7 KB · Views: 72
Good Morning everyone! So some very exciting stuff going on, right away when I got back from my trip to Central America I ran to work station and began knocking out stuff left and right. So I put on 3 coats of primer filler on the blaster and it came out perfectly no dripping no cracking issues despite the unpleasant weather. I cant wait to start painting this baby I might wait a while longer for more suitable weather for that, but here she is the ready to paint E-33 Blaster Musket.
View attachment 595113View attachment 595115View attachment 595116

This is what the kit will look like If I ever do a mold hopefully, unfortunately I've had no request so I'll hold off on this for awhile. Tough if anyone is interested here don't hesitate to message me.
 
Also had some time to work on the Gauntlets this weekend, surprisingly my wife and I where able to get them finished. Also found a new talent of hers, she does a much better paint job with details than I do. We just need to put on second coat of the silver and also add some black wash and anti-shine, going for the rustic look that the action figure has. She is also working on her first weapon prop which will be the knife dart placed in his left gauntlet. So cross you fingers everyone and wish her luck!
photo 1.JPGphoto 2.JPGphoto 3.JPGphoto 4.JPG
Those where prior to the paint job, used 3 different types of foam. 1/2 inch foam, 6mm, and 2 mm sheets it came out a lot better than I hoped, coated them with mod podge. I've given up on plasti dip because it ruined a lot of projects of mine, and I cant even use it in the winter it just creates to many blemishes. We put down five light coats of modpodge mixed with a tiny bit of water and it produced a wonderfully flat hardened coat that sealed the foam perfectly. I definitely recommend this stuff Mod Podge hard coat in the purple jar.

photo 1 (2).JPGphoto 2 (2).JPGphoto 4 (2).JPGphoto 5.JPG
that's the left arm that has the knife dart on it.

photo 3 (2).JPGphoto 4 (1).JPGphoto 5 (1).JPGphoto.JPG
And the right arm, which houses a flame thrower I made that out of PVC pipe I believe it was 1/2 inch. Wish I could put a working flame thrower on there, but I don't think that will be con safe and the foam probably would melt to my skin :facepalm....
 
Awesome job on the gauntlets.
I still did not have time to write my own thread. Currently I am working on the mechanism which will hold the weapons on the shin guard in place :) I have finished a prototype but ran out of glue -.-
Can't wait to see more pictures of your built
 
Awesome job on the gauntlets.
I still did not have time to write my own thread. Currently I am working on the mechanism which will hold the weapons on the shin guard in place :) I have finished a prototype but ran out of glue -.-
Can't wait to see more pictures of your built

Thanks Radlos, and yeah I am absolutely dreading how I'm going to start those shins and the shin guards. All those little weapons are going to be a menace in my build hopefully I can just get them all done in one weekend. Best of luck on your end ;).
 
This thread is more than 7 years old.

Your message may be considered spam for the following reasons:

  1. This thread hasn't been active in some time. A new post in this thread might not contribute constructively to this discussion after so long.
If you wish to reply despite these issues, check the box below before replying.
Be aware that malicious compliance may result in more severe penalties.
Back
Top