hey now, that's pretty slick, and quite crafty how you stuffed that battery pack in there, I love it. That looks really good dude, well done :thumbsup Glad you got it worked out. I'm of that same thinking with battery run builds...not like it'll be on that often and for very long. This diorama though, I want to be able to have it on for extended periods of time so I'm going wall adapter for it. besides, there are going to be quite a good many lit items in this as well and batteries just aren't an option.
Hey there brother, thanks for the compliment! It's coming along, slowly. Is that a Bandai? Not so much room in those for batteries is there...I've run into that myself, frustrating huh. Those look like the really thick batteries too. Can't imagine they only go that long. Do you have the voltage paired right to the LED's? that might be your problem. I've been using LED's with a resistor that will take either from 3 to 7, or 5 to 12. If your resistor isn't right it'll either burn your LED or run out of juice real fast. Looks great otherwise. If you just press fit and not glued it, I'd take another run at the lighting. The way you have it displayed, on a stand, in flight, you could always use a two "coin" type battery holder, run the wires through the stand, and put the holder under the stand. Just put some cut sprue under the stand to raise it up just enough to make room for the battery holder, say 3/8th of an inch, then run some evergreen stock around the edged of the stand base to the table and paint accordingly. that mght give you longer battery life (lit time) and of course reposition your switch to an inconspicuous location. Let me know what you do, I'm interested to see...heck, ALL of us here are interested. Having a thread be fun and everyone sharing is what makes this great!
- - - Updated - - -
I forgot to mention...use the holders that have the two coin cells sitting side by side, not stacked, then it'll be really flat and not take up space. And if you mount it under the stand, it's easier to change out the batteries. :thumbsup[/QUOTE]
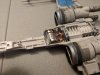
Thanks for the words of encouragement.. I actually had an hour today to crack this back open and replace my batts. Yes it is a Bandai T70 and its just press fit together so the interior is pretty accessible. I did end up removing some of the over redundant pegs and slots to make room for those LR44s bu now they are 377 batts held in place with magnets! Way more room. I also added the proper resistor after doing a calculation for the 4 LEDs i have in series instead of just throwing them in there. I will probably go ahead wire it to the stand eventually with the 1.5v coin battes underneath like you said. I actually have the holders for those already. I know it probably wont last too long with the 3x 377s but I wont turn in it on much - its really just for show every once in a while. Looking forward to seeing your final build.
Thanks again!
View attachment 817538
The switch is actually in the cockpit when closed
View attachment 817543
I forgot I had some free battle damage from the old crappy soldering iron I dont use anymore. ended up using a decal under the burn and adding some silver and smoke.
View attachment 817544
POWER!
View attachment 817539
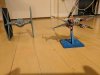
With a TIE I did something similar to.
View attachment 817541
No stand.
View attachment 817542[/QUOTE]
I just wanted to know if I was in the right ballpark size wise.