New Galactica with battle damage and a twist

Wow! I always find it so cool when people who worked on our favorite shows chime in and give encouragement! :cool

Yeah, the micro chisel is a gift from heaven isn't it!? :angel
 
Looking great!! Always good to see another BS-75 build :)

Thanks Lee. I plan on doing your images proud with this one.

Yeah, the micro chisel is a gift from heaven isn't it!? :angel

Yeah Darph, you can say that again. Definitly on my "Things to save if the house burns down" list. If I knew in the beginning what I know now, I would have saved myself a lot of time and nerves. :)


I don't know if you can see it in the pictures, but when I dug out the ribs in the neck on the port (left) I actually removed all the plastic between the ribs, my reasoning was that it would be easier to clean up and I could just use bondo to close it up again. Well that worked ok, but cleaning up the bondo was not as easy as I had anticipated. On the starboard side, I poured a bit of resin into the insided of the neck which allowed me to dig out between the ribs without worrying about breaking through to the inside. In the end that turned out much better than I could have hoped and was by far the better variation. I will add some pictures of it later.
 
Last edited:
Here is the pic that I promised in my last post. I basically just poured in about 2cc resin while holding the body at an angle and presto...

IMG_2307.JPG

I did this on the one side from the beginning, and here I sanded down the bondo on the other side to a very bare minimum and then did the same process with resin. This not only allowed me to carve out the ribs along the neck without having to worry about breaking through, It also adds quite a bit of stability. One thing to be aware of if you do this, make sure you plug up the holes where the turrents mount onto the top, otherwise resin could leak though them and you will have resin all over the top side of your model.

I also got started putting in some details between the ribs. There is actually a lot going on in there that you really do not see in the series or all the screen shots. Here is what I have going so far and a comparison shot of CGI. I tried to get some of the more prominant details (like the pipeing and some of the paneling) exactly like the CGI model, the rest is just done according to my own taste. I know I have said this many times, and every one has read it since day one... start doing things like this in a place where you don't immediatly see it to practice a bit... I do not know why I started here, I guess I was just to excited and thought what could possibly go wrong. :) Well it went ok but the panels that I put on towards the end are quite a bit cleaner as the ones in the beginning.

detail_comparison.png IMG_2308.JPG

Well that is all for now, thanks for stopping by.

IMG_2307.JPG


detail_comparison.png


IMG_2308.JPG
 
Last edited by a moderator:
That looks Great! I did something similar with mine but not nearly as detailled, just some bits of plastic glued here and there as well as some scribed panel lines,


Yours is going to look great once painted!
 
Thanks Darph, you are much too kind.
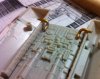
I am kind of worried about how it will look painted, I am not quite so sure if it will look as "clean" as I want it to or not. It is a heck of a fiddle working with those tiny bits of plastic. I see the ones you have on yours is about the same tiny things, so I am sure you know what I am talking about. the silver pieces are actually little pieces I cut out of a potatochip bag... I couldn't find anything else thin enough to get the look that I wanted. Counting the potatochip bag, there are about 3 different thicknesses that I am using to create the structure. I bought the Acreation decals for armor and between the ribs, but I do not think I will put them on, All of the builds that I have seen with the decals look much too dark in my opinion.
 
Like you I had bought the Acreation decals but ended up not using them (gave them to me best mate for his G), I didn't want to just put a base coat and decal. I think me getting carried away like I did on the lighting and the base may have had something to do with that! :lol
 
Last edited:
Thanks Lee, the credit goes to you though... I am just trying to copy it as best I can. ;)

Yeah Darph, I like the fine detail that you get with the decals, but the just color tone just does not fit. Depending on how motivated I am, I might cut out a couple of the individual paneling from the decal sheet and put them in here and there... but a lot of water will flow under the bridge before I get that far.

I have been fighting with myself for quite some time now with a slight problem, as I carved out the ribs in the neck region, I feel I took out a bit too much on the port side. On the starboard side, I also took a bit too much out and got the main hull curvature wrong. To be perfectly honest, I do not think anyone would have noticed it... but I would probably be kicking myself in the butt after I am finished asking myself why i didn't just fix it when I had the chance. It became a bit more of a problem now that I am detailing... the panels are sitting way to far behind the edge of the upper armor plates. Soooo after long debate with myself, I decided to correct the situation. I put a bit of resin in between the ribs on one side and i will do the other side tonight. Of course I will have to clean it up again, but I think the efforts will pay off in the end.
 
Last edited:
Ok, step by step I am getting there. I was fighting with my glue (CA) because it just wasnt working like I wanted it too and I was making too much of a mess trying to get these little pieces glued to a spot. Long story short, I am using a different glue now, one with 30 min hardening time. So far it looks pretty good, but I won't know for sure until I get a coat of paint on it. I think I have enough detail on this section of it to fire up the airbrush in the next couple of days to see if all the work that I am doing is really going in the direction that I want it to or not.

At any rate, here are a couple of shots of the current status...

IMG_2336.JPGIMG_2340.JPG

Here is a picture of the ribs that were too deep and needed to be filled in with resin and re-drilled . This is the first pass with the dremmel, I will be cleaning it out with the chisel next, but it looks much better than before.

IMG_2337.JPG

I have also been doing a bit on the engineering part. I sanded off the one piece in the middle, I will be making that new so that it looks a bit more reallistic. the two long round parts on both sides of it (one of them highlighted in red) will also be modified, but I do not know if I will have to take it all off to get the look that I want or not. I also took off the manifold tubing that goes to the top engines and replaced it with 2mm wire...

IMG_2339.JPG
 

Attachments

  • IMG_2339.JPG
    IMG_2339.JPG
    1.4 MB · Views: 172
Last edited:
UPDATE:

I had to take a break from doing the detail, so I did some more work on getting the landing bay alcoves fixed so that the landing bays can actually fit inside them. The outer hull was already sanded down to allow the bays to fit, but the alcoves are no where near where they need to be to allow the bays to fit. I had to completely detach the front end of the alcove from its back wall and then sealing it up again at a more downward position. Here are some pictures of the results...

Normal view (the red lines show where I had to sand the hull back) and Upside down:
IMG_2347.JPG IMG_2348.JPG

There is quite a big gap between the hull and the alcoves, but that should be easy enough to fill once they are permantly mounted inside.

with the landingbay:

IMG_2349.JPG

I will likely completely redo the red boxed areas, the angle of the protection panels on the hull should run more parallell to the slope of the landing bay ends.

Thanks for tuning in.​
 
Last edited:
Thanks Darph,
I wish it only added up to 'a few extra minutes'. What with family and other side attractions like work, Sometimes it is really hard to find the time to spend and knowing how much I still want to do on it, does not make it any easier. But on the otherside, the path is important, not the goal.
Nevertheless, I will be one happy camper once this girl is finished and collecting dust on a shelf somewhere. ;)
 
Update:

I got a bit done on the upper engine pods. First I sketched out where the detail was needed...

DSC01573.JPG

After filling in the inside with a bit of resin to avoid breaking through while dremmeling, (which is why the color in the cut out areas is more yellow-ish) I dremeled out the deeper parts. There are quite a few lines similar to the thruster tips. My first try to scribe them went about as good as I expected it too... very lousy. then I got an idea, why scribe them into the plastic when you can glue them to it and have everything looking perfectly in sync. I took some very thin fishing line and glued them to the plastic. When I am finished cutting the access off and there is a coat of paint on it, there should be a very nice looking ribbed pattern....
DSC01568a.jpg

Here is a shot of the detail that is going in on the top part. You cannot see it in the picture, but here I also cut some fishing line and glued it into the little recessed area....
DSC01572.JPG
 
Last edited:
Your detail work looks amazing! Can't wait to see it in primer. I have one of these queued up in my stash for after I finish the JJPrise, so following along with interest.

What are you planning to do to fill in the thruster ports?
 
What are you planning to do to fill in the thruster ports?

Hi Hugh, Thank you.
Yes I cannot wait till I get a coat of primer on her either. I am concentrating on the engine pods now, so that I can get them to the point that I can paint one of them to see how all of this really looks. I would hate to find out after doing the whole model that something isnt looking right. ;)

Regarding the thrusters, I plan to put a short brass tube in each of the thruster holes. The tube will be slightly smaller than the hole itself so it will have to have a "back wall" to support it. The tubing that I have has a good outer diameter, but the brass is too thick so I will have to hollow it out a bit more to get a thinner wall. Here is a shot of the thrusters from one of Lee's pictures, this is the look that I am aiming for...

Thrusters.PNG

As I am planning on lighting her, I am not sure how far my insanity will drive me on this... one option that I would like but I do not know if it is physically possible, would be to mold the brass tubing and then cast it in black transparent resin which would be backlit with a soft red/orange color (the color of heated metal) and then I would have a fiber optic inside the tube to simulate flickering thruster flames in a brighter lighter color. These LEDs would be set up so that I can turn them off and on when needed/wanted.
 
Last edited:
UPDATE:

I got one of the lower engine pods detailed

IMG_2360.JPG

Side view:
the lateral support beams are only dry fitted, once I am ready to attach the engine pods to the body I will have to drill a hole in the body for them to fit into. Until I shot this picture with the pod mounted, I thought the top of the pod would be a little less visible, I see now that I will need to add some paneling to the rear section and clean up or replace the casted detail.

IMG_2361.JPG

View of the bottom side:
I did not like the look of the flack cannon mounts along the side, so I removed them and will replace them at a later date.

IMG_2362.JPG
 
Last edited:
UPDATE:
I usually do not do an update back to back, but since the pod was more or less finished I was dying to see how it looked with a coat of primer... and I gotta admit.... as JaJa Binks would say, Me-sa Likes

IMG_2363.JPG

IMG_2364.JPG

This is a VERY thinned down coat, just enough to show any ugliness and cover up my alignment marks. I was expecting to see more glue smuges etc. but it looks quite good for a first try. I really like the way the added armor panels give it a bit more perspective.
The only thing that I noticed was that the thined primer did not cover the copper wire so well. I am hoping that a second coat will cure that. well at any rate, I can now go ahead with other areas.

Thanks for tuning in.
 
Last update for this weekend:

I added a bit more detail to the lower engine pod both on the upper inside and upper outside slants...
IMG_2372.JPG IMG_2371.JPG
Here is a shot of one of the upper engine pods with additional armor panels and added detail on the back end...
IMG_2369.JPG IMG_2368.JPG

and here is what it looks like with a coat of primer...

IMG_2370.JPG
 
Last edited:
Update:

I got most of the armor panels done on the main body bottom...

DSC01577.JPG

DSC01576.JPG

DSC01575.JPG

and with a coat of primer...

DSC01578.JPG

[UPDATE]: Looking back, I should have done the detail between the ribs first. The detail on the armor plates is more prone to be damage as the more protected areas between the ribs.
 
Last edited:
This thread is more than 7 years old.

Your message may be considered spam for the following reasons:

  1. This thread hasn't been active in some time. A new post in this thread might not contribute constructively to this discussion after so long.
If you wish to reply despite these issues, check the box below before replying.
Be aware that malicious compliance may result in more severe penalties.
Back
Top