Dark Trooper Project - Phase 3 Dark Trooper COMPLETE

Time to start testing and fitting stuff! We used a few straps inside the chest to make sure it sat at the right height. We did have issues with the chest trying to fall backwards and smack me in the face. We resolved this with a hook and a strap to a harness that I wore. The harness was basically just a camelpak that I had on and the strap attached to the loop in the back. It keep it from falling backwards. Also, strapping my arms in using straps was another way we kept it steady, but this caused some issues. I'm still not entirely happy with the comfort of the arms. I lose feeling way too quick, but more on that later.
20170221_222506.jpg
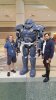
See how my arms are sticking out. This is similar to the wide body thing that MWiggs has going on.
20170221_222225.jpg
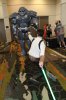
Putting one arm on with the large shoulder. It looks pretty cool I think.
20170226_000202.jpg
I look like a megaman boss.
20170228_204741.jpg
Tiny legs!
20170221_222348.jpg
Another angle.
IMG_5896.JPG
And here are the legs standing up on their own later on with the cod off.
20170228_210206.jpg
And the start of the head mount. Unfortunately, due to time constraints, we decided to settle on a fixed mount. So no head movement. It looks pretty cool with the head finally on it though. We did fix the "floating head" issue you see there too btw, I'll expand on that in a later post. Kinda feels good to see it all coming together after all of that work. Getting pretty close to the end of this whole deal!
 
This has been really cool so far. I was blown away by this build when I saw it on the Celebration livestream. Now I'm just dying to know how you got it to Orlando ;)
 
This has been really cool so far. I was blown away by this build when I saw it on the Celebration livestream. Now I'm just dying to know how you got it to Orlando ;)

Awesome Build !

Thanks guys! The thing is huge. To get it to Orlando, we had to rent a small trailer and drive it from our home state of South Carolina, which isn't terribly far. We bought a few Dewalt 61 gallon job boxes for the helmet and some of the smaller parts to try and protect them. We wrapped the bigger pieces in foam or other protective material and just hoped for the best. We packed it in with all of our other costumes and tied it down and hoped we made it all the way there without any major disasters. It survived intact but I was worried most of the way, hahaha. Unfortunately, this means we'll probably never get it to Anaheim or any other con that is not within easy driving distance. Maybe we'll get it down to Dragoncon this year if I have room in my hotel room and enough help from friends who can go. It takes up the entire room almost on it's own...
 
So most everything is done build wise at this point, though there was the matter of finishing the belt and jetpack. Unfortunately, the time crunch was starting to hit now and I don't have many pics of these two being built. Dave finished building both in Maya and the unfolding in pep looked kinda ridiculous. The belt in particular was a huge pain to build out of foam but we decided to give it a try:
20170304_185924.jpg
Look at this thing...and we had to do it mirrored as well. That was the least fun part of this other than the finishing stage...

We finished the belt and started on the jetpack. The jetpack took about a day to finish on it's own, and I don't have any pictures of that process but it came out looking awesome! In lieu of building the little round jets and nozzles, we used a couple of big in ground basins for the jets and canning funnels to do the little jets under the pack.
20170308_213719.jpg
Here's an image of the side of the jetpack and the back of the belt. You can see the white 3d printed part we drilled into the basins to put them on there. They even rotate! The little jets are not on in this picture, but the lower right corner of the pic is the surface where they would go.

With all of it built, it was time to try it all on!
20170308_213511.jpg
Looking good, but kinda skinny without the belt. Paul for reference.
20170308_214155.jpg
Here we are with the belt held up to it, we hadn't mounted it yet. We ended up going with a slotting kind of deal to attach it to the back.
20170308_213425.jpg
Here's a side view with the jetpack showing. We still have support braces to keep the shape of the big shoulders, so they are riding a little high.

A couple of things we learned from trying it on. One, it's a little top heavy which makes it a little scary being on stilts. Two, I'm not going to be moving fast in it. Three, it needs tighter supports for the leg stilts, because it's one thing to walk it just the legs and completely another to walk with all the top on. Four, the arm situation is not ideal, my arms were cramped and losing feeling way too fast to make this thing wearable for long. We would try to resolve some of these things with braces and stuff, but we really needed a good long test and we didn't have time unfortunately. I'll get to that at the end of this build thread though in my "lessons learned" section.
 
While we pondered if there was any way to fix our issues and still make it in time, we decided to start on the finishing process. Paul and I were working on deciding on a paint color that closely matched the reference material. When most people make the darktrooper, they tend to make it black or silver or grey, but it's actually sort of a blueish grey per the reference material.
20170308_214155a.jpg
Here's a pic of the color matching we attempted with photoshop...or maybe paint. I can't remember which program he used but it was just to see how it looked.

We had no issue finding a good silver and gloss black, but finding a spray paint for the major body armor pieces was next to impossible. So Paul found an online site that will color match and we found a paint chip at lowes and sent it to them. We ended up with a somewhat pricey but accurate crate of about 10 cans of "blue grey slate". So we had tested our filling process and epsiloned one of the earlier attempts at the shoulder bell. I decided to test this paint on the shoulder bell to see if it looked right.
IMG_5928.JPG
Painted and it looks sort of grey inside.
IMG_5929.JPG
And sort of blue outside. It's pretty much exactly what we wanted. We did decide it needed to be shined up a bit. We got some gloss clear coat for that. So paint is decided on! And our test piece looked pretty good using our filler and epsilon method. It was pretty strong but it seems like our method of filling might be an issue. I'll get to that though.
 
This is insanely!
You are out of control.
Im truly blown away by this build.
Your commitment and execution are of greatness.
Applauding you right now.
Robert
 
Ok, so I showed you all the test piece with the finish on it, but I don't think I ever fully explained our finishing technique for the foam pieces. As you can see, we had many many seams on each piece and some of them are horrible. Dave came up with the method of using a dremel to flatten out the sharp edges where the foam didn't necessary form a nice curve. He called this process "grinding". I'm not sure if I have any pictures of it, but the idea was to grind down the seam so it could be rebuilt into a flat or nice curved surface. We had thought to fill in the seams with latex caulk but we weren't sure how it would work with the epsilon. So Dave had some drywall mud lying around that created nice lovely flat surfaces and sanded really easy. It filled in the foam seams really well. But we were really nervous about it's fragility and if it would just crack to hell once the epsilon was on it. So we tested that one shoulder bell you saw and it worked out pretty great! The epsilon could have mild flex without snapping and I even punched it once and it barely did anything.

We epsiloned using a Urethane filler called URE-FIL11 to make it thicker however. This created a solid piece of armor that felt great and was sturdy. WE DID NOT DO THIS ON THE FINAL ARMOR. This is one place were I feel like our biggest lesson learned was. We were so concerned with the texture of how the thickened epsiloned set (it was really rough and would need a lot of sanding) that we decided to just use straight epsilon on the final product so that the surface would be smoother. It turned out, it was our brush and layering technique that needed work, not the thickness of the epsilon. So we applied the dry wall mud and thin epsilon coat to the whole armor. And it looked beautiful! I'll show the pictures in a sec. However, because we didn't use the thickener on the epsilon, we probably needed to do like 3 or 4 more coats to get it to the "safe" thickness for the drywall to not be an issue. So due to the time crunch, there are a few pieces of the armor that are in high flex zones on the suit that cracked after the contest. The belt and the calves and parts of the thighs and some of the collar. I tried fixing it with e6000 and that seems like a nice temporary fix, but I would not recommend using the drywall mud anymore. The process was a nightmare for how fragile some parts ended up. However, the armor did still hold up rather nicely, I'm just a little worried about it's long term durability.

So onto the pics. I don't have a lot of this process because we were pretty much out of time now. We had like two weeks to do this:
20170329_212650-1.jpg
There's the chest with the nice flat surface now.
IMG_5932.JPG
You can get an idea of how it worked though.
IMG_5933.JPG
Another shot. Sanding this stuff took way too long.
IMG_5935.JPG
The big shoulders on there now.
IMG_5941.JPG
Jetpack with the seams filled in. You can also see the canning funnels I was talking about being fitted as the jets.
IMG_5942.JPG
Another shot of the jetpack
IMG_5943.JPG
And Dave sanding!
 
Very awesome!

Man, you guys totally need to make some kits. I'm sure you'd have plenty of people foaming at the mouth to buy a dark trooper armor kit-- I know I would be. :p
 
This is absolutely amazing. I love everything Dark Forces related :)

Very awesome!

Man, you guys totally need to make some kits. I'm sure you'd have plenty of people foaming at the mouth to buy a dark trooper armor kit-- I know I would be. :p

Haha, thanks guys. Glad to see everyone loving it. We were a little worried nobody remembered Dark Forces or the Dark Trooper anymore. There were a few small kids at SWCO that were like, "Are you a Power Armor from Fallout?"

As far as kits go, maybe some day. There are still a few issues with the armor we have to work out. I have been contemplating doing another mold of the helmet now that it's finished and sanded up, since the original one is torn in some places and I'm not sure how well a second helmet would come out of it. That's going to be a little bit off though, right now I'm resting and trying to finished up my Mando armor for DragonCon.
 
Last edited:
Sorry, took a little break from posting. And I'm just about finished too! I'm so lazy....

Anyways, the next steps were to epsilon the armor pieces and hope we bought enough of the stuff. Turns out a little bit of that stuff goes a long way, we only used one of the gallon units we bought for the whole armor. Though like I said in the earlier post we probably needed to do some more coats so I'm not sure if I can be that happy about it. It's much too thin in some places and the drywall coating we did is too brittle for it not to be rock solid. I'm definitely worried about the longevity of some of the higher flex pieces, but it is what it is. The armor survived being worn three or four times, a trip across the stage at SWCO and two trips in the back of a uhaul trailer from South Carolina to FL with just a few minor cracks on the belt and calves. We definitely need some way to patch the cracks though, as I'm worried it will start to chip off otherwise.

So, I don't have any pictures of the epsiloning process because it requires gloves and masks and lots of stickiness. If you are interested in the process, definitely look up how to do it with the URE-FIL filler, as it makes it much more sturdy. I really really wish we used it in the final armor, but you live and you learn. Though, epsilon definitely is cool stuff, it makes a nice glassy hard surface on the foam.

The process itself was rather easy. Get a few plastic cups and mark them A and B. Measure out the parts of A and B of the product that it instructs you to. Mix it for as long as it instructs you to. Then we applied it very thinly with foam brushes, which you'll want to have a TON of, because you won't really be able to reuse them. Wait for the coating to get "tacky hard" and apply another until you're happy with the overall result. The instructions say one reapply is enough, but I can't imagine how. It might have been fine on just the foam, but we were also trying to seal in the filler, which might be why our situation was different. Again, find something else to fill yours with if you decide to do this process, the effort is not worth it for the long term durability. It sure does look nice though...

Anyway, we were down to the wire now. Paul had a baby and so it was up to me and Dave to finish it almost on our own from this point on. We had some small things to do, like get the hands working, figure out how to see out of it (did you notice the helmet has no eye holes?), and paint it. We had about two weeks left to SWCO when we started painting. This was not enough time but we got it done by working on it during every free minute of every day...

So, here's some pics of the painting process.
IMG_5944.JPG
Primed everything with a flat black primer.
IMG_5945.JPG
Silver parts got their own palette.
IMG_5946.JPG
And started painting the body color pieces.
20170407_130149.jpg
There was a few pieces we had to tape off and paint in waves, like the gauntlets and the helmet and the chest abs that you see up there.
darktrooperhelmet.JPG
The helmet came out looking pretty freaking awesome though! That's helmet before we clear coated everything. I'm pretty happy with it.
IMG_5949.JPG
The silver pieces. Dave decided to throw an artistic touch on everything by hand painting with several shades of silver. The silver pieces got the lighter silver wash to give it a textured and oiled look as in the picture here. The body color pieces got some edge detail with silver to give it a metallic look.
20170407_130334.jpg
Like so!

And just like that, the armor was painted. We literally painted the last piece the Monday before the celebration. The paint did not fully cure by the time we got there, so I had to sleep with a bunch of off-gassing armor pieces in my hotel room. I'm sure the reduced brain cell count was worth it though....

A few things remained before we left though. Test fitting the whole thing and getting our way of seeing out of the thing to work. The helmet teeth did have holes which gave a slight view out, but that was not enough. I didn't want to step on any children! So stay tuned for the exciting conclusion!
 
Last edited:
Alright, now it's time for the first full test of the completed costume! We decided to do this the Tuesday before celebration. We also gathered to test our method of seeing out of the costume. We decided to go with a small screen using a drone camera. The screen was mounted into the helmet and the camera was mounted under the helmet so I could have a nice big view of everyone standing in front of me and where my feet were going. But before that, pictures of the first full run!
darktrooperarmor.JPG
There we are! Fully painted and worn by me! A couple of things. We didn't have time to finish getting the hands to fully articulate, so the right hand is permanently in a fist and the left hand has all strings attached to a handle. When I squeezed the handle, the left hand closed. It was what we could do with our hand man dealing with a newborn infant, haha. I would have liked to put a gun in the right hand at least (even though I'm left handed), but we just didn't have time to do the gun.
darktrooper.JPG
Next thing, the jetpack is missing two of the jets on the left side. We just forgot to put them on in this picture, no major problems. Also, we had to cut footwear-adjusting slits in the back of the calves in order to make sure the shoes can be tightened. So where those slits are, is where my feet are fastened to give you an idea of how tall the stilts are. Also, you can see where we cut out the back of the knees to let the legs bend easier. I should note that it's hard to bend the legs that much anyway, so when I walk in the thing it's a little more of a shuffle.
darktrooperfinal.JPG
And Dave and Paul next to me for scale!

So the test is complete, and everything is put together. Though, the camera needs to be set up. Also, there were a few problems like I mentioned before. One, the thing is slightly more scary to walk in with all the top pieces on because it's a little top heavy. Two, the arms are still really really uncomfortable, to the point I can't be in it for very long. Three, I need to work on my shoulder exercises, because it's rather heavy after a little bit of time wearing it. Still, I was able to move the arms a good bit and walk a little bit, so we had to deal with it.

So the next day, we all gathered again with the materials for the camera and screen. We mounted it in the helmet with velcro and I installed some helmet fans and a couple of battery packs for the electronics. Finally, the camera was installed in the chin.
Photo May 31, 4 54 44 PM.jpg
Like so! It's the little tiny black thing in the chin area right under the front "grill". You can also get a good look at the neck piece that we created to cover up my face. That's the resolution to the "floating head" issue I mentioned a few posts back.

We tested walking with the camera, and it's okay. A little disorienting, but it's really good for standing and seeing my surroundings. I found myself mostly using the teeth holes to look straight out to walk without feeling like I would tip over.

And that's the build at it's completion everyone! Now all that was left was to come back over to Dave's on Wednesday, pack it into a Uhaul, and get ready for our adventure. I will post some pics of us at the convention and the video of the costume contest later, along with a final "lessons learned/future mods" post to say all the stuff I'd like to fix or change. Thanks to anyone who's been following and to all of those who keep the spirit of the old Lucasarts games alive!
 
Now for some pics of it in action at the convention:
darktrooperSWCO1.jpg
In the convention hall now! Transporting this thing is quite an undertaking. It took four of us carrying and pushing bins. And putting it on is just as much fun. We drew a bit of a crowd just doing that.
darktrooperSWCO3.jpg
There, a better picture in landscape. I wish I could figure out how to rotate the portrait pictures, they aren't in landscape on my PC.
darktrooperSWCO4.jpg
Lots of people wanted pics
darktrooperSWCO5.jpg
A nice aerial view.
darktrooperSWCO9.jpg
Awwww, hahaha.
20170415_175950.jpg
darktrooperSWCO8.jpg
It drew quite a crowd though!
darktrooperSWCO6.JPG
And of course we found a Kyle Katarn to fight it. Wrong era, but who's paying attention, haha.

And here's the costume contest!
20170415_133004.jpg
Us getting ready
File Jun 05, 6 09 47 PM.png
Me standing behind Warwick Davis

The youtube video is below as well for those who want to see it in action. We're at 44:02 and also starting at 59:20 you can hear me try really hard not to step on Warwick Davis! You'll probably notice I can't walk extremely well and that I have Paul, Dave, and my other friend Justin up there with me. That's so I don't fall on the dark stage, but also I'll cover some more in the lessons learned post that I conclude with the reasons why I had them come with me. In the end, it probably cost us winning anything, because the judges seemed to care more about showmanship than fabrication. Still, it was fun nonetheless!

https://www.youtube.com/watch?v=RHWHN3q93Gs


Attachments

  • darktrooperSWCO2.jpg
    darktrooperSWCO2.jpg
    2.8 MB · Views: 584
  • darktrooperSWCO7.JPG
    darktrooperSWCO7.JPG
    2.4 MB · Views: 510
Ok, time to finish this up. My closing thoughts. The project was quite long and laborious, but it definitely was fun in the end. Here are my lessons learned and pros and cons of the suit for anybody looking to make an undertaking like this:

Good things:
- Eva foam is really versatile and easy to work with and pretty durable with just hot glue.
- Clay modelling was really fun and not as difficult as I thought it would be. Learning to do the silicone mold and mother mold was neat as well.
- Everyone loves an 8ft tall costume, even if they think it's Fallout 4 power armor and not what you spent time trying to make...
- It looks super cool in my room upstairs!
- Epsilon pro is some super cool stuff for eva foam, just make sure you use it right.
- Dave made some really cool models for the project!

Not so good things:
- Eva foam is a pain in the ass to make curved or circular objects out of (see the belt).
- The arms need work. It's currently not possible to stay in the suit without my arms falling asleep after about 20 minutes.
- Walking is super hard with the upper part of the body on. It needs something on the back of the heels to keep from falling backwards and a better strapping mechanism for my calves to the stilt. I was still able to cross a stage, but I had friends with me as a security blanket and I think that cost us in the costume contest.
- Maybe don't bother with the costume contest, you may lose to a guy with sequins glued onto a storm trooper armor set....
- Perhaps find a better way to fill eva foam seams than using drywall putty. Unless you are prepared to really layer on the epsilon pro. As of right now, the armor is rather fragile.
- It's very hard to get anywhere because of it's size. If it were less fragile we could pack it up better and maybe it would only need three people to move it around, but right now it needs a minimum of four people to move it and two to help put it on someone. Because of this, I'm not sure how often I'm actually going to be able to get it to conventions. I especially wanted to take it to Dragoncon, but it feels like it might be a logistical nightmare and I doubt it'd fit in my hotel room in the Hilton or in the crowds of people.

Possible future fixes/changes:
- The arms might be better suited having some sort of mechanism inside the chest to control them instead of my actual arms. They'd be less animated, but I could definitely be in the costume way longer. Or perhaps we need to work on the positioning a little bit, but that would probably require refabbing some of the components of the arm and I'm not likely to get any help with that for a little while, hahaha.
- I might redo the legs, or I might not. As it is now I can take a few steps and I don't really need to running in it or anything, but I definitely would like the added security of better leg strapping and perhaps something to make sure I don't fall backwards. It's funny how much the jetpack on this thing pulls you backwards.
- Dave and I talked about possibly doing more epsilon on top of the current armor pieces and then repainting the really high traffic pieces like the belt and arm pits and calves so that it's more durable. Expect that to be done sometime in the year two thousand and who knows...

So that's it everyone. To those following/posting in the thread, I thank you for your compliments and interest. To those viewing, I hope you enjoyed watching our year of pain and suffering and accomplishment as much as we did living it! If anyone has any questions or comments or feedback, post on the thread or send me a message on here and I'll check in from time to time, but for now, I consider this a wrap!

Thanks!
Mike

PS: He looks really cool in my room upstairs. He almost touches the ceiling.
darktrooper_costume_room.jpeg
 
This thread is more than 6 years old.

Your message may be considered spam for the following reasons:

  1. This thread hasn't been active in some time. A new post in this thread might not contribute constructively to this discussion after so long.
If you wish to reply despite these issues, check the box below before replying.
Be aware that malicious compliance may result in more severe penalties.
Back
Top