You are using an out of date browser. It may not display this or other websites correctly.
You should upgrade or use an alternative browser.
You should upgrade or use an alternative browser.
Anakin Starkiller uni body v2 preparation group thread
- Thread starter kevin926
- Start date
russellsch
Master Member
I think it looks great! I love the muted tone of it. :thumbsup
Filandrius
Sr Member
It's a little shinier in person (I buffed quite quite a lot, without outright polishing it) That fluorescent lightning is great for details but kills the shine a little bit. 
Somerset
Sr Member
I'm having a little debate about where to position the chunk on the unibody, as it seems the alignment of the pommel cubes relative to the booster seems a little different than the multi-piece.
I thought the chunk should be hovering offset to the left over the cube on the opposite side of pommel to the D-ring (third cube around) and then just sitting below and to the right of the cone-knob (plenty of pictures in the show-off thread).
However, on the unibody, the cone knob is directly over the cube opposite the D-ring. So should the chunk sit to the left of the cube or to the right of the knob? Logic would say to the left cube if that was a separate piece that could be turned and aligned differently, but I'm more used to seeing it under the right of the cone-knob.
Help please!
Filandrius
Sr Member
Indeed, the alignment of the cubes on the unibody doesn't match the existing reference, as if the pommel was installed incorrectly compared to the screen-used prop.
For mine I compromised and installed the chunk using the knob as reference, despite the logic of the incorrect aligment which would place it differently. The aligment compared to the knob is just more noticeable, IMHO.
For mine I compromised and installed the chunk using the knob as reference, despite the logic of the incorrect aligment which would place it differently. The aligment compared to the knob is just more noticeable, IMHO.
Attachments
Indeed, the alignment of the cubes on the unibody doesn't match the existing reference, as if the pommel was installed incorrectly compared to the screen-used prop.
For mine I compromised and installed the chunk using the knob as reference, despite the logic of the incorrect aligment which would place it differently. The aligment compared to the knob is just more noticeable, IMHO.
Due the the way the pommel was attached on the original saber, it is free to rotate. It's held in place with a side set screw. You are correct that the unibody pommel cubes do not replicate the way the pommel was aligned on the Celebration photos. I chose to have the pommel match up with how the saber looked during filming on Mark's belt, during the Ewok village scenes, since that's when it gets the most belt screen time.
Somerset
Sr Member
Due the the way the pommel was attached on the original saber, it is free to rotate. It's held in place with a side set screw. You are correct that the unibody pommel cubes do not replicate the way the pommel was aligned on the Celebration photos. I chose to have the pommel match up with how the saber looked during filming on Mark's belt, during the Ewok village scenes, since that's when it gets the most belt screen time.
So on that basis the chunk should be aligned with the pommel cubes – got it. I’ll have a ponder on accuracy vs. what I think looks best. Thanks for clearing that up guys!
Filandrius
Sr Member
You know I hesitated a long time between accuracy and what looked best? My OCD is now asking very loudly if I chose well... The chunk would've been on the "wrong" side of the knob but it would've been accurate to the screen-used pommel. Oh well!
Filandrius
Sr Member
The more I think about it and the more I think I should've done what Somerset did (ask what you guys think) before drilling that darn hole.
Filandrius
Sr Member
Wish I'd thought about that before.
I'm taking the coward's way out and will just glue it on... can always change it round at a later dare. Variety is the spice of life after all...
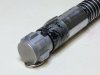
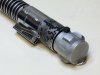
Finally getting around to this (I moved to a new place last month and getting my apartment all set up took precedence).
Here's my work in progress:

I still need to take some paint thinner to the nipple on the end of the blade holder. Also the pommel is too clean. I haven't done anything to the clamp yet, which is why it still gleams as new. I wanted to wait to do that because I wasn't sure exactly what I was going to do with it. Now I think I'll hand work some black into it. Just enough to dull it down some.
I'm also on the fence about gaffers tape. I know it's more accurate, but originally I wasn't going to do it because I thought it looked too cheap to me, but now I'm not sure I like it without it. I go back and forth on that.
But for a work in progress, I'm happy with how it's going so far. It doesn't show well in the photo, but the booster and emitter are not that shiny in real life. They actually dulled down nicely when I was prepping it.
Quick question: how do most of you secure the clamp in place? I know mine isn't oriented right in the picture, that's because it's loose enough that it can still rotate on the body. Do you just use glue to lock it into place?
Here's my work in progress:
I still need to take some paint thinner to the nipple on the end of the blade holder. Also the pommel is too clean. I haven't done anything to the clamp yet, which is why it still gleams as new. I wanted to wait to do that because I wasn't sure exactly what I was going to do with it. Now I think I'll hand work some black into it. Just enough to dull it down some.
I'm also on the fence about gaffers tape. I know it's more accurate, but originally I wasn't going to do it because I thought it looked too cheap to me, but now I'm not sure I like it without it. I go back and forth on that.
But for a work in progress, I'm happy with how it's going so far. It doesn't show well in the photo, but the booster and emitter are not that shiny in real life. They actually dulled down nicely when I was prepping it.
Quick question: how do most of you secure the clamp in place? I know mine isn't oriented right in the picture, that's because it's loose enough that it can still rotate on the body. Do you just use glue to lock it into place?
Finally getting around to this (I moved to a new place last month and getting my apartment all set up took precedence).
Here's my work in progress:
View attachment 719407
I still need to take some paint thinner to the nipple on the end of the blade holder. Also the pommel is too clean. I haven't done anything to the clamp yet, which is why it still gleams as new. I wanted to wait to do that because I wasn't sure exactly what I was going to do with it. Now I think I'll hand work some black into it. Just enough to dull it down some.
I'm also on the fence about gaffers tape. I know it's more accurate, but originally I wasn't going to do it because I thought it looked too cheap to me, but now I'm not sure I like it without it. I go back and forth on that.
But for a work in progress, I'm happy with how it's going so far. It doesn't show well in the photo, but the booster and emitter are not that shiny in real life. They actually dulled down nicely when I was prepping it.
Quick question: how do most of you secure the clamp in place? I know mine isn't oriented right in the picture, that's because it's loose enough that it can still rotate on the body. Do you just use glue to lock it into place?
For the clamp, mine is on there tight but can still move.
If I were to ever do this again, I would sand down all but one of the graflex clamp tabs ( the tabs inside the clamp )
Then mill out a small pocket in the saber for the clamp tab to fit Into, this way it stays in the same location all the time
I also lined up my clamp for the throne room scene, then took a sharp chisel and made a dent on the saber near the generate rings. This way I now can quickly line the clamp up on the saber when someone else handles it and moves it out of alignment
Sent from my iPhone using Tapatalk
Filandrius
Sr Member
As you can see in post #177 above, I used the "mill out small pockets" trick for the clamp tabs (mainly because I used a genuine Graflex clamp and didn't want to dremel out the tabs) It works really really well in keeping the clamp in the right spot.
As you can see in post #177 above, I used the "mill out small pockets" trick for the clamp tabs (mainly because I used a genuine Graflex clamp and didn't want to dremel out the tabs) It works really really well in keeping the clamp in the right spot.
I was it aware of this?! How did I miss it?! Any chance u can tell me what bit you used to make the pockets for the clamp tabs to sit in?
Sent from my iPhone using Tapatalk
As you can see in post #177 above, I used the "mill out small pockets" trick for the clamp tabs (mainly because I used a genuine Graflex clamp and didn't want to dremel out the tabs) It works really really well in keeping the clamp in the right spot.
I found it, didn't think I could on my ipad but I did. Very good idea!!!
Sent from my iPhone using Tapatalk
Filandrius
Sr Member
I used a Dremel with a cutting disc. I "marked" the blank with the clamp by scratching it with the tabs, then milled them out. Tweaked them until the clamp fit perfectly.I was it aware of this?! How did I miss it?! Any chance u can tell me what bit you used to make the pockets for the clamp tabs to sit in?
I used a Dremel with a cutting disc. I "marked" the blank with the clamp by scratching it with the tabs, then milled them out. Tweaked them until the clamp fit perfectly.
very nice job!
Posted this in another V2 thread, figured I'd copy it here as well....
What are the dimensions of the head of the square screw?
I took this from a barbell clamp. It's head is roughly .300" square.

The threading is definitely overkill for use on a V2. I can always chuck it up in the ol' lathe and trim it down/rethread with a die...
What are the dimensions of the head of the square screw?
I took this from a barbell clamp. It's head is roughly .300" square.
The threading is definitely overkill for use on a V2. I can always chuck it up in the ol' lathe and trim it down/rethread with a die...
Similar threads
- Replies
- 0
- Views
- 473
- Replies
- 32
- Views
- 919
- Replies
- 6
- Views
- 1,035
- Replies
- 2
- Views
- 650