Overwatch Genji's Helmet

Hello everyone,

I have some long overdue updates for you. I'm pretty much done with the silicone mold making and halfway through my first cast.

So first, I molded the forehead part. I hesitated between doing a brushed-on mold with a hard shell or a much simpler pour-in mold. I went with the second option because I don't have much experience in mold making and it looked easier. This was my first mistake : I ended up using A LOT of silicone, a lot more than I wanted, even with an optimized mold shape. Beside the fact that silicone ain't cheap, the mold is also super heavy, which is a problem, considering I want to rotocast this part.

IMG_1183.JPG


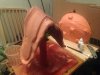
So I decided to not repeat the same mistake for the jaw/chin part, for which I made a brush-on mold. You can see it in progress here:
IMG_1201.JPG


IMG_1204.JPG


You can also so the mold for the bucket itself sitting behind, I forgot to take pictures while I was making it, because I was not too sure if I was doing it right, but I think it worked pretty well in the end. I have yet to pull the master out, as I have not made the mother mold on top yet, I was waiting for the jaw silicone to be done, so I could make both mother molds at the same time.

Then I decided to try to cast the forhead.

First I tried rotocasting it with Smooth Cast 65D, and it did not go so well :
IMG_1202.JPG


IMG_1203.JPG


I tried twice without any luck:

IMG_1206.JPG


It's really hard to figure out what is happening inside your mold when you can't see it.
So then I tried to completely fill the mold with resin instead, using Smooth Cast 300 but that did not work either because that's not what I designed the mold for. Even after I cut some vents so air would not get trapped, it would not fill up because of where the pouring spout was located, it's just physics. No matter how I orientated the mold, it would either not fill up or overflow through the pouring hole I had positioned too low. On top of that, such a high volume of resine gets hard very fast, so you don't have much time to work.

IMG_1212.JPG


IMG_1213.JPG


So as a last resort, I tried rotocasting again, but with smooth cast 300 instead of 65D. And guess what, it worked:

IMG_1214.JPG


IMG_1215.JPG


IMG_1216.JPG


This is funny because the 65D is clearly advertised for rotocasting, for its high viscosity. But in my case, this viscosity was more of a problem, because it would not allow the resin to flow everywhere inside the mold, while the 300, which is much more fluid, did.

The tip is a bit messy because the mold did not cure very well there, but I can fix it with a bit of sanding and putty. I will eventually remake this mold as a brushed-on like the others when I'm completely done with the first cast.

Next to that, molding and casting the smaller parts was like a breeze, no issue there :

IMG_1205.JPG


The small cone is rotocast, so it gave me some practice for the big bucket

Now I just have to finish the mother molds for the chin and bucket, and cast them, which should be much easier than the forhead, for which I had to continualy rotate a 20 pounds mold for many minutes, it was exhausting
 

Attachments

  • IMG_1201.JPG
    IMG_1201.JPG
    1.3 MB · Views: 293
quick not-so-interesting update, I did the mother molds for the helmet and jaw. Does not look like much work, but cutting these pieces of plywood to the right shapes was tricky, especially for the jaw.

So hopefuly, I should be able to cast these two last parts and maybe do the painting this week. I have to do some painting test first. I bought several types of chrome paints, I want to see which one looks better. I also want to test diffferent colors for the undercoat, see if I can get some nice effect if I use blue/purple paint. Also want to test different kind of clear coats, I'm not sure chrome paint react really well to it. So yeah, tests.

This is what my garage looks like at the moment. I try to clean up as often as possible, but each step creates a new mess
IMG_1235.JPG


I'm using Smooth-on's Plasti-Paste for the mother mold. That **** is nasty, it sticks to everything
IMG_1236.JPG


IMG_1237.JPG


Then it was time to pop open the bucket.

DID I MENTION I HAVE NEVER DONE THAT BEFORE?
This was one of the most nerve wracking part so far. It was sealed to the base wood board, I had to used a bunch of tools to pry it open. I tried to use a dremel, but because of the shape of the helmet and the size of the dremel (it's pretty big), I could not reach the seam between the board and the shell. So I used a wood carver and a hammer. I could hear a lot of cracking, I was ****ting my pants, I was so scared of breaking something. It took me almost an hour to get through it but I finally made it.

IMG_1238.JPG


Then It was time to remove the master from the silicon mold. I thought it would be as easy as flipping a sock inside out. Ah ah, silly me. It took me another 10 minutes just to do that, mostly because I was worried of damaging the mold if I stretched it too much

IMG_1239.JPG


But here is it out, now it's time to put the mold back together and try to cast with Smooth Cast 65D

IMG_1240.JPG
 
Last edited:
Oh and I built a small vaccum forming box to mold the the visor. It may be a bit too small but I figured it would be much easier to use an existing box than starting from scratch. We'll see how it goes, I'll try to find another box if this one does not do the trick

IMG_1241.JPG
 
Just curious what is the red primer you're using?
Nothing fancy, generic brand, I got it at an automotive store. I used red because the putty I use is gray, so it allows me to differenciate the layers. And red looks cool. But I don't use it because it's better than another one.

Today I casted the last, but not least parts

IMG_1249.JPG


IMG_1254.JPG


IMG_1255.JPG


IMG_1250.JPG


IMG_1251.JPG


IMG_1252.JPG


IMG_1253.JPG


The casts are not perfect, some air buble and seams here and there, but I want to just get over with it, so I'll just use a bit of putty and sanding.

There is a hole at the back of the jaw, but this part won't be visible, so screw it.
 
Its really interesting to see documented 'fails' and 'errors' as well as successes. It gives those of us who haven't done this type of work a much better insight into the pitfalls and issues as well as how to do it right.

Looking forward to seeing your final piece, it looks great so far.
 
Its really interesting to see documented 'fails' and 'errors' as well as successes. It gives those of us who haven't done this type of work a much better insight into the pitfalls and issues as well as how to do it right.

Looking forward to seeing your final piece, it looks great so far.


Thank you. Here are the things I could learn from this project:

- silicone is expensive and don't have a very long shelf life : I ordered my silicone back in november of last year I believe, but then the project was put on hold several times and I ended up using it only this month. As a result, it did not go bad bad completely but it was much thicker that it was supposed to be. I realized that when I order a bit more to complete the molds, it was much more fluid, much easier to mix, pour and would not trap as many air bubbles. So don't order silicone way ahead, wait for your master to be ready to mold.

- resine is rather cheap compared, so don't hesitate to start over if you mess up your cast.

- resine sets very quickly, so be sure everything is ready when you mix part A with part B.

- you can clean up uncured resin from your molds with aceton. Yeah that happened to me once. I got distracted between pouring part A and B and ending pouring part B twice. That was the first layer, so I had to clean up the whole mold after that.

- don't make big pour-in molds : too expensive, and then you end up with a heavy and bulky mold, which is an issue if you had planned to do rotocasting with it. Also, it's really hard to pop the parts out. The mold itself is easier and faster to make, but in the end, it's very unpractical.

- Don't make 1-part brush-on mold for buckets. I thought it would be easy to remove the cast from the mold, just like flipping a sock inside-out, but it's actually super hard and you risk damaging the mold or the cast from pulling too hard. So it's probably better to make two halves, you'll have a seam line, but resine is very easy to sand.

- Make your brush on molds thick: mine were 4 layers : 1 layer with silicone thinner, to avoid air bubbles and to ensure the silicon would flow in every hole. one regular layer, and 2 layers with silicon thickener. In the end the molds were not thick enough and a bit too floppy. As a result they did not keep their shape perfectly, despite the many registering keys I had made (pouring silicone in an ice tray). This resulted in bumps and dents in the bucket, and the jaw mold not sealing correctly.
I think a couple more layers would have helped.

- Got better results at rotocasting using Smooth Cast 300 than Smooth Cast 65D, while 65D is clearly advertised for rotocasting. It's thicker and more viscous, but in my case, the high viscosity caused more trouble than anything. I used the 65D for the bucket though, because I could see the inside of the mold and the resin flowing while I was doing it.

- Smooth-on's Plasti Paste: it's great because it's much easier to use than real fiberglass. Just make sure to smooth out the surface as much as possible while it's still fresh, because then, any stroke mark will transform into evil spikes that will mess up your hands and scratch your arms while rotocasting.

- you don't have to buy expensive mold release spray for two-parts molds, you can use petroleum jelly (known as vaseline in europe). It's much easier to find and very cheap. It's not as conviniant, but believe me, when you have already shoveled several hundreds in materials, you don't mind saving 20 bucks.

- wear gloves. I don't, because I hate it, but if you don't mind the gloves, were them, especially for the resin part

- do something simpler for you first helmet, like a stormtrooper. That **** was way over my head for a first try. I was very close to giving up several times. The only reason I carried on was because I had already invested too much time and money on this project and if I did not complete it would have been a real waste.
 
Last edited:
Almost done with the paint! However, this is not the cast but the master. I had too many issues with the cast, including the helmet that got deformed pretty badly during my move. It was well packed, but something was probably sitting on it. I don't have the will to unpack the molds and recast everything (I'm moving again soon overseas). I just want to get over with it quickly.
the chrome paint is a pain in the ass, I had to repaint each parts several times. I'm nearly there, I just need to vac form the visor and tint it green

IMG_0134.JPG


IMG_0135.JPG
 
Last edited:
One last update for today, I added the "scarf" and tested light with an led flashlight placed underneath the helmet. The visor looks teal because the light is a cold white, almost blue. But it looks greener in real life and I will use a warmer light (maybe rgb led so I can fine tune it) for the final setup

IMG_1474.JPGIMG_1470.JPGIMG_1468.JPG
 
One last update for today, I added the "scarf" and tested light with an led flashlight placed underneath the helmet. The visor looks teal because the light is a cold white, almost blue. But it looks greener in real life and I will use a warmer light (maybe rgb led so I can fine tune it) for the final setup

Something like a green EL strip might look really cool if you have room for the electronics somewhere. https://www.adafruit.com/product/446

edit: I just realised you need to see out of it. I'm dumb.
 
Something like a green EL strip might look really cool if you have room for the electronics somewhere. https://www.adafruit.com/product/446

edit: I just realised you need to see out of it. I'm dumb.
Actually, this is a good idea. This version is not really wearable, it's the master 3D print that I painted, I set the resin cast aside for a while because I was having too many issues with it at the moment. I'll recast it later when I have more time. So this version is very heavy and not flexible, meaning it's hard to squeeze your head inside unless it's tiny (my girlfriend could, I could not). So it's more a display piece than an actual costume part. So visibility is not really the priority. I was thinking of using an led strip, but el tape is a good idea too. I just don't know how bendable it is, if it could follow the sharp angles of the visor or if I need to split it in several parts
 
FAN-FRICKIN'-TASTIC! Glad you stuck with it, though the casting didn't go as you pleased. I don't suppose you're willing to share some of that sweet sweet STL?
 
This thread is more than 5 years old.

Your message may be considered spam for the following reasons:

  1. This thread hasn't been active in some time. A new post in this thread might not contribute constructively to this discussion after so long.
If you wish to reply despite these issues, check the box below before replying.
Be aware that malicious compliance may result in more severe penalties.
Back
Top