asalaw
Sr Member
Looking into my wayback machine, I'm thinking the last time I did a build thread was about eight or ten years ago, on ASAP, and it was my first John Long P1. Full circle I guess. Anyway, I've gained a few skills since then, plus a Techshop membership in DC, so I'm back to building with a vengeance. First up: Well, I kinda already told you, except to say that while my first one was a Friday's Child/Private Little War model with the red jewel and wide diamond-embossed aluminum, this one's going to be a pristine-finish TMOST with the blue sapphire watch crown (also seen mounted on Finney's P2).
Also, I'm restoring my old MM P2. Well, remodeling it, really. There was absolutely nothing wrong with it, except that I wanted more out of it. It looked nice enough, till I cut it into four pieces on the bandsaw...
So here's where I started today. First, my setup. I basically come in with way more crap than I'll ever use and take over a whole bench. I'm sure I'm overcompensating for some anxiety-based penis thing or other.

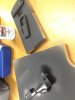
Onto the phaser! I'd already done the soldering and started some of the actual putting parts into the shells when I decided to do this thread, so please forgive the medias res.
I found the brass pins that hold the door in place weren't traveling as smoothly as I'd like, so I dremeled one out and re-seated it. Here are the bottom halves after potting:

The pins needed cleanup and finishing, so I got that started...

Last trip to the shop, a couple of days ago, I spent some quality time with the side rails and got them very spiffy. I'd hoped to get to these today to really give them a mirror finish, but somehow 10 hours at the shop isn't as long as you'd think it is. Basically I started these out on the aluminum grinder to just sort of love-tap them into shape (grinders are angry things, and aluminum is really soft). This saves a ton of time.
Once they're roughed in, I set up my Dremel with a grinder bit on the bench vise, which gives me an instant mini-grinder. Much softer touch, much more control. Then I sand them a bit with very fine sandpaper, throw up a buffing wheel on the Dremel, rouge it up like a Kansas City hooker, and go to town. Not finished yet, but coming along nicely.

Meanwhile, my first P1 ever, the very one I mentioned at the top of this post, needed repair. A side rail broke off, and the battery contacts were seriously grungy. While the freshly-primered P1 shells were drying, I dug into my dearest old prop:

And while that epoxy was curing, I decided to try out the HobbyLite filler Steve Neill recommended in both his 66" Enterprise thread and his book on scratch-building RC submarines. I had an old unfinished data disk someone gave me years ago with the world's worst wood grain...

The short answer: it's everything Steve raves about and more. I also have a fresh tub of the balsa-colored stuff, but I didn't bring it with me. I'll try that out on my next project, a scratch-built (SHHH... not s'posed to tell).
And while I'm trying out new fillers, I finally got around to using that Evercoat metal glaze filler. Smells exactly like Bondo, kicks in sort of the same way as Bondo, but WAY better for working on resin and fiberglass. Much softer, much less sanding time. I'm in love. If I ever meet Steve in person, I may have to bring flowers and candy.
BUT, there's a caveat. This stuff is definitely, absolutely, firmly, and painfully NOT Bondo. So for anyone else reading this who hasn't worked with it yet (I can't be the only one... can I?),
A WORD OF WARNING.
This stuff kicks fast. Like incredibly fast. Like your first time in the backseat at homecoming fast.
That is, it kicks really fast if you're using the same amount of hardener you're used to using with Bondo. So DON'T. Don't use much hardener at all. I used less hardener every time I mixed a batch, and it still kicked faster than my wife when I cuss at the TV. I'm talking around 60 seconds of working time.
THIS was too much:

Finally, I listened to Yoda (that little green ****er was riding me all day) and unlearned what I had learned. I plopped my hardener separately from the gob of putty, and gradually stirred in pin-head-sized dots of hardener with a toothpick.
THAT was when I finally got the 5 to 6 minutes' working time advertised on the container. Oy!
So, this stuff is SO not Bondo. But that's also the good news--it sands down fast, so you can just keep working. From now on, Bondo's my go-to filler when I need to fill a large meteorite crater, or stuff Al Franken's head, or something else equally immense and vacuous.
And while that was setting up, I started on the old MM P2.

What you see above is the right half after I've joined it with 3/32" of styrene sheet as a spacer to accommodate the John Long P1 that's going to go in there (a GJ-style P1 that's not in this thread). The Bondo you see on the front of the pistol is where I broke it when I was cutting it on the bandsaw. Took me 10 minutes to find that little piece on the wood shop floor. Ten anxiety-ridden, brick-sh!tting minutes. But I found it.
The left half of the phaser isn't joined yet, and won't be till I've fully finished the join on the right side. I want to make sure what I have in mind works on the right before I screw it up on the left.

What I plan on doing is laying up a piece of fiberglass across the join in the interior, with epoxy. I'm hoping that'll give me a nice joint with good tensile strength without having to hog out a couple of channels and lay metal rod in there. I really don't feel like doing that. So we'll see. I'd've done it today, but some IDIOT (I'm looking at YOU, asalaw!) forgot to bring the glass cloth to the shop.
So, sand sand sand, putty, sand, sand, putty...


And while that sets up, back to the old P1 repair...

Hey, good as new! I just skipped to this part to be symbolic. It's a deeply layered metaphor symbolizing the evanescent meaning of the fact that I forgot to take pictures of the repair job.
Anyway, sand sand putty sand putty putty sand sand...


CRAP. Now I've got Chitty-Chitty Bang-Bang stuck in my head. And yes, I'll say it: Chittyest Disney movie ever.
And... finally... PRIMER!!!!! YAAAAAAY!!!!
Step into my paint booth, said the spider to the fly...

I know what you're thinking. You're right. It is the PERFECTLY engineered farting chamber. Very loud fans, air sucked out through filters. Absolute stealth-pooting. Dairy before, paint booth after.
And spray-and-wait-and-spray-and-wait-and
BREATHE!!!! BREATHE!!!
And spray-and...


What I like to do, since there are air hoses everywhere at Techshop, is use them. After sanding, I give my parts a good blast. I enjoy the sensation for a moment, and then get back to work, using the compressed air to blow the dust off the props.
The blue rag is a tack cloth, which I learned about watching the funniest Brooklyn furniture restoration PBS show in the history of ever. Name escapes me. [EDIT -- It was called Furniture on the Mend, starring the "Furniture Guys," Ed Feldman and Joe L'Erario. It was in Philly, not Brooklyn.] It's sticky, hence the name. You dab it on the part to be painted, and it grabs anything remaining after the air blast, such as finger oils, dust mites, and grabby panhandlers.
I like to wet the paint, which I learned from John Long, though he was talking about metallics and gloss paints. If he knew I was wetting primer, he'd have a conniption, so don't tell him. It'll be our secret -- just you, me, and the rest of the Internet. [Edit - I've stopped doing this. Makes for too thick a coat, though it sure does look pretty when it first goes on. ]
And another lovely tip from Steve Neill, the Rust-oleum automotive primer. Three bucks and change at Home Depot, dries fast, sandable in an hour or two (ignore the 4-hour wait before sanding that's on the label).
And it seems there's a limit of 24 files per post, so onto the next post...
Tomorrow. I'm wiped out.


Also, I'm restoring my old MM P2. Well, remodeling it, really. There was absolutely nothing wrong with it, except that I wanted more out of it. It looked nice enough, till I cut it into four pieces on the bandsaw...
So here's where I started today. First, my setup. I basically come in with way more crap than I'll ever use and take over a whole bench. I'm sure I'm overcompensating for some anxiety-based penis thing or other.
Onto the phaser! I'd already done the soldering and started some of the actual putting parts into the shells when I decided to do this thread, so please forgive the medias res.
I found the brass pins that hold the door in place weren't traveling as smoothly as I'd like, so I dremeled one out and re-seated it. Here are the bottom halves after potting:
The pins needed cleanup and finishing, so I got that started...
Last trip to the shop, a couple of days ago, I spent some quality time with the side rails and got them very spiffy. I'd hoped to get to these today to really give them a mirror finish, but somehow 10 hours at the shop isn't as long as you'd think it is. Basically I started these out on the aluminum grinder to just sort of love-tap them into shape (grinders are angry things, and aluminum is really soft). This saves a ton of time.
Once they're roughed in, I set up my Dremel with a grinder bit on the bench vise, which gives me an instant mini-grinder. Much softer touch, much more control. Then I sand them a bit with very fine sandpaper, throw up a buffing wheel on the Dremel, rouge it up like a Kansas City hooker, and go to town. Not finished yet, but coming along nicely.
Meanwhile, my first P1 ever, the very one I mentioned at the top of this post, needed repair. A side rail broke off, and the battery contacts were seriously grungy. While the freshly-primered P1 shells were drying, I dug into my dearest old prop:
And while that epoxy was curing, I decided to try out the HobbyLite filler Steve Neill recommended in both his 66" Enterprise thread and his book on scratch-building RC submarines. I had an old unfinished data disk someone gave me years ago with the world's worst wood grain...
The short answer: it's everything Steve raves about and more. I also have a fresh tub of the balsa-colored stuff, but I didn't bring it with me. I'll try that out on my next project, a scratch-built (SHHH... not s'posed to tell).
And while I'm trying out new fillers, I finally got around to using that Evercoat metal glaze filler. Smells exactly like Bondo, kicks in sort of the same way as Bondo, but WAY better for working on resin and fiberglass. Much softer, much less sanding time. I'm in love. If I ever meet Steve in person, I may have to bring flowers and candy.
BUT, there's a caveat. This stuff is definitely, absolutely, firmly, and painfully NOT Bondo. So for anyone else reading this who hasn't worked with it yet (I can't be the only one... can I?),
A WORD OF WARNING.
This stuff kicks fast. Like incredibly fast. Like your first time in the backseat at homecoming fast.
That is, it kicks really fast if you're using the same amount of hardener you're used to using with Bondo. So DON'T. Don't use much hardener at all. I used less hardener every time I mixed a batch, and it still kicked faster than my wife when I cuss at the TV. I'm talking around 60 seconds of working time.
THIS was too much:
Finally, I listened to Yoda (that little green ****er was riding me all day) and unlearned what I had learned. I plopped my hardener separately from the gob of putty, and gradually stirred in pin-head-sized dots of hardener with a toothpick.
THAT was when I finally got the 5 to 6 minutes' working time advertised on the container. Oy!
So, this stuff is SO not Bondo. But that's also the good news--it sands down fast, so you can just keep working. From now on, Bondo's my go-to filler when I need to fill a large meteorite crater, or stuff Al Franken's head, or something else equally immense and vacuous.
And while that was setting up, I started on the old MM P2.
What you see above is the right half after I've joined it with 3/32" of styrene sheet as a spacer to accommodate the John Long P1 that's going to go in there (a GJ-style P1 that's not in this thread). The Bondo you see on the front of the pistol is where I broke it when I was cutting it on the bandsaw. Took me 10 minutes to find that little piece on the wood shop floor. Ten anxiety-ridden, brick-sh!tting minutes. But I found it.
The left half of the phaser isn't joined yet, and won't be till I've fully finished the join on the right side. I want to make sure what I have in mind works on the right before I screw it up on the left.
What I plan on doing is laying up a piece of fiberglass across the join in the interior, with epoxy. I'm hoping that'll give me a nice joint with good tensile strength without having to hog out a couple of channels and lay metal rod in there. I really don't feel like doing that. So we'll see. I'd've done it today, but some IDIOT (I'm looking at YOU, asalaw!) forgot to bring the glass cloth to the shop.
So, sand sand sand, putty, sand, sand, putty...
And while that sets up, back to the old P1 repair...
Hey, good as new! I just skipped to this part to be symbolic. It's a deeply layered metaphor symbolizing the evanescent meaning of the fact that I forgot to take pictures of the repair job.
Anyway, sand sand putty sand putty putty sand sand...
CRAP. Now I've got Chitty-Chitty Bang-Bang stuck in my head. And yes, I'll say it: Chittyest Disney movie ever.
And... finally... PRIMER!!!!! YAAAAAAY!!!!
Step into my paint booth, said the spider to the fly...
I know what you're thinking. You're right. It is the PERFECTLY engineered farting chamber. Very loud fans, air sucked out through filters. Absolute stealth-pooting. Dairy before, paint booth after.
And spray-and-wait-and-spray-and-wait-and
BREATHE!!!! BREATHE!!!
And spray-and...
What I like to do, since there are air hoses everywhere at Techshop, is use them. After sanding, I give my parts a good blast. I enjoy the sensation for a moment, and then get back to work, using the compressed air to blow the dust off the props.
The blue rag is a tack cloth, which I learned about watching the funniest Brooklyn furniture restoration PBS show in the history of ever. Name escapes me. [EDIT -- It was called Furniture on the Mend, starring the "Furniture Guys," Ed Feldman and Joe L'Erario. It was in Philly, not Brooklyn.] It's sticky, hence the name. You dab it on the part to be painted, and it grabs anything remaining after the air blast, such as finger oils, dust mites, and grabby panhandlers.
I like to wet the paint, which I learned from John Long, though he was talking about metallics and gloss paints. If he knew I was wetting primer, he'd have a conniption, so don't tell him. It'll be our secret -- just you, me, and the rest of the Internet.
[Edit - I've stopped doing this. Makes for too thick a coat, though it sure does look pretty when it first goes on. ]And another lovely tip from Steve Neill, the Rust-oleum automotive primer. Three bucks and change at Home Depot, dries fast, sandable in an hour or two (ignore the 4-hour wait before sanding that's on the label).
And it seems there's a limit of 24 files per post, so onto the next post...
Tomorrow. I'm wiped out.
Last edited by a moderator: