You are using an out of date browser. It may not display this or other websites correctly.
You should upgrade or use an alternative browser.
You should upgrade or use an alternative browser.
Rey - Star Wars: The Force Awakens Build (open for everyone!)
- Thread starter TheLadyNerd
- Start date
duckybegood
New Member
Hello everyone! I've been an avid follower of this thread since October, slowly building up my courage to join in. There have been ups, there have been downs, there has been a trip to the emergency room after I sewed through my finger working on the saddle bag (Got lucky and managed to miss the bone, plus I got to see a grown war veteran swoon.)
Kristen, Kendra, TheLadyNerd, and Galacticat, I cannot thank you guys enough. Your posts have been a lifeline these past months. I have an entire folder that is just screencaps from you guys' incredible posts. I cannot, cannot thank you enough for noting down your every step and giving us newbies a lifeline.
So, after months of playing mad alchemist with the RIT dyes, a collective 29 swatches, I finally thought I had achieved the longed for colours (with the exception of that accursed sandwashed crepe de chine that turns purple.)
I had measured every drop, annotated every step. Finally, I had it! The shirt, the shoulder wraps, and the head wrappy! Just enough beige, just enough grey, just enough neutral, just enough variation to look cool. Success! Thought I. Nothing can go wrong, thought I.

No more procrastinating, thought I. The time had come! There was absolutely no way I could fail!
I was wrong.

POR QUOIS
The only thing I can imagine is I used Dharma's Procyon Detergent before and after and that affected the colour whereas on my sample swatch I just used regular Tide detergent after I'd rinsed with cold water. Tried to drunk a swatch in RIT taupe, no dice (too dark.) Tried a dunk in RIT tan, no dice (too warm.) The thing is, the more I look at it, the more I think I like it. The problem is there is a massive, massive discrepancy between the Visual Guide photos (very grey,) the photos I took at the Denver exhibit (very warm,) and the screencaps (more yellow.) But then I look at the swatches I'd liked and I think they work nicely with that yellow cast, so tomorrow I'm going to try dunking a swatch in yellow- 1 cup of hot water to 1ml of yellow dye as a stand in for 8 gallons of water and 1 cup of dye.
So, back to the drawing board I go.
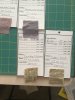
Until then, I hope to contribute at least a little in return for all that you guys have done. Here is a picture of all the swatches I've made complete with instructions. That way, if you (like me) have never dyed before and want a frame of reference for Rey or even a different costume, you at least have some idea of what it will look like and can tweak accordingly. Understand that these are made on purpose to be very saturated so I could get a feel for the colour. I have not yet tried them with either more water or less time (5 mins opposed to 10)
For these little swatches I used a top loading washing machine set to SMALL LOAD. Used HOT/COLD cycle. Used HALF A CUP OF DYER'S SALT from Dharma. Amounts of dye used for a small load are included. Again, these are very saturated colours.
All the fabrics I got from here. So the Cotton Jersey from Dharma, the Crinkle Viscose is from ebay seller fashionfabrics4all, the stonewashed crepe de chine is from Dharma, and the handwoven fabric for the head wrappy is from Dharma.
So, for any other dye newbies like me, this is what I did:
1. Put fabric in washer.
2. Set to SMALL LOAD.
3. Set to HOT/COLD. Hit go, however you do that, but DON'T CLOSE THE LID.
4. Wait for it to fill.
5. Pour in SALT and DYE.
6. IMPORTANT Before you close the lid or hit Go, get our your phone and set a timer for 10 minutes. I did 10, but you might want to do 5 to be safe.
7. Hit GO.
8. Watch Futurama or Scrubs (very important step.)
9. When the timer goes off, open the lid, switch to RINSE. Close lid/Hit Go.
10. After the rinse cycle is clear and the machine is empty, set to WARM/WARM. Put in half a cup of detergent. Pick whichever cycle you'd like. Hit GO.
11. After that's done, throw that sucker in the dryer.


And so far, these are the ones I'm liking best for Rey:

(only the bottom ones. I've yet to find a combination I like for the pants. Neutralizing the purple without making it go too cold or blue has proven, uh, interesting. Last time I added Apple Green it came out ice blue. So. The testing shall go on!)
The best part is, I cut out all my fabric pieces before dying, so I could sew them and then dye them as full pieces. Yeah, well, I only just remembered I completely forgot to pre-wash the fabric. The adventure, indeed, continues.
Kristen, Kendra, TheLadyNerd, and Galacticat, I cannot thank you guys enough. Your posts have been a lifeline these past months. I have an entire folder that is just screencaps from you guys' incredible posts. I cannot, cannot thank you enough for noting down your every step and giving us newbies a lifeline.
So, after months of playing mad alchemist with the RIT dyes, a collective 29 swatches, I finally thought I had achieved the longed for colours (with the exception of that accursed sandwashed crepe de chine that turns purple.)
I had measured every drop, annotated every step. Finally, I had it! The shirt, the shoulder wraps, and the head wrappy! Just enough beige, just enough grey, just enough neutral, just enough variation to look cool. Success! Thought I. Nothing can go wrong, thought I.
No more procrastinating, thought I. The time had come! There was absolutely no way I could fail!
I was wrong.
POR QUOIS
The only thing I can imagine is I used Dharma's Procyon Detergent before and after and that affected the colour whereas on my sample swatch I just used regular Tide detergent after I'd rinsed with cold water. Tried to drunk a swatch in RIT taupe, no dice (too dark.) Tried a dunk in RIT tan, no dice (too warm.) The thing is, the more I look at it, the more I think I like it. The problem is there is a massive, massive discrepancy between the Visual Guide photos (very grey,) the photos I took at the Denver exhibit (very warm,) and the screencaps (more yellow.) But then I look at the swatches I'd liked and I think they work nicely with that yellow cast, so tomorrow I'm going to try dunking a swatch in yellow- 1 cup of hot water to 1ml of yellow dye as a stand in for 8 gallons of water and 1 cup of dye.
So, back to the drawing board I go.
Until then, I hope to contribute at least a little in return for all that you guys have done. Here is a picture of all the swatches I've made complete with instructions. That way, if you (like me) have never dyed before and want a frame of reference for Rey or even a different costume, you at least have some idea of what it will look like and can tweak accordingly. Understand that these are made on purpose to be very saturated so I could get a feel for the colour. I have not yet tried them with either more water or less time (5 mins opposed to 10)
For these little swatches I used a top loading washing machine set to SMALL LOAD. Used HOT/COLD cycle. Used HALF A CUP OF DYER'S SALT from Dharma. Amounts of dye used for a small load are included. Again, these are very saturated colours.
All the fabrics I got from here. So the Cotton Jersey from Dharma, the Crinkle Viscose is from ebay seller fashionfabrics4all, the stonewashed crepe de chine is from Dharma, and the handwoven fabric for the head wrappy is from Dharma.
So, for any other dye newbies like me, this is what I did:
1. Put fabric in washer.
2. Set to SMALL LOAD.
3. Set to HOT/COLD. Hit go, however you do that, but DON'T CLOSE THE LID.
4. Wait for it to fill.
5. Pour in SALT and DYE.
6. IMPORTANT Before you close the lid or hit Go, get our your phone and set a timer for 10 minutes. I did 10, but you might want to do 5 to be safe.
7. Hit GO.
8. Watch Futurama or Scrubs (very important step.)
9. When the timer goes off, open the lid, switch to RINSE. Close lid/Hit Go.
10. After the rinse cycle is clear and the machine is empty, set to WARM/WARM. Put in half a cup of detergent. Pick whichever cycle you'd like. Hit GO.
11. After that's done, throw that sucker in the dryer.
And so far, these are the ones I'm liking best for Rey:
(only the bottom ones. I've yet to find a combination I like for the pants. Neutralizing the purple without making it go too cold or blue has proven, uh, interesting. Last time I added Apple Green it came out ice blue. So. The testing shall go on!)
The best part is, I cut out all my fabric pieces before dying, so I could sew them and then dye them as full pieces. Yeah, well, I only just remembered I completely forgot to pre-wash the fabric. The adventure, indeed, continues.
Attachments
Kristen, Kendra, The LadyNerd, and Galacticat, I cannot thank you guys enough. Your posts have been a lifeline these past months. I have an entire folder that is just screencaps from you guys' incredible posts. I cannot, cannot thank you enough for noting down your every step and giving us newbies a lifeline.
I second that and must include Redwillow and Contec as well for helping me with the goggles, thanks so much for all your help, couldn't have done it without you! Eternally grateful to you all.
DidiUK
Last edited:
Goldhawk
Well-Known Member
I second that and must include Redwillow and Contec as well for helping me with the goggles, thanks so much for all your help, couldn't have done it without you! Eternally grateful to you all.
DidiUK
I too must agree! Although I want to include CosplayArcher. Even though she wasn't on here a lot, I happened to meet her in person and she was able to help me with ideas for the pants, as well as give me an idea of how the fabrics would look when the costume was done.
Contec's bag pattern was invaluable, that was the first thing that I made. Redwillow's write-ups of the costume are also extremely helpful. Also division6's backpack and bracer patterns.
Thank you to everyone! There are several of us who wouldn't be where we are now without your help and dedication!
kristen jones
Master Member
We all of us draw upon each other at one time or another. It's why we have this community, and why i love it so much.
Though i feel it must be said that none of us would have this valuable 129 page trove of knowledge were it not for TheLadyNerd. (or as I call her: Thread Momma)
She has brought us together in one place, and in so doing gave rise to the greatest collection of resources and creative people I have ever had the privilege to be a part of.
THANK YOU, Thread Momma! <3 <3 <3
Last edited by a moderator:
jackwabbit
Well-Known Member
Adding my thanks to everyone, as well. Group hug, everybody!
TheLadyNerd
Well-Known Member
We all of us draw upon each other at one time or another. It's why we have this community, and why i love it so much.
Though i feel it must be said that none of us would have this valuable 129 page trove of knowledge were it not for TheLadyNerd. (or as I call her: Thread Momma)
She has brought us together in one place, and in so doing gave rise to the greatest collection of resources and creative people I have ever had the privilege to be a part of.
THANK YOU, Thread Momma! <3 <3<3
Kristen, you never cease to make me leak.
 Thank for the shoutout. I needed that this morning. Also for a reminder kick in the butt to get my blog post going! I have a photoshoot this month for a post I'm writing called "The Ultimate Guide to Rey's Costume" that I'll be posting on my site with pictures, diagrams, and shoutouts to many of the fine folks here. (Which means I get to have the fun time of reading through all 129 pages of this thread and sectioning it all out for the best of the best. Quite the task ahead. But well worth it!
I'm so proud of all of you sister and brother Reys! Your costumes, your dedication, your passion, and friendliness to one another is just heartwarming. Proud Thread Momma right here. :love
Last edited by a moderator:
kristen jones
Master Member
^And proud we are to have you. <3
duckybegood
New Member
Kristen, you never cease to make me leak.
*BREATHING INTENSIFIES*
Honestly, your write ups on aging and weathering fabric have been awesome. I would love to see more of your weathering process! If one day you would do a tutorial on your Lara make up effects that would be so cool.
Okay! So! In my ongoing adventures to find the pants colour, me and my mathematically challenged brain finally figured out a way to practice dyeing using a regular measuring jug while using the same ratio as I would in a washer. Dyeing using the same ratio but smaller items gives you a lot more freedom to experiment since you're far less inclined to be worried about wasting dye, water, and most importantly of all: fabric.
Alright, so. Me trying to do a write up on ratios is kind of like a drunk amoeba trying to give a lecture on string theory, but here goes. If we use one cup of dye for every two gallons of water, we can shrink that down to 1ml of dye to every 32ml of water.
So now we turn to our friend, Mr. Measuring Jug. There's 236ml of water in one cup, so to meet the ratio of 1:32 we're going to use in the tub you would need approximately 7ml of dye for every 236ml(one cup) of water. You'd be using the exact same ratio as you would in the tub, just to a lesser amount. That way you can practice more without worrying about wasting dye, fabric, water, or time.
For those of us who are terrified of dyeing, this lets us use a lot less fabric, and a lot more time to experiment.
So, I know a lot of times it was visual tutorials that helped me, so I hope this helps someone:

1. The Tools. These top down measuring jugs are awesome. The tiny little measuring jugs you can find at Crate and Barrel and are so incredibly helpful. And say hello to senor eyedropper, your new best friend. You'll also need a bobby pin to hold your fabric swatch, an a cheap plastic cup so you can dry your fabric swatch and write down your measurements.

2. Your microscopic fabric swatch that hopefully you won't miss.

3. Your vague idea for what colours to try. Taupe was too warm, so let's add in some pearl grey to tone it down. As galacticat noted, a drop of green might help neutralise it.

4. Write down e v e r y t h i n g. Not just so you can tell your swatches apart (you don't want to get a swatch just right only to not remember how it happened. I have done this.) but so you can recreate the results later.


5. Measure it all out and dump it all into your measuring jug.

6. For silk, add in some vinegar (I'm going to also try citric acid later since I despise the smell of vinegar) and for cotton add in salt. The instructions should be on the RIT bottle.

7. Pour in your boiling/hot water. I wanted a very light/ diluted result, so I did four cups of water.

8. Take your bobby pin and stab it through your microscopic fabric swatch.

9. Dump that sucker in and...

10. Hit that timer!

11. Fish that sucker out, ideally not with the wrong end of a sharpie pen. Or your fingers. Or, uh. So I've heard.

12. Cradle your bobby pin across the mouth of the cup so that your swatch can dry somewhat evenly.
Now wait. Remember, you can't ever judge a swatch by how it looks wet. A swatch you brushed off as a failure while wet might dry into the perfect match.
Now you can dye as many swatches as you want with as little waste as possible! To try from light to dark, start with your dyes and 1 cup of water. Make a sample of that. Then add another cup to your existing dye mixture, and make an example of that. Now you should have a slightly lighter swatch. This way you can get good range of shades.
Hope this helps absolutely anyone! I put off working on this costume for months because of my fear of dyes. Now that I'm feeling more comfortable with it, a whole world of costuming possibilities opens up because I won't have to hope I find a fabric that is just the right weave and just the right colour without breaking the bank. Dharma offers a variety of swatches so when you have a project, you don't have to go into a jo anns with your fingers crossed- find a swatch that matches your costume, order your fabric, break out the ol' dyeing kit and experiment till you have just that perfect colour!
Last edited:
kristen jones
Master Member
*BREATHING INTENSIFIES*
Honestly, your write ups on aging and weathering fabric have been awesome. I would love to see more of your weathering process! If one day you would do a tutorial on your Lara make up effects that would be so cool.
Was that to me?
My Lara makeup....
Honestly that was a happy accident...the first time I'd done blood and wounds. I was as surprised at how good it turned out as anyone else. LOL

mbotastic
Active Member
This is just super! Thank you duckybegood. I have been dyeing swatches of fabric for my pants, shirt and dress/wrap using a 5 qt bowl and trying various amounts of dye in set increments. But the math part of calculating ratios for when I do a larger full dye later, I've been ignoring. Like, oh I'll figure that out later once I find the perfect color! Lol. This helps me figure out what I'll need to do so much better.
On another note, I see you are also using the Dharma stonewashed crepe de chine like others. So how have people dealt with it being so shear? Even after dyeing it is pretty shear. Do you just wear something underneath (leggings or spanx or something? Double it up?. Thanks for all your awesomeness!
On another note, I see you are also using the Dharma stonewashed crepe de chine like others. So how have people dealt with it being so shear? Even after dyeing it is pretty shear. Do you just wear something underneath (leggings or spanx or something? Double it up?. Thanks for all your awesomeness!
duckybegood
New Member
Was that to me?
My Lara makeup....
Honestly that was a happy accident...the first time I'd done blood and wounds. I was as surprised at how good it turned out as anyone else. LOL
View attachment 714931
Omg. I am so sorry.
Ladies and gentlemen, this is why you should never math and post. Honestly I'm sure I could have had seventeen tequilla slammers and not been one quarter as hazy as I was trying to figure out ratios and metric-to-imperial conversions. As I was trying to figure out the ratio I could actually hear my mother's voice across the ages like some Hamletian ghost, 'You should pay more attention in math class~ You'll need it one day~~~'
I saw LadyNerd's Lara icon and got you guys mixed up. (Though I love that this thread has a strong Rey/Lara Croft cross over.)
Yeah, your posts on using an airbrush to create a weathered effect was a godsend. When I was younger, to age fabric I would drag it behind a car, run it through the dryer a million times, leave it out in the sun, sprinkle salt on it, throw it in the dryer with a bag of rocks. Not only were those methods incredibly time consuming, they were absolutely unpredictable. You were always one misstep away from completely ruining the costume. And, well, not to mention it wasn't the more sanitary method.
You were the first person I ever saw mention airbrushing. More sanitary, and way more control because you can actually focus which areas would be sun bleached, which areas would be muddy, etc.
But seriously, if ever you have the time to make a write up of how you got your Lara to look so lived in, it would be so cool. Back when I cosplayed in 2005, the best a google search for "costume weathering" could get you was stories of how Viggo Mortensen aged his Lord of the Rings costume by wearing it while doing things like mowing his lawn. I've always been big on trying to get rid of the 'newness' look of fabric. Colour is a big thing, yes, but there's also something about the way the fibers drape that I could never quite figure out. There's a stiffness to fabric being worn for the first couple of times, but in your Lara costume, that really isn't there. It looks 'lived in'. The fibers look stressed, if that makes sense.
mbotastic said:But the math part of calculating ratios for when I do a larger full dye later, I've been ignoring. Like, oh I'll figure that out later once I find the perfect color! Lol.
Oh man, do I hear you. But it happened so often that I'd stumble across the right colour but couldn't recreate it due to not knowing the measurements that I went in the complete opposite direction of trying to control and annotate every variable.
Still, though, dye is unpredictable. With the head wrappy thing, it looked great in my swatch, but because I switched detergents it turned out far, far, far too warm. The best case for that is to fill your tub or washing machine and start incrementally adding in whatever colour you need (so, since mine was too warm and peach, I wanted to add a cold yellow.) Just little tiny bits. Then take a white, undyed swatch of fabric and swirl it around in the bath for a bit. You don't want to have such little dye so that the wash is basically water and your little white swatch comes out white, but you don't want so much dye that the water is saturated with it. Use your little white fabric to judge when you have just enough water-to-dye ratio to give the white swatch a *tint* of whatever colour you need.
Then throw that bad boy in. If you're going for a little bit of a tint, 5 minutes. A bit more, 10. It's always easier to increase than to take away, so do small increments.
mbotastic said:On another note, I see you are also using the Dharma stonewashed crepe de chine like others. So how have people dealt with it being so shear? Even after dyeing it is pretty shear. Do you just wear something underneath (leggings or spanx or something? Double it up?. Thanks for all your awesomeness!
Oh my god, right? I was wondering about the same thing! It seems to take *some* opaqueness with dye, but I'm still worried about how sheer it's going to look. Like, it's opaque in the shade, but when light hits it from the back... I mean, I don't know, maybe it'll look different on the body? Oh man, I'm so relieved, I thought I'd gotten the wrong fabric. On one hand, it's perfect for a desert climate, but on the other, I was really shocked by show sheer it was. I think the idea of using such an airy, flowy silk for a desert climate is brilliant (it will really help with the photoshoots) but man is it sheer looking.
Still waiting on the serger to get calibrated (picking it up today,) so I don't know how the opaqueness from the dye will look when it's actually worn on the body.
For Rey's Staff, can anyone describe how they attached the two canvas rifle straps to each other and how they attached then to the clasps at either end?
thanks
den
thanks
den
Goldhawk
Well-Known Member
I used one whole strap and one half. I cut ONE of the fastener/hook things at the end off of the whole one, and I cut the second strap in half and the fastener off of that. I then butted the raw ends of the whole and half together (Do NOT overlap!) and whipstitched them together by hand with some heavy duty taupe thread (dogwood color by coats and clark in heavy duty.) and a leather needle, you know, the kind with the triangular point.
The other end of the half strap I then threaded the slider on and one of the lobster claw clasps. I had to look at pictures of the strap to do this. I looped the very end of the half strap around the underside of the slider and sewed it down with the same thread. That left the clasp on a loop at the top. The bottom of the strap I left the original fastener on and used it to attach the other lobster claw clasp, if that makes sense. That part is the bottom of my staff strap, and from a few pics I have seen matches the one in the movie.
I hope this helps. If the words are a little confusing I can post pics of my strap, which I probably will anyway. I think Fett4Real posted some, but he was the only one and we ought to have a little more
- - - Updated - - -
Also, what straps are you using? I used the vintage WWII British Enfield Rifle straps in tan. I know, I know, I felt awful about cutting them up.
Oh, by the way, the other half of the strap you cut up will be the side water bottle holder on the backpack.
https://m.youtube.com/watch?v=PDltmxEo7mIFor Rey's Staff, can anyone describe how they attached the two canvas rifle straps to each other and how they attached then to the clasps at either end?
thanks
den
kristen jones
Master Member
I used one whole strap and one half. I cut ONE of the fastener/hook things at the end off of the whole one, and I cut the second strap in half and the fastener off of that. I then butted the raw ends of the whole and half together (Do NOT overlap!) and whipstitched them together by hand with some heavy duty taupe thread (dogwood color by coats and clark in heavy duty.) and a leather needle, you know, the kind with the triangular point.
The other end of the half strap I then threaded the slider on and one of the lobster claw clasps. I had to look at pictures of the strap to do this. I looped the very end of the half strap around the underside of the slider and sewed it down with the same thread. That left the clasp on a loop at the top. The bottom of the strap I left the original fastener on and used it to attach the other lobster claw clasp, if that makes sense. That part is the bottom of my staff strap, and from a few pics I have seen matches the one in the movie.
I hope this helps. If the words are a little confusing I can post pics of my strap, which I probably will anyway. I think Fett4Real posted some, but he was the only one and we ought to have a little more
- - - Updated - - -
Also, what straps are you using? I used the vintage WWII British Enfield Rifle straps in tan. I know, I know, I felt awful about cutting them up.
Oh, by the way, the other half of the strap you cut up will be the side water bottle holder on the backpack.
Quite succinctly put.
I did the exact same. :-D
mbotastic
Active Member
Hi all,
Thanks for being such a rich resources of thoughtful and creative knowledge and for being open to sharing it. I have a quick staff related question. I've been hard at work building my staff with 3D printed parts. I put then on an aluminum rod, hoping for some added heft. Today I had the realization that because of this it maybe won't be let into conventions (I'm in Boston so I'm firstly thinking Boston Comicon where metal props aren't allowed I think). Has anyone eye used an aluminum rod and been able to go to cons? Oh brother, I think I probably have a lot of work to undo. Thanks for any tips.
Thanks for being such a rich resources of thoughtful and creative knowledge and for being open to sharing it. I have a quick staff related question. I've been hard at work building my staff with 3D printed parts. I put then on an aluminum rod, hoping for some added heft. Today I had the realization that because of this it maybe won't be let into conventions (I'm in Boston so I'm firstly thinking Boston Comicon where metal props aren't allowed I think). Has anyone eye used an aluminum rod and been able to go to cons? Oh brother, I think I probably have a lot of work to undo. Thanks for any tips.
thanks guys.
that was very helpful, especially the video. I did as prescribed and my staff is now done, though the soft parts could stand some weathering. For the wraps I cut up a brown T shirt and a white T shirt into strips.
I didnt take any pics yet but I'm pretty happy with how it came out.
that was very helpful, especially the video. I did as prescribed and my staff is now done, though the soft parts could stand some weathering. For the wraps I cut up a brown T shirt and a white T shirt into strips.
I didnt take any pics yet but I'm pretty happy with how it came out.
jackwabbit
Well-Known Member
Hi all,
Thanks for being such a rich resources of thoughtful and creative knowledge and for being open to sharing it. I have a quick staff related question. I've been hard at work building my staff with 3D printed parts. I put then on an aluminum rod, hoping for some added heft. Today I had the realization that because of this it maybe won't be let into conventions (I'm in Boston so I'm firstly thinking Boston Comicon where metal props aren't allowed I think). Has anyone eye used an aluminum rod and been able to go to cons? Oh brother, I think I probably have a lot of work to undo. Thanks for any tips.
Hm. I haven't had this issue with props, but yeah. I guess if it's not metal, maybe it would be an issue? That said, the metal is inside in this case, so it might be be recognized as such? I used PVC for mine. It was a bit floppier than I wanted until I doubled up the PVC (put a 1/2" pipe inside my 3/4" pipe using electrical tape on the outside of the smaller one to make a super tight fit, so no rattling). I'd recommend a wood dowel for best of both worlds?
Good luck!
kristen jones
Master Member
Yup. Wood Dowel.
I did that, and have had zero wobble issues or refused admission to con issues.
Plus I made it sectional, so i can break it down into two for packing.
I did that, and have had zero wobble issues or refused admission to con issues.
Plus I made it sectional, so i can break it down into two for packing.
Similar threads
- Replies
- 18
- Views
- 1,489
- Replies
- 9
- Views
- 741
- Replies
- 2
- Views
- 567