cavx
Master Member
The pair I molded was from a size 10 or 11 I believe...but I modded a size 13 and they fit. So I haven't really felt the need to make anymore sizes. Yea, the stuff I use is "water clear" it's completely clear. I think mold release and mold finish affect the transparency the most. Even humidity can affect clarity.
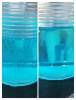
This stuff is hydroscopic meaning it attracts water which then clouds it. So don't mix and pour on cold or rainy days. Lucky right now, it is dry and hot.
I was curious about the larger sizes because it seems like only the mid-sole changes.
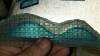
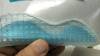
What I intend to do soon is to make a hard cast of each part of the molds and sand the inside parts to at least 400 grit, then make a new silicone mold from that. i ended up polishing the inside half of the molds I made (I used A40 shore silicone and have since found an A60 shore) with a ceramic bit. It took the rough surface where the silicone molded the glue marks off the original parts and gave them a more uniform look.
These V3 US10 parts fit the V2 8 and 8.5 which is interesting.
Last edited:
 could you please guide me, i really want these shoes but i want a nice looking model with good light, what do i have to buy ?