My Early Disasters pt 2 - A Biker Scout Helmet - How hard can it be?

Wedge86 - I'm finding the more I use it, the less intimidating it is. The sanding is a huge pain though.
I realised last night that the shape of the mouth area was all wrong, so I modelled a better version with modelling clay, and will bondo it tomorrow. Probably. Fence permitting.
20171021_225930.jpg
 
Every time you post, I smile.

Nice progress.

Don't know if you caught my latest project, but it might be one to add to your list when you've finished the current master piece.

I turned this
37585626022_53f25bf141.jpg


Into this
37617900801_c875945811.jpg


I used the same techniques as you -Bondo, lots of sanding, and a new paint job. I don't have any WIP pics or video this time, but you can view more pics here:.https://www.therpf.com/showthread.php?t=282542&p=0#post0
 
So much sanding to do. So little time available. Hey, everyone is eating dinner and having conversation...Think I'll slip down to the workshop and rub my hat for a while. (That sounds bad.)
Wow, this bit is so smooth, bet if I spray the helmet, it'll look cool!

20171026_195036.jpg
No it does not.

Damn.

More sanding soon.
 
Working in small bursts, I'm having to concentrate on a small area. With typical brilliance, it is an area that does not quite appear in this photograph.
20171102_073539.jpg
Yesterday's ten minutes of work resulted in a better surface in this area, almost good enough that I can move on to a different section. I also added more bondo to areas that were severely dented, out of shape, or badly covered in the first couple of rounds. I think it's a safe bet to say I'm not going to be done by November, but it does look like I'm actually in this for the long haul, scrubbing away at small areas until they're right.

I don't know how I'm going to do the eyepieces. At all.
 
A few more passes with 80 grade sandpaper, with additional layers of paint in between sanding, and the area I'm concentrating on is looking good. Despite a couple of layers of lacquer, it still looks a little flat. The photo shows the other areas that need more work, but I'm not rushing.
20171110_205634.jpg
I like the 80 grade because it removes material well, but leaves things pretty smooth. Not PROFESSIONALLY smooth, but we all know the standards are lower here. But I do have standards.
 
A few more passes with 80 grade sandpaper, with additional layers of paint in between sanding, and the area I'm concentrating on is looking good. Despite a couple of layers of lacquer, it still looks a little flat. The photo shows the other areas that need more work, but I'm not rushing.
View attachment 772408
I like the 80 grade because it removes material well, but leaves things pretty smooth. Not PROFESSIONALLY smooth, but we all know the standards are lower here. But I do have standards.

Your continued effort and perseverance are truly to be admired. I'm inspired.
 
Today I was at the FanExpo Vancouver, looking enviously at the various suits and helmets on display (I was dressed as Clark Kent, and I kid you not, no one noticed.). Anyway, amongst the various stalls there was a guy selling off blasters and modded helms, and he had a Rubees Clone Trooper Mk II that was really nice, and reminded me what a long way I still have to go.

Unfortunately, although it's a long weekend, my kid has her film-making course buddies filming a short in our house all day tomorrow, and I have to take the dogs out for the day. No work for me.

Those 501st guys though... HOW DO THEY GET THEIR HELMETS SO SHINY?
DSC01438.JPGDSC01443.JPGDSC01462.JPGDSC01472.JPG
 
It is a truth universally accepted that there are no shortcuts to quality. There's the famous triangle of work : Fast, good, cheap. You can pick any two. Since cheap is my watchword, getting good results is never going to be a speedy process. But am I one to accept the wisdom of the ancients? No, I am not. I'm not even one to accept the wisdom of the middle-aged. So I always go looking for things that will make this easier.

Of course, the easiest way to get good results is to plan carefully, measure precisely, prepare meticulously, and craft with care and attention.

Like THAT's gonna happen....

As I scrub at my imperfect bondo surface int he random ten minute stretches that I claw out of odd days, I wonder if there are ways to compensate for my hamfistedness. And recently, reading a book someone else has written on cosplaying (A book more expensive and less detailed than my own two, btw) I heard about spray filler.
https://www.homedepot.com/p/Rust-Ol...Primer-Flat-Gray-Spray-Paint-249279/202097276

So, I picked up a can, hiding the purchase in the prep for Halloween. It's not a cure-all, and it's best for filling tiny holes and scrapes. I used it on the area I've been concentrating on, and the results are...well, they're not astounding, but sanding this paint with finer sandpaper does give a good surface. I think I'll use it as a final layer, once I've sanded the heck out of the rough bondo and filled the major holes and problems.
20171114_175149.jpg
 
It's tempting to post endless pictures of a slight;y-changing surface, but there are some big issues still to address. I don't have time to do that, obviously, because this is the weekend we put up the Christmas lights and build a new sideboard in the kitchen, but I did make a couple of attempts and take photos. Look at this:
20171125_130547.jpg
So, in the pep model, there were pieces I will call "The Sideburns". They came down pretty low and had cutouts in them. When I was adding the bondo, I simply coated them like everything else, but my additional research didn't show them on any of the TIE helmets I could see. Especially this model -
20170923_194915.jpg
So, I clipped off the ends of the sideburns, and covered the resulting disasters with some plasticine. I have some other areas to re-cover with bondo, so this and the other side become part of that. Here's the other side:
20171125_130556.jpg
Frantic sanding in five-minute bursts here and there has resulted in a fairly smooth dome, but the lower regions need more smoothing, and the edges need better definition. Plus, there are some gaps appearing where the bondo didn't take, or the paper underneath is worn through.
20171125_130644.jpgThis is the good side.
20171125_130634.jpgThis is the not-so-good side.
 
Impressive progress! It's really coming along.

I used that same filler primer on my pepakura Resistance helmet. My advice would be to wait until you're ready to paint to apply it. Do it in semi-thick coats and let it dry fully (overnight) inbetween coats. 2 coats will really fill in the imperfections in your sanding - but it won't work miracles! Luckily the Star Wars universe is meant to look slightly lived-in, although I realize I can get away with more wear and tear on the Resistance helm. Also, don't make the same mistake as me and try to mask too early before your filler primer has dried. Since it goes on pretty thick, I can't stress enough to let it dry. I only let mine sit for a few hours (in 100 degree F heat) and after I did some masking, I pulled up the entire coat of paint I had over the filler primer, as well as the primer itself.

Also, if you were planning on using the Bondo spot filling putty, I would advise against it. It's not much more use than regular Bondo and it's really only for little tiny scratches or pot marks. Not to mention it's exorbitantly expensive.

Best of luck, can't wait to see it finished! (but take your time!!) :D
 
Thanks to TerranCmdr and SnowBuilder for the kind words and advice. Mrs Dim is in the UK this week, so I'm planning to front-load the week with domestic duties, and skive off the last half playing Battlefront and fixing up the helmet. Stand by for more incoming pictures that look curiously similar to the last bunch, unless examined minutely.

Also, fairly convinced the next project is a Shoretrooper helm. Pity really, because I was hoping to keep my sanity all the way through 2018. Still, you can't have everything. Where would you put it?
 
Nice progress! A ton of Bondo later... How heavy is it? All that Bondo usually adds some weight! You know it feels like just yesterday you were starting this thread... Crazy how time flies!

Sent from my XT1097 using Tapatalk
 
Nice progress! A ton of Bondo later... How heavy is it? All that Bondo usually adds some weight! You know it feels like just yesterday you were starting this thread... Crazy how time flies!

Sent from my XT1097 using Tapatalk

Thanks PropReplicator2! Pretty sure it wasn't yesterday, cos yesterday was Monday and I achieved nothing, personally and professionally. The helmet is currently running lighter than average for one of my projects, in that it can be lifted by one reasonably fit man, but that doesn't matter because, thanks to my scaling problems, it's too small to go on an adult head. If you forced it onto a child's head, the poor mite would topple over within a minute, but also have their face lacerated by the clumsily applied fiber-glass matting inside. It's like razors in there. Naturally, I've put in some duct tape, but it wasn't as useful as I expected it to be...

But yeah, time flies when you're avoiding domestic responsibility, and I really hoped I'd get this one done by the release of Battlefront 2. Now I'm thinking I'll get it done by the time I purchase Battlefront 2, which is when the price drops below $20. That seems more manageable.
 
Disgusted with myself. It's Saturday afternoon, and I have around twenty four hours before Mrs Dim returns from the UK, and a hefty amount of that time has to be spent cleaning all the things I've been telling her I was cleaning every day. Add to that the fact that my Middle Kid has been actually doing some extra-curricular schoolwork (which is great) that requires me to drive her all over the place (which is not), and the dog training and actual "getting paid" work, and I have achieved about thirty minutes of helmet work. In a sodding week. Amazing.

However, it was the kind of stuff that's difficult to do with Mrs Dim around, because there's very few occasions when we're not both in the house together and the smell of bondo worries her. Can't imagine why.

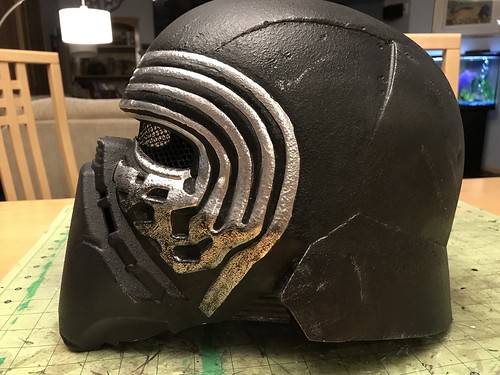
So what I did was mix up a fresh batch and go over the areas where I have sanded so much there are holes, or where the surface was so uneven sanding wasn't helping, or where the Pep model got cut up after the lacquer went on. So yeah, I have more sanding to do, but it should be the last time I add stuff on.*
20171209_150118.jpg20171209_150153.jpg
On the plus side, I have yet to look up any pep models for the Shoretrooper helmet, or that video I know is on YouTube. I have one reference picture that I took at Disney last March, and I haven't even copied it from the holiday photos into the "reference pictures" file. Restraint.

*Sometimes I think I make statements like this just to disappoint my future self. Past Me is way too optimistic.

- - - Updated - - -

Oh, and weird footnote. Remember I said I was trying out the spray filler? I bought two cans of it, on separate days. Both cans are gone. Vanished. Not a sign. Nobody but me uses spray paint at all in this house, and certainly no one is in a hurry to spray anything a dull brown. What the hell?
 
The thread counter is telling me it's been three weeks since my last post. Santa brought me a useful present that I've been very keen to make use of:
20171230_150324.jpg
It's taken a while to get enough time to use the damn thing. So long, in fact, that I'd accidentally sprayed the helmet black in the hopes it would look finished and I could move on to the next project.
20171230_150332.jpg
It does NOT look finished. There followed a very satisfying hour or so of sanding, cursing, changing tools, drilling, filing, hand sanding and getting polyfiller on my new Avengers T-shirt.
20171230_151851.jpg20171230_155404.jpg
After that I had to help my wife re-upholster some dining room chairs, so I quickly dumped another two layers of paint over the helm.
In this picture it looks pretty good, but when the paint dried, it showed up a whole bunch of imperfections. I think I'll be using the polyfiller to cover over the worst, rather than trying to sand them down, but it's probably going to be 2018 before I get another decent run of time in the workshop.
20171230_165801.jpg
2017 may have been a crappy year for the world (as a UK ex-pat I feel the pain of the Brexit shenanigans, while having little fallout personally) but it's been a good one for me and my family. I hope it's treated you guys well, and that 2018 comes with more fun and successful projects for you all.
 
This looks really good. The dome looks really smooth. Nicely done.

Hope you have a great New Years and I can't wait to see your progress in 2018.
 

Your message may be considered spam for the following reasons:

If you wish to reply despite these issues, check the box below before replying.
Be aware that malicious compliance may result in more severe penalties.
Back
Top