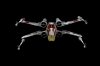
I did a quick build of a 1/72 Bandai X-Wing as Red 6, with a few artistic (read: lazy) liberties here and there. Not really any WIP pics, but here are some completed ones.
Base coat is AS-20. Red stripes were masked and painted with nine parts red and one part hull red. Yellow is a mix of deck tan and yellow. Weathered with pastels and Tamiya panel line paint for the droid strip to help the krazy detail in that area pop a bit.


To see more pics go here: https://flic.kr/s/aHsma6VfPN
Thanks for looking!
SB
Base coat is AS-20. Red stripes were masked and painted with nine parts red and one part hull red. Yellow is a mix of deck tan and yellow. Weathered with pastels and Tamiya panel line paint for the droid strip to help the krazy detail in that area pop a bit.
To see more pics go here: https://flic.kr/s/aHsma6VfPN
Thanks for looking!
SB