Building an Ark shipping crate
Because I had to ship off the ark to get it sprayed gold, it needed a crate that would allow the pieces to travel without any chance of rubbing or wear on the parts.
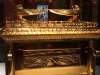
This is what I ended up with.
Functionally, the ark box is supported on the bottom with spacers that keep the legs and box away from any part of the crate, or even any packing material inside. It is attached to those spacers through the bottom with lag bolts. The lid is turned upside down and screwed to a shelf inside from the bottom. That shelf is screwed to horizontal runners, the long flat leaves get bubble wrapped and attached to wood that is and screwed to the inside of the long crate panels, and the cherubs ride inside the box in bubble wrap. The thin piece that is used on the bottom of the lid is attached to the underside of the top for travel. There are felt pads under the legs and on the shelf.
The rattle can lines painted on the crate indicate the orientation of the removable top side and end panels, and which screws are used to allow that. The board on the top of the crate is there to make it less convenient for the shipper to place another pallet on top of this one because even when you specify no stacking, the carrier will do it anyway.
The overall dimensions are 48" x 32" x 30-5/8" high, plus the base risers. The risers are 3-5/8" high (but anything close is good) and that top brace is 2-1/4" high (but anything close is good). Keep in mind you shouldn't exceed the 48" x 40" dimensions of a standard pallet.
It's built from 3/4" plywood and some 2" x 2" material for the corners and assembled with drywall screws.
The top, one end and side are taken off to allow access for loading and unloading.
This isn't meant to be a project with dimensions or a cut list, but rather just a guide to show you how I did it in case you plan to ship yours as well.
philip