Galileo Study Model - half studio scale replica

Shaw

Well-Known Member
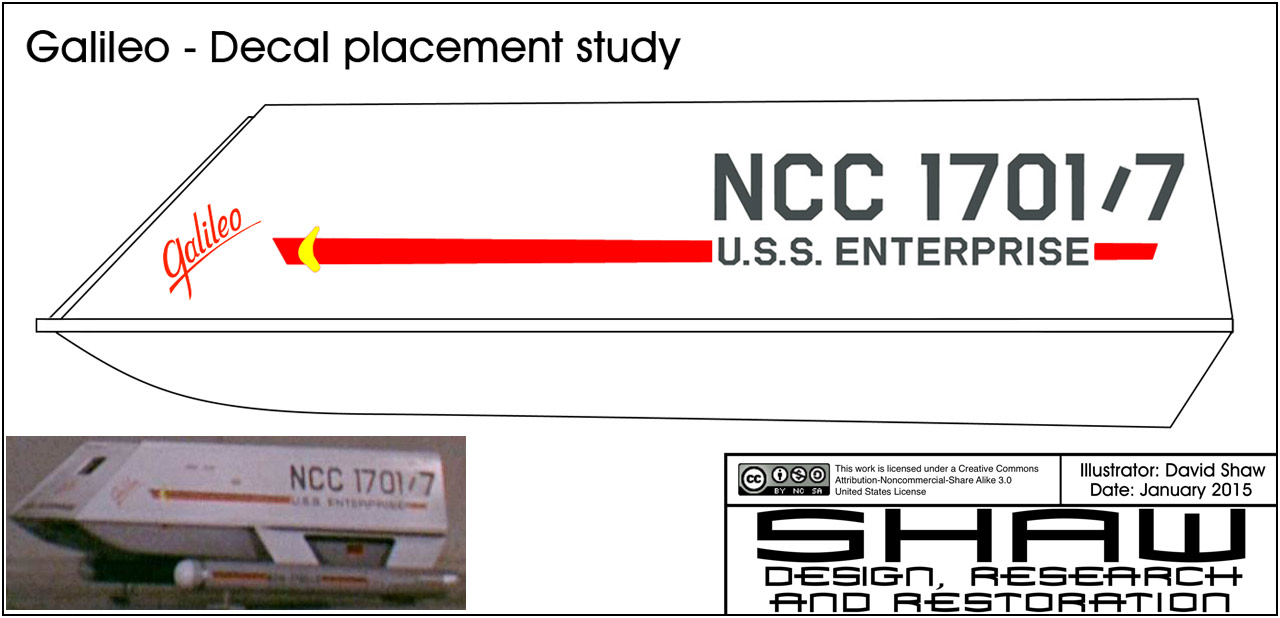
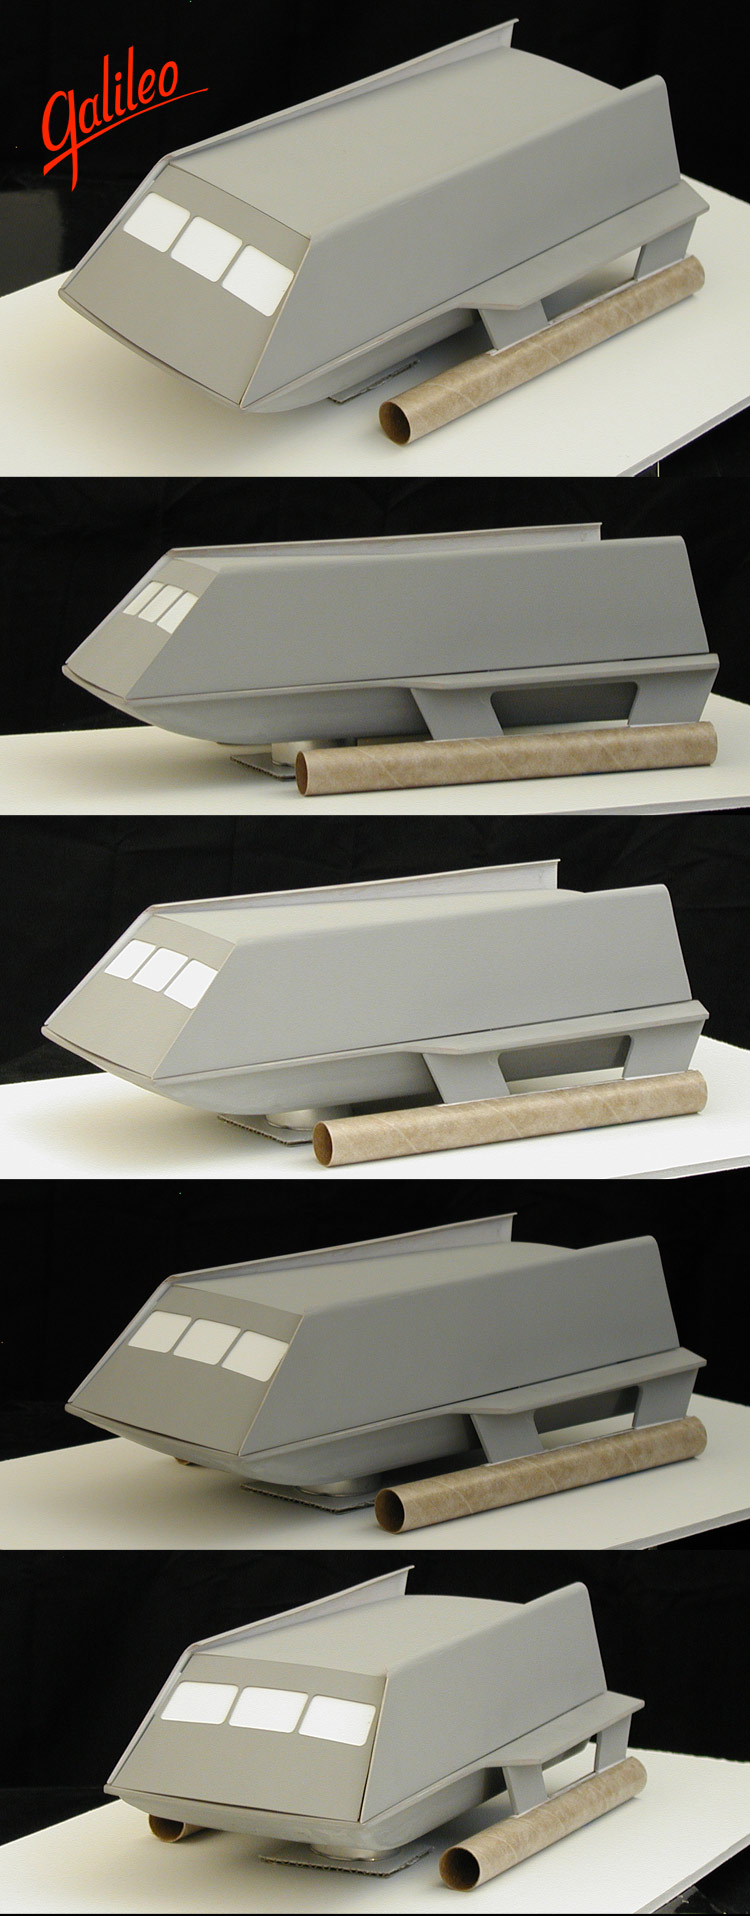
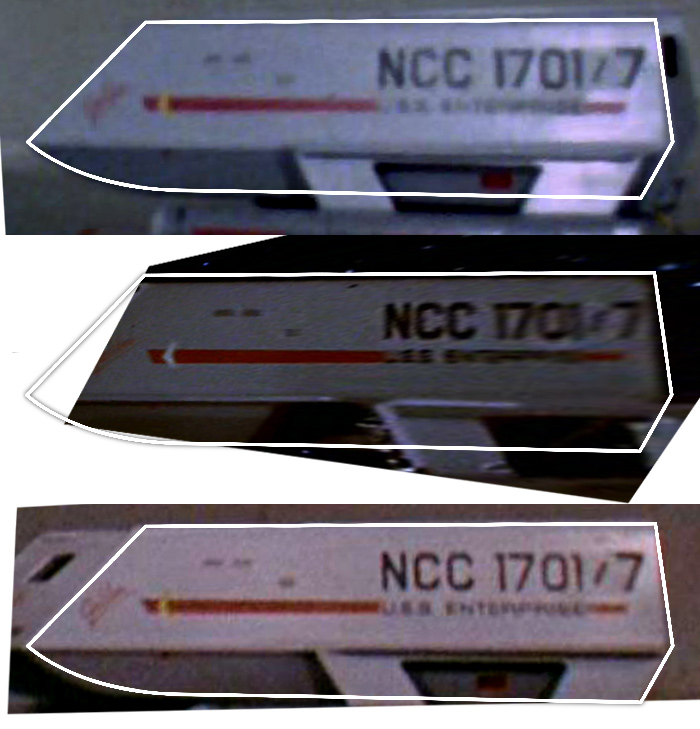
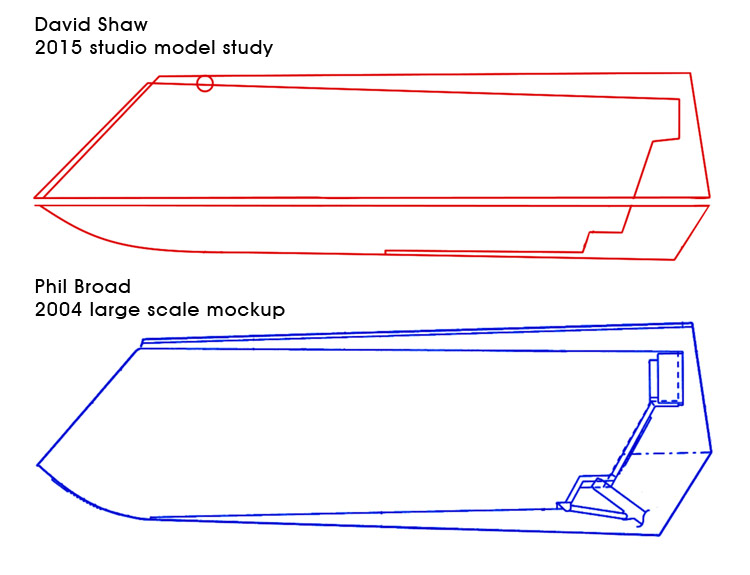
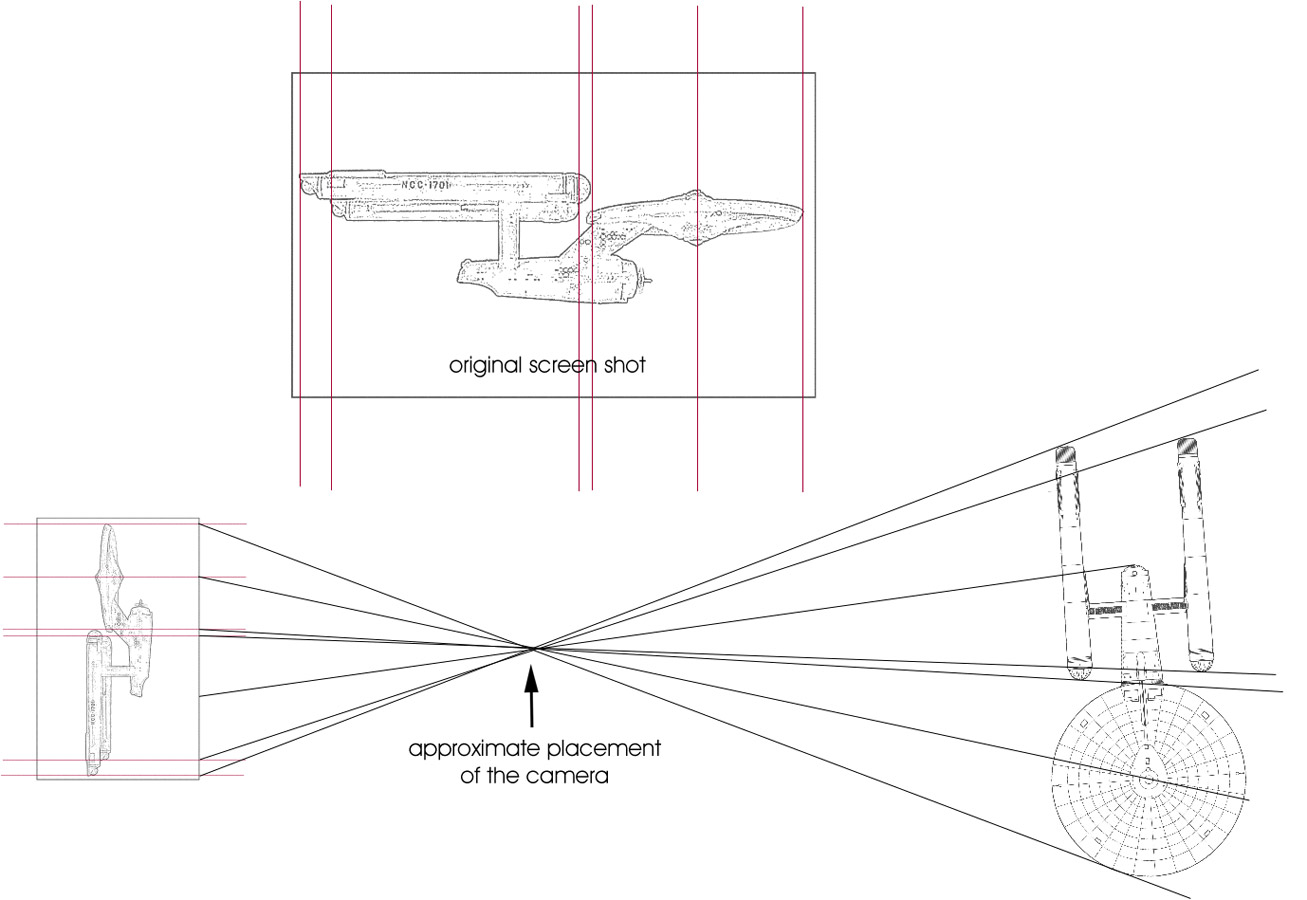
Over the weekend I sketched out plans of the Galileo studio model based on reference photos I had on hand and decided that I should cross check them by building a model. When I looked at doing a studio scale representation, it knocked itself out of what I could afford (in both time and money) right now... but half studio scale seemed to be okay.

This model takes a back seat to the 33 inch TOS Enterprise, but any time I find myself some free time (I'm waiting for materials to be shipped to me to make molds and cast the first major parts of that model), I'll throw some effort in this projects direction.


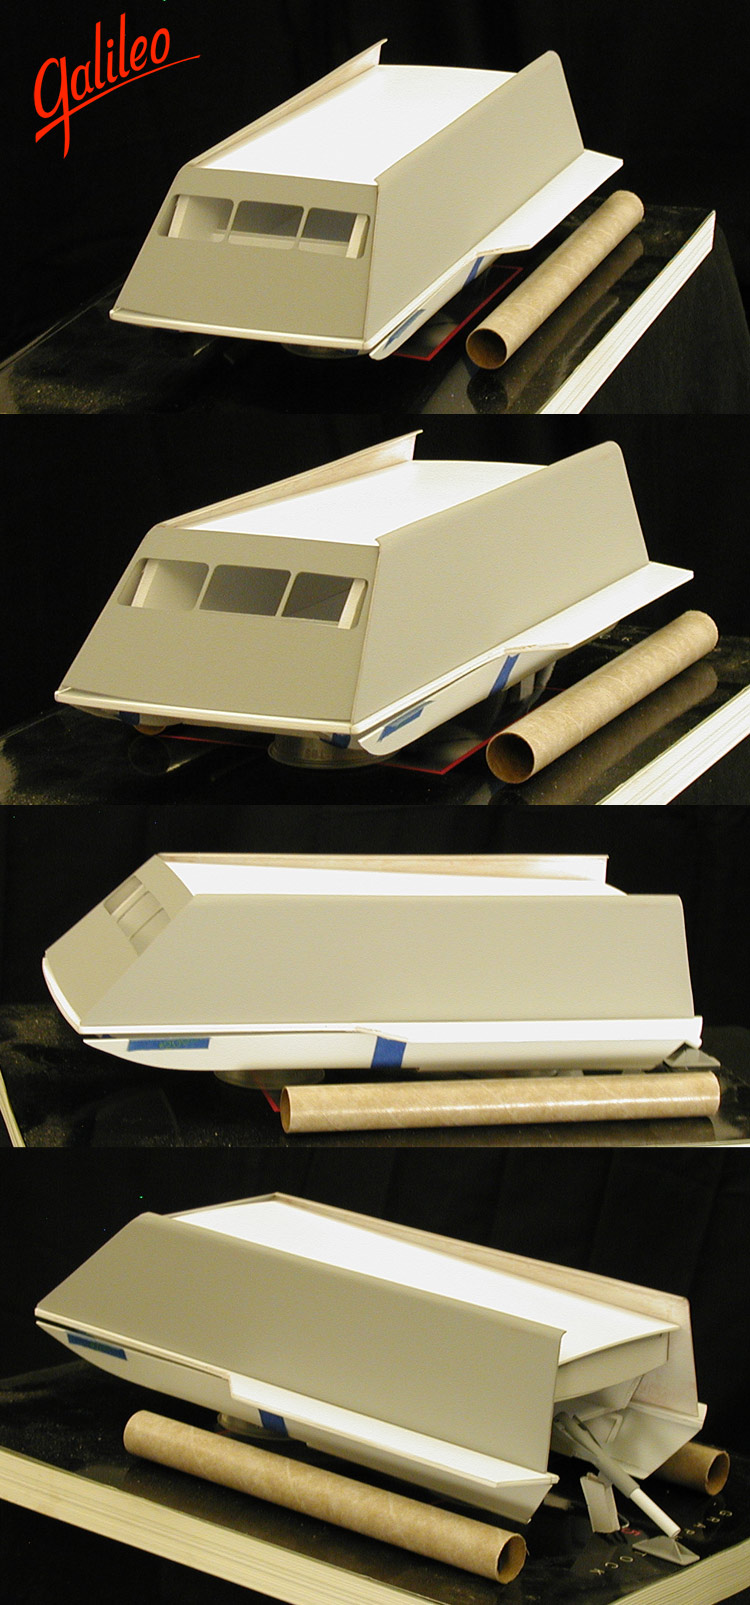
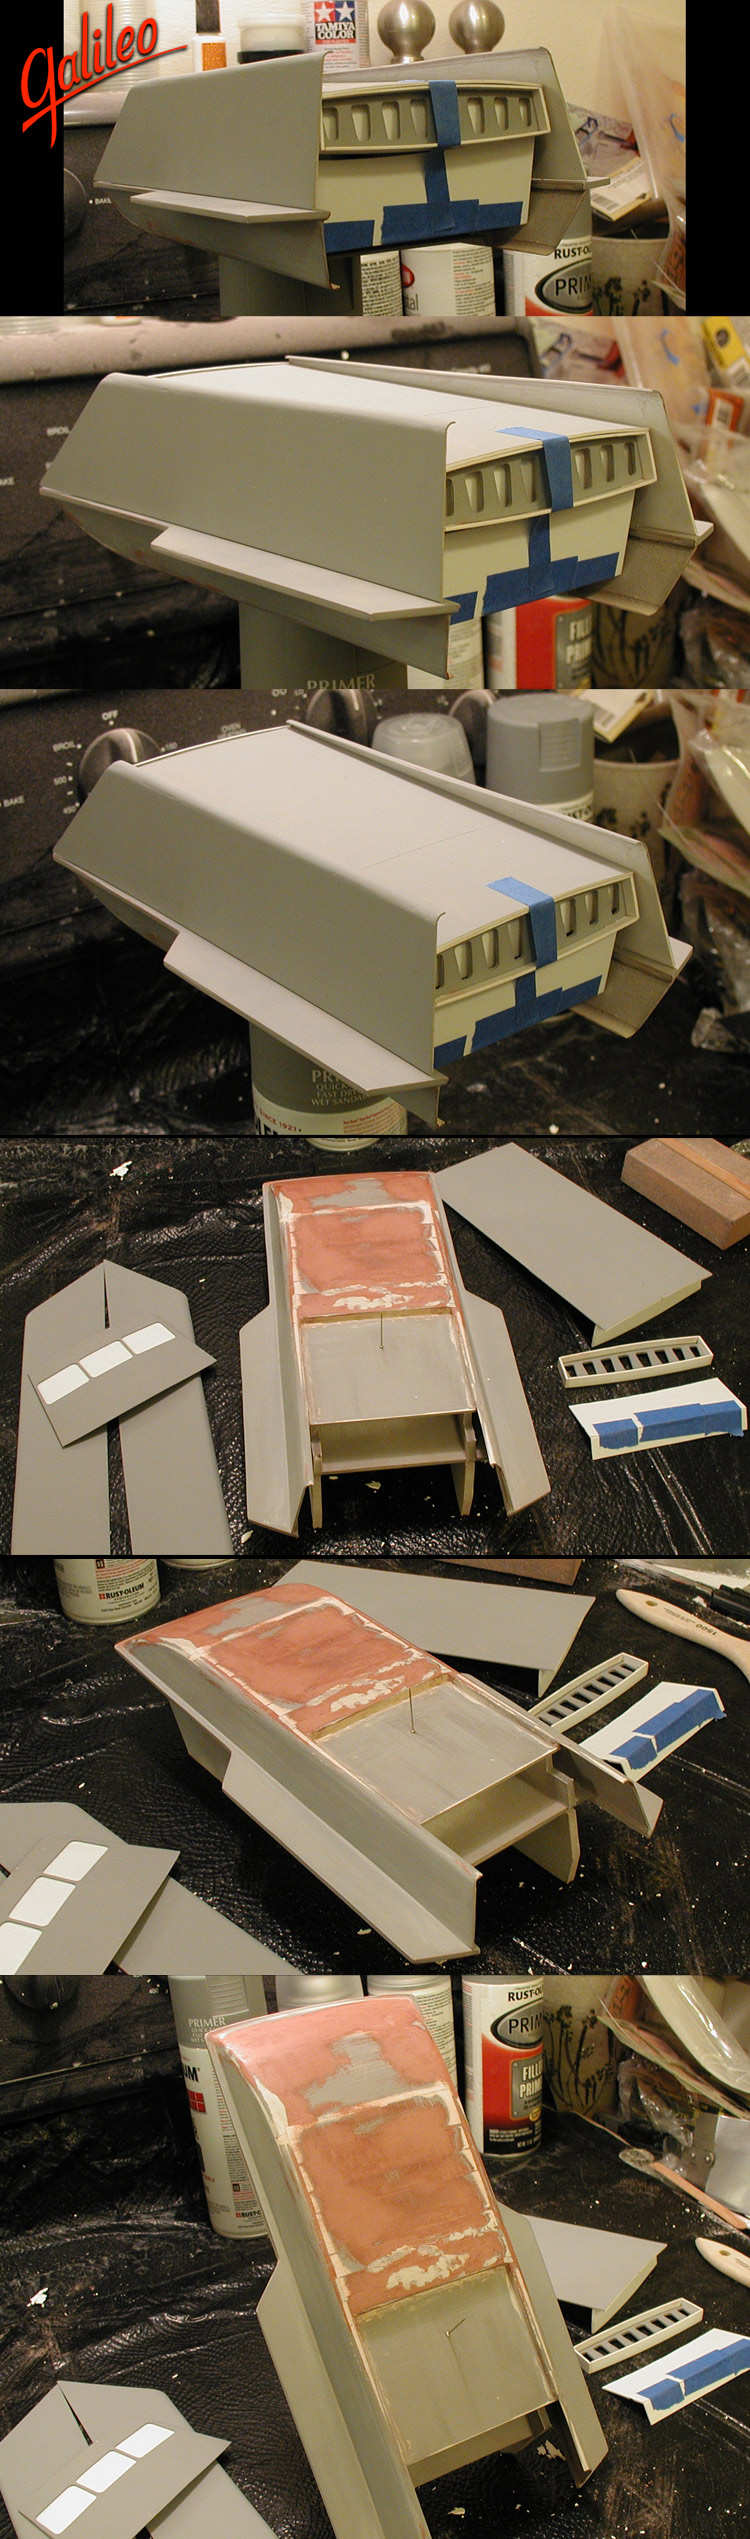
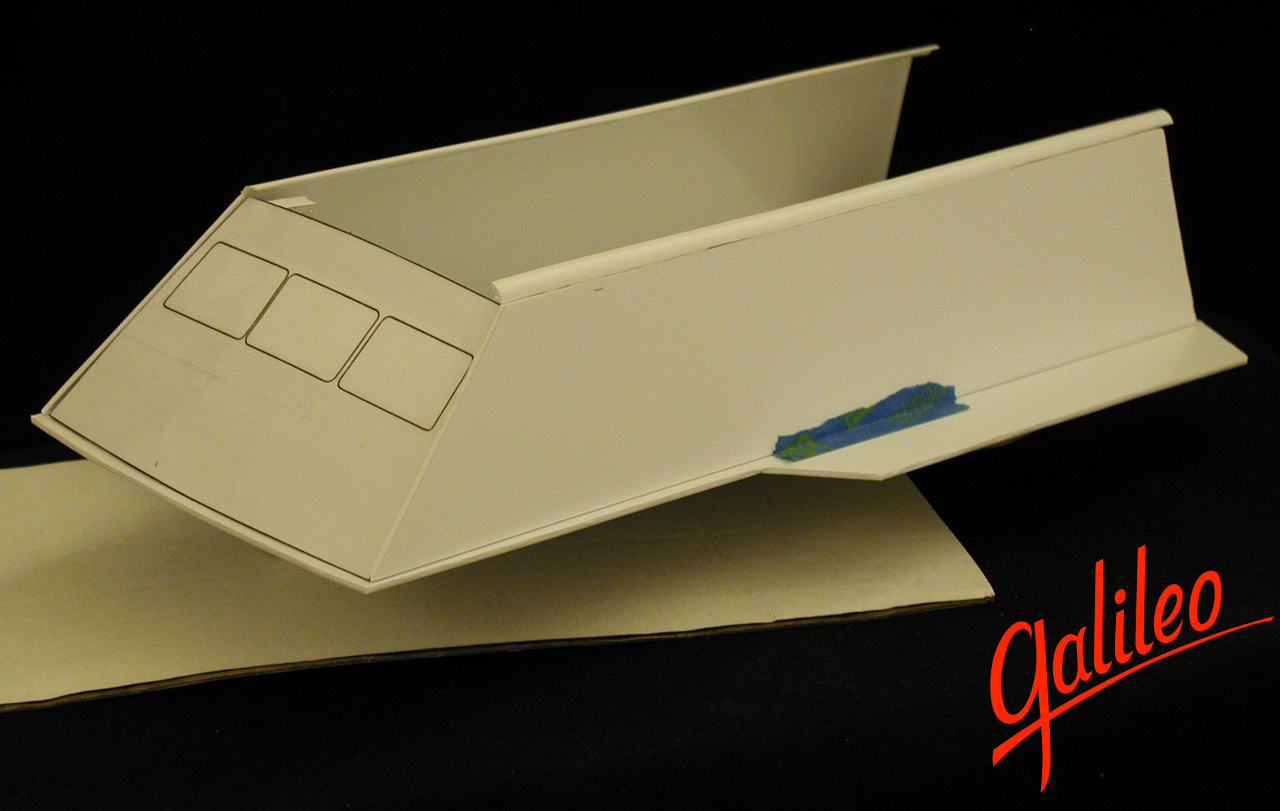
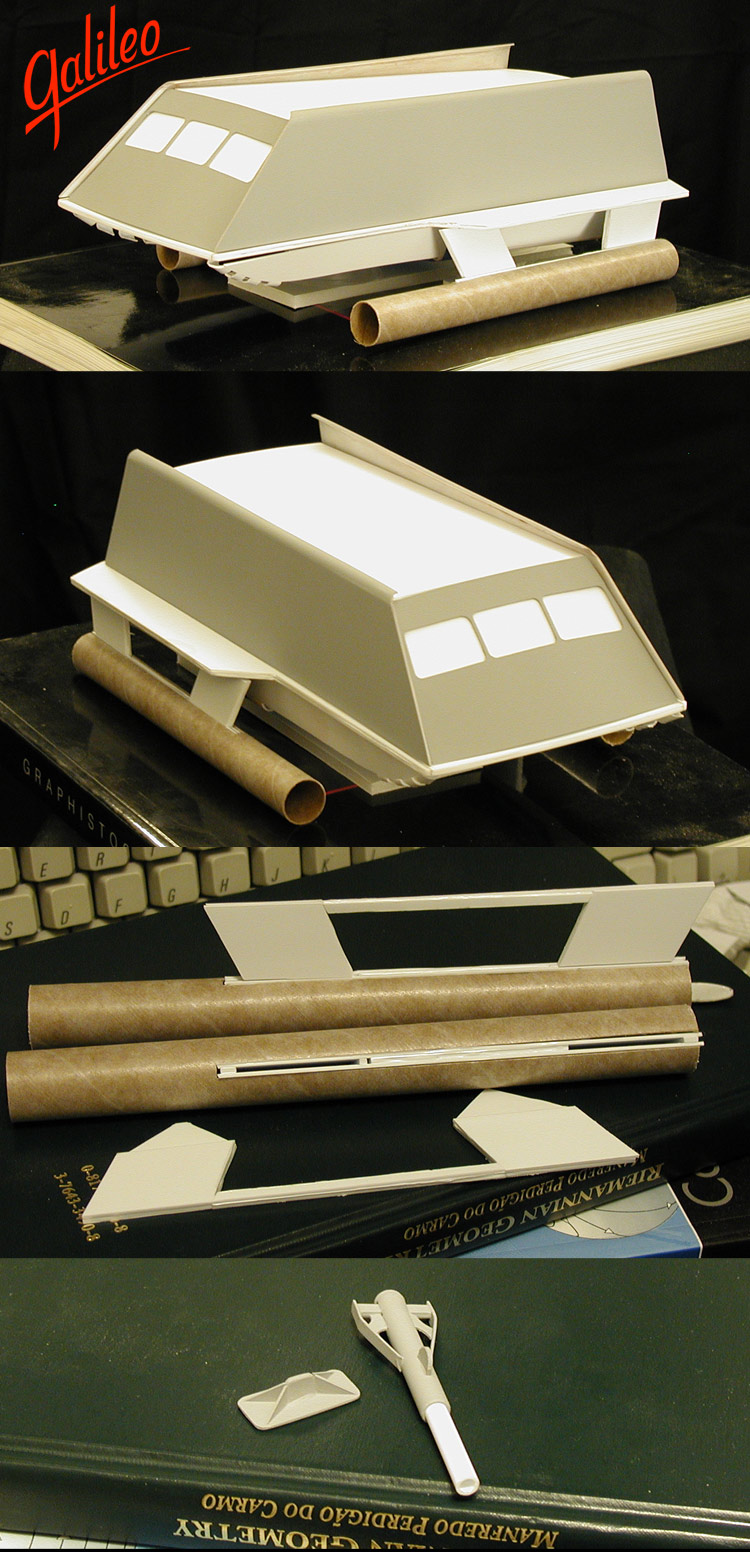
Today I printed out templates and started cutting out parts... not much to it so far.
 
Kewl! Given the awesomeness that is your Phase II study model and TOS Enterprise 33-inch builds, I just know you'll do this one justice ;)

I've done a considerable amount of research into the original Galileo filming miniature as I'd started a similar project to replicate the set-used filming model, but due to an unfortunate mishap which resulted in the loss of some parts it got put on hold, and as other projects took priority it kind of got put on the back burner.

Anyway, if you need any sort of assistance I'm available to lend a hand. @feek61 would also be a good source of information, as he built his own studio-scale Galileo miniature before I did (his is what motivated me to make my own). I know you're the type to always thoroughly research any build you take on, but figured I'd make the offer all the same :)

Given that the original set-used filming miniature was 22 inches in length, with yours being half-scale would that put its length at 11 inches?
 
Thanks, I appreciate the offer. I actually spent some time reviewing both builds before I started in on this one to help me get some ideas on how I wanted to approach it.

Given that the original set-used filming miniature was 22 inches in length, with yours being half-scale would that put its length at 11 inches?
Yep, with the rear landing pad it'll be slightly over 11 inches. And like a lot of my research, this is a study of the model as a model, so because the original didn't have an interior, neither will this one. I did an interior set study for Starship Exeter about 10 years ago and there is tons of info about the large scale mockup, so I felt like this filming model should get some attention.

Right now I'm trying to decide if I should make the face plate removable. This isn't going to be a lit model, so there isn't a good reason to include this feature on this build. I might just include a panel line representing where the seem would have been and hold off on replicating the functionality of the studio model for a studio scale build.

I've also been studying the decal placement on the original model, noting differences from other decals used in the series. One thing I noticed is that Galileo seems more italicized than on the larger mockup.


I'll keep working at it until I feel it's right.
 
Some more progress shots...

galileo_003.jpg

Most everything in those images is either taped together or set in place... there is still a long ways to go.
 
Looking good so far, sir! :D It's already starting to really take shape, imho. A couple questions though, if you don't mind.

First off, since there will be no interior what are you planning on doing for the forward viewports? Are you going to use black or smoked plexi? Or were you thinking of having all three greyed out like we sometimes saw on the filming miniature? Maybe just the middle one "open" (black/smoked plexI)?

Secondly, how exactly did you manage to fabricate the rear landing strut? The part that attaches underneath the impulse drive looks a helluva lot nicer than what I made, lol.
 
Thanks guys!

First off, since there will be no interior what are you planning on doing for the forward viewports? Are you going to use black or smoked plexi? Or were you thinking of having all three greyed out like we sometimes saw on the filming miniature? Maybe just the middle one "open" (black/smoked plexI)?
I'm going with the windows closed look, so the part in the previous set of images (made of 0.02" styrene) will be glued onto another part (made mainly of 0.04" styrene) that has a slight curve to it to make the window openings inset. The windows will be hull color, with some weathering to help make them more visible.

It is interesting that the studio model was design so that this part was removable so the option of how the windows could be set was there for the effects team (as well as access to the internals for maintenance). I think the model was built with the idea that it would get more time in front of the cameras than it actually got.

To date, the only images I have of the studio model's starboard side during TOS is from a short shot of the model (with just the center window open) in Journey to Babel.

Secondly, how exactly did you manage to fabricate the rear landing strut? The part that attaches underneath the impulse drive looks a helluva lot nicer than what I made, lol.
Thanks!

I'll take some better shots of it, but it is mostly just small pieces of styrene brought together. I haven't decided if I'll be using it or not as some of the effects shots of the model didn't include it. The model won't be sitting on the display stand I'll be making, it'll be elevated, so it wouldn't be used/needed to support the model.
 
[...]

I'm going with the windows closed look, so the part in the previous set of images (made of 0.02" styrene) will be glued onto another part (made mainly of 0.04" styrene) that has a slight curve to it to make the window openings inset. The windows will be hull color, with some weathering to help make them more visible.

It is interesting that the studio model was design so that this part was removable so the option of how the windows could be set was there for the effects team (as well as access to the internals for maintenance). I think the model was built with the idea that it would get more time in front of the cameras than it actually got.

To date, the only images I have of the studio model's starboard side during TOS is from a short shot of the model (with just the center window open) in Journey to Babel.

Good call on having the viewports closed. Especially since this will be an interior-free build, there's not need to do anything else. I'd be interested to know what you plan on using for the hull colour, as I never got far enough along with my studio-scale build to figure that out. FYI, I believe the top and bottom halves of the hull were slightly different shades.

It is interesting they put so much thought into its design, likely for the reason you mentioned. It's a shame it didn't get more screen time. I would've liked that. Like you, Journey to Babel is the only episode I can think of where the filming miniature's starboard side was shown. Then again, that was probably due to the port side having more detail on it, and therefore more interesting to look at.

[...]

I'll take some better shots of it, but it is mostly just small pieces of styrene brought together. I haven't decided if I'll be using it or not as some of the effects shots of the model didn't include it. The model won't be sitting on the display stand I'll be making, it'll be elevated, so it wouldn't be used/needed to support the model.

Please do, as I'd like to see it's construction for myself. I tried emulating the design of the full-scale mock-up (my build was meant to be an idealized combination of both the studio-scale and full-size models), but my attempts came out not looking as good as I'd hoped :p lol
 
Right now I'm leaning towards Tamiya Insignia White (AS-20) for the main hull color and Light Gray (AS-18) for the underside and nacelles. The main thing for me is that the nacelle domes (which will be white) are different enough from the main hull color, so I'll be testing a number of colors.

I still need to do a color examination of the photos, and the main thing I'll be looking at will be the brightness levels on the two colors. If I can match the difference in brightness of the two grays (and between them and white) to the original model, then I should have something that matches the feel of the original.


And here are a few more progress shots...

galileo_004.jpg

I've started on the nacelles and the supports. Right now I'm mainly making sure that a slot fit attachment system on them works correctly before worrying too much about the final contours and details of the parts. The idea is that the nacelles will be the last thing attached after all the painting is done. That way I won't have to fight the model to make sure things are getting even coverage or making sure areas are correctly masked.

The rear landing strut is, at this point, a work in progress... maybe even a first try. It didn't take that long to make, so I might take another stab at it.
 
I've made a little more progress...

galileo_005.jpg

... mostly on the underside of the model. The top looks like it'll come together without much work, so I'm putting off gluing those parts in place until I finish dealing with the bottom.
 
:thumbsup

A little more progress...

galileo_006.jpg

... again, mostly on the underside of the model.

I've also done additional image studies on the markings...

shuttlecraft_markings_comp.jpg
 
Really liking how it's coming together there, Shaw! Any chance we could see some pics of the underside? I forgot to ask before, but am interested in seeing how you put the lower half of the hull together. Did you learn anything new from your additional image studies of the hull markings, btw?
 
I'll take some shots of the underside this evening. It was mostly planking strips of styrene across the open area between the two sides, and then some sculpting to maintain the rounded edges.

The main thing I got from the studies so far is that the striping and the boomerang feature are similar to what we saw on the large scale mockup (compared to what was used on the Enterprise studio models). Those features were painted on, where as the name and numbering were done as decals on the model. The NCC 1701/7 seem to match the Enterprise studio models' decals, but the U.S.S. ENTERPRISE I'm still working out. The thing is, Jefferies was known for drawing out the block lettering by hand when he needed it (such as the U.S.S. CONSTELLATION decal, the screen graphics from Court Martial and the original decals that came with the 18 inch AMT Enterprise model kit), so I haven't ruled out the idea that he just drew that up special for the Galileo studio model.

There is still studying to do there, which is why I haven't put together the decals for the model yet. I'll post those when I get closer to a final set.
 
A little more progress... this time testing the arrangement of some of the aft elements and that look at the underside of the model.

galileo_007.jpg

The pin on the underside is held there by a super strong magnet, which is going to be the mounting point for the model to attach to the display base.
 
Looking awesome, and very clever build from sheet styrene! :)

What's that armature in there, is that masonite, or wood veneer, or what?
 
Sweet! :D Thanks for those additional pics. I take it the internal framework was made using foam core craft board?

Btw, I love your idea for mounting the model to its stand in such a way so as not to take away from the overal aesthetic of the model. Brilliant!

One constructive criticism, if I may. The angle of the section underneath the impulse engine needs to be more pronounced.
 
Thanks guys!


Yeah, it is foamcore board. It supplies enough of a structure to keep the parts from collapsing like a house of cards when testing them together and later gluing them together.

One constructive criticism, if I may. The angle of the section underneath the impulse engine needs to be more pronounced.
The part is hanging down and not pressed into place... but even then, my measurements of the studio model show it to not be nearly as steep an angle as on the large scale mockup.

model-mockup_comp.jpg

My final measurements were from a few different views of the studio model... both shortly after it was found and after it's later (unfortunate) restoration. I'll go back and cross check, but I gather data from each image independently and then compare the data sets from all relevant images against each other looking for anomalies (measurements that vary greatly from each other). I don't recall any significant differences when plotting out the rear section's contours.

But I could have missed something, so I'll double check.
 
Awesome! When did you get to measure the model? I was planning to make mine based on the Phil Broad BPs of the set prop (especially since he has all those great contours already done), but I'd rather match it to the original 22" model (if that's even the right length...) if possible. I didn't even know its recent whereabouts and condition were known. Shows ya how much I know. :)
 
Thanks!

When did you get to measure the model?
Actually, I haven't measured the model in person. I have a number of key measurements (which I use as a gauge) and then reverse engineer everything else from those. The more photos I have to work with, the better my measurements get.

The basic technique is how I reverse engineered my plans for the 33 inch Enterprise. Once I had some key measurements (from the original plans for the model) I could start doing studies of existing photos. This is a very basic example of how I make use of geometry to reverse engineer information from photos...


I'll usually collect data from a photo, assign a weight to that data based on aspects of the photo, and then compare similar data from other photos to zero in on a best measurement.

With subjects like the 33 inch Enterprise and the shuttlecraft studio model, I have a relatively limited pool of images... but I have tons of images of the 11 foot model, and have reverse engineered a nice set of plans of that model (as an artifact, not as an idealized fictional starship) which I was using to build a one-sixth studio scale replica of the model as-a-model (replicating the details of the studio model's unfilmed side as it would have looked while being filmed during the second season of TOS).

I've spent a ton of money on math classes, I figure I should put some of that education to good use.


Anyways, I generally cross check my research with study models like this one to find errors or omissions in plans. Eventually I'll make these plans available for everyone. I know I like the more streamlined look of the Galileo studio model, so I figured I'd give it a try.

Plus I wanted to show I can build other things besides the Enterprise. :p
 
This thread is more than 8 years old.

Your message may be considered spam for the following reasons:

  1. This thread hasn't been active in some time. A new post in this thread might not contribute constructively to this discussion after so long.
If you wish to reply despite these issues, check the box below before replying.
Be aware that malicious compliance may result in more severe penalties.
Back
Top