DL-44 Weathering Techniques?

VanOaksProps

Sr Member
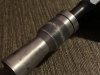
I've been debating whether or not to weather my DL-44 for the better part of a year now and have finally decided that I'm going to do it.

I'd love to know some of your favorite weathering techniques, aside from blueing and sandpaper, before I jump in with both feet.

The majority of the gun are Todd's Costumes parts and the base is a denix.

Thanks in advance!
 
i used aluminum black on the flash hider, and then scuffed up the paint with some 0000 steelwool
denixpaintdone2.jpg


i also removed the trigger, slide and the slide button on the side and used aluminum black on those as well. to give it a more used feel, i still need to paint the scope and weather the grips. its just been so cold i cant paint
denixpaintdone4.jpg
 
Nice work Haliwax it's really coming along!

Dminor,
There's hitting it with a dry of brush silver paint on or just sanding away paint/finish from "heavy use or natural wear areas" on the blaster, though it really depends on the finish or materials the blaster was built with that is going to dictate how you weather it. Resin blasters are usually done differently than metal ones.
The common parts that would rub the holster during draws/reholster...ings. Parts of the scope and rear portion that might get banged around while climbing around the maintainance areas of the Falcon or climbing in and out of the pilot's or gunner's seats, etc.

Most use pics from production/costume stills as reference as to what/how much needs to come off so as to better match the prop.
 
Last edited by a moderator:
Yes, pay particular attention to the reference photos of the actual prop. Which version are you doing? This is an ESB Denix I did with a resin scope. You could dry brush some silver and call it a day or really go all out. I stripped my gun and painted the body, leaving some parts bare metal for a little more realism. The flash hider was done with aluminum black. The scope is painted resin. On metal parts you can physically wear the paint down with sandpaper, files, etc.

IMG_4941.JPG

IMG_4942.JPG
 
There are so many ways to go depending on what model you're creating and what finish you are wanting to achieve.

My ANH DL is finished as an 'as issued' Bapty version. The Denix was disassembled and completely reworked, filed and stamped. The body was blued and weathered with slight rubbing and a fine sandpaper and a leather belt. The flashhider was painted so as to appear rusted (as per the original pics of the blaster).

Paint, gun blue, black polish, graphite powder are only some of the techniques you can use on yours. The secret to weathering is to slowly build it up in layers because lets be honest, that's precisely how weathering works in the real world. Work slowly instead of diving in with unbridled enthusiasm. Rather underwork it than overwork it, that way it looks genuine instead of contrived.

Best of luck

ANH_Bapty_Raats_1_SMALL.jpg


ANH_Bapty_Raats_2_SMALL.jpg


Regards
MARK
 
Yes, pay particular attention to the reference photos of the actual prop. Which version are you doing? This is an ESB Denix I did with a resin scope. You could dry brush some silver and call it a day or really go all out. I stripped my gun and painted the body, leaving some parts bare metal for a little more realism. The flash hider was done with aluminum black. The scope is painted resin. On metal parts you can physically wear the paint down with sandpaper, files, etc.

I'm doing an ANH version with all metal parts.
 
I like to hit the edges with either high grit wet sanding or steel wool. I might do a little light surfing to the flat surface areas to keep it from looking to neat but just enough to tell upon close inspection, not down to the metal.

I also wet sand the protective finish off the wood grips and hit them with a black wash to darken the wood and the dirty up the grooves.

A like to use the Aluminum Black as mentioned for scoring.

I also like to weather scopes based on real images of real scopes to get an idea of how they naturally wear.

Lastly, I like to take small brush and brush on black acrylic paint to the recessed areas and then quickly wipe it off with a paper towel. This darkens those areas making the areas pop.
 
Here's mine ,copied the finish from reference photos. Blued, scratched, scraped, painted scope as well. Good luck on yours. Can't wait to see it
IMG_2862.JPGIMG_2864.JPG
 
As far as main body goes, I've had excellent results with aluminum black base layer and rubbing on a layer of powder graphite, sealing, then weathering.
What did you use to seal it? Clear coat, or some artistic "fixative" for charcoal drawings or similar? I am afraid that I would make it look too much like paint.
 
I use a matte coat craft sealant.

You can see it in use here o the body (not scope or scope mount as those are painted so that they look like separate add-on pieces). I also used it on the muzzle to dull the shine to give it the duller Hoth muzzle look.
 

Attachments

  • IMG_0050.JPG
    IMG_0050.JPG
    72.3 KB · Views: 188
  • fullsizeoutput_242c.jpeg
    fullsizeoutput_242c.jpeg
    3 MB · Views: 173
Some great looking blasters here! Here's my DL-44 thread (not quite done), mostly Todd's parts and a Denix.

I went with Aluminum Black for the Denix and stripped Todd's flash hider, paint and masks for the scratches on the scope mount. Methods are pretty well covered. There are certainly lots of options, depending on the look you're going for. If you have any specific questions feel free to ask!
 
This thread is more than 7 years old.

Your message may be considered spam for the following reasons:

  1. This thread hasn't been active in some time. A new post in this thread might not contribute constructively to this discussion after so long.
If you wish to reply despite these issues, check the box below before replying.
Be aware that malicious compliance may result in more severe penalties.
Back
Top