My 31" "20,000 Leagues Under The Sea" Nautilus Build

TimeyWimey

Well-Known Member
RPF PREMIUM MEMBER
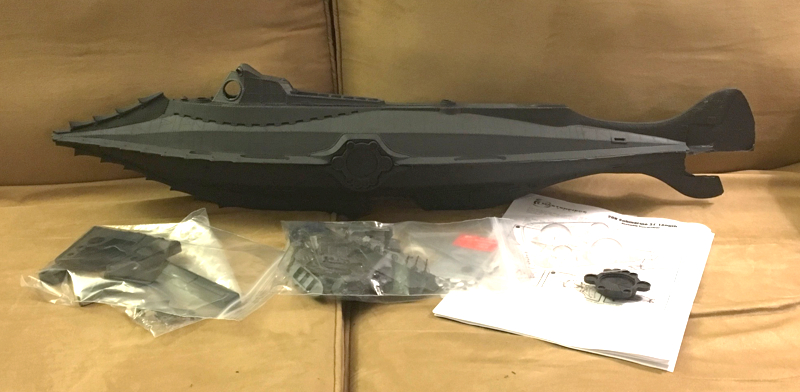
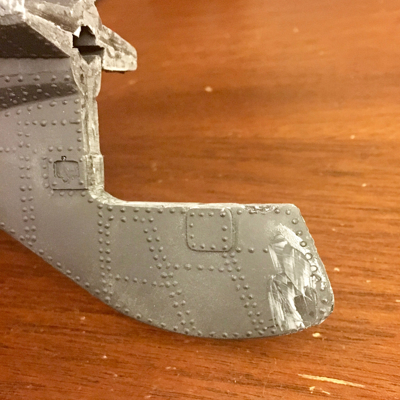
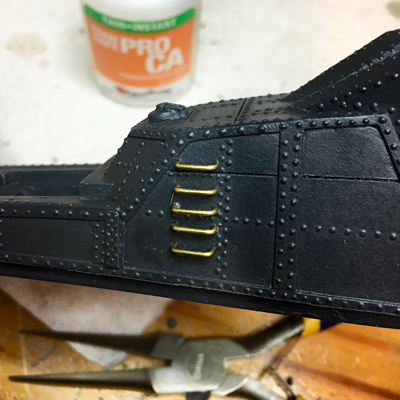
I have long been basically in love with the Disney "20,000 Leagues Under The Sea" Nautilus. Until recently, however, the closest thing I had to a model of it was a Christmas ornament. However, a few weeks ago, I took delivery of a 31" model kit from Masterpiece Models, which I have begun working on. Soon, I'll start posting text and pictures here (and also on a forum I just joined specifically for Nautilus enthusiasts) as a build diary.

If you have any suggestions as I go along, they will of course be welcome. Keep in mind that I'm trying not to be too much of a rivet-counter on this build, as long as she has a good likeness, I'll be happy. I'm really looking forward to displaying this large model of an amazing Harper Goff creation (and I also have the recently released model of the submarine from "Fantastic Voyage" waiting in line).

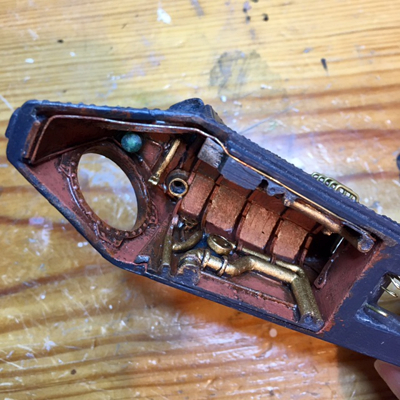
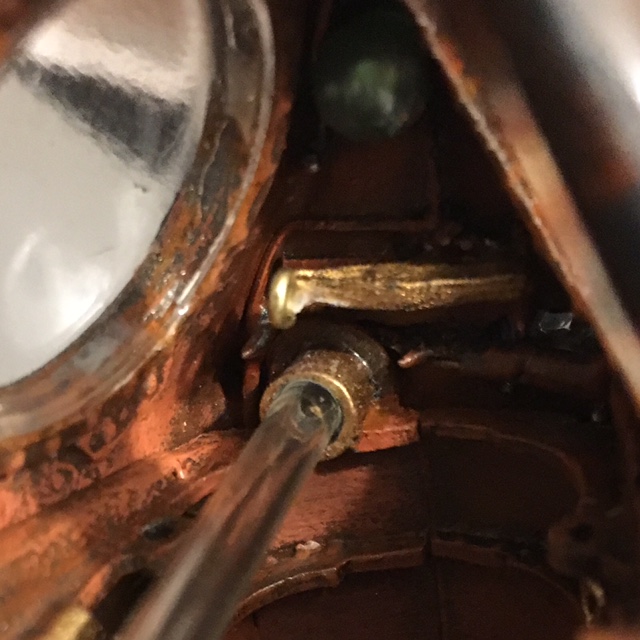
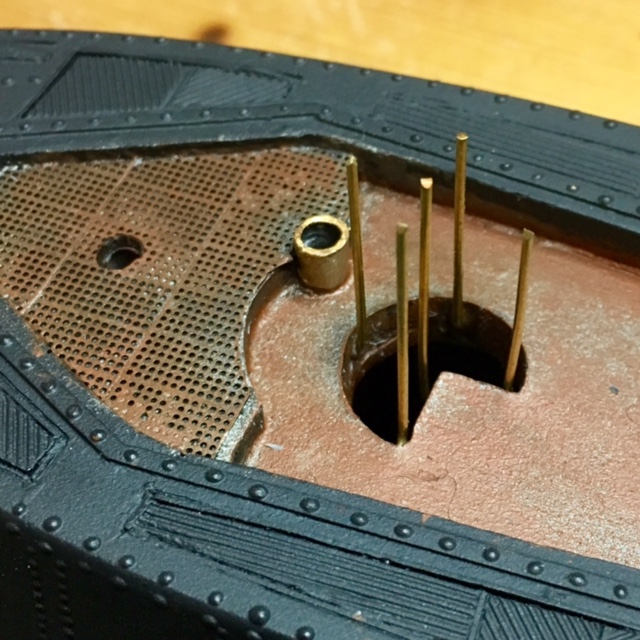
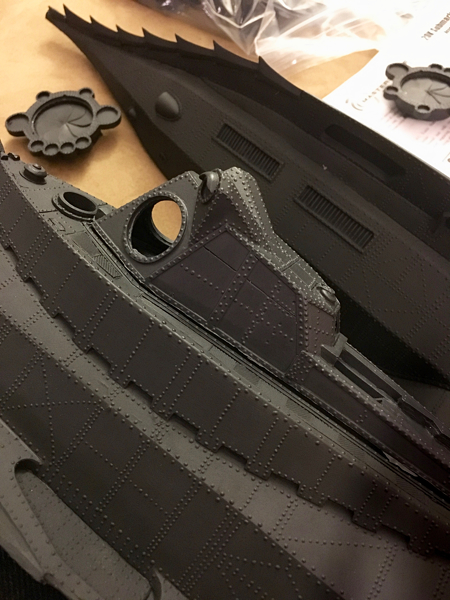
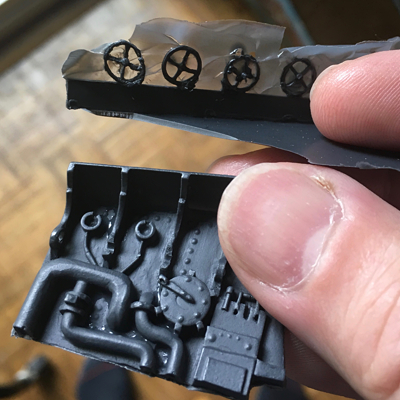
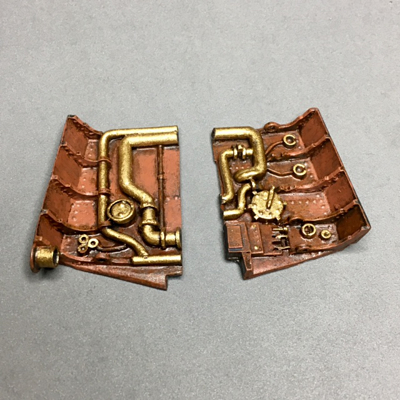
As I understand it, from reading the Nautilus-devoted forum I mentioned, this model appears to have been around in some form for a while, and it sounds like in some versions (more expensive than this one) some of the smaller details were cast in white metal. Mine is entirely resin, and some parts, like the very small hand wheels, are a bit distorted. In fact, there are a few other issues here and there that will require some ingenuity to rectify, but in general, it seems like quite a nice kit for the price.

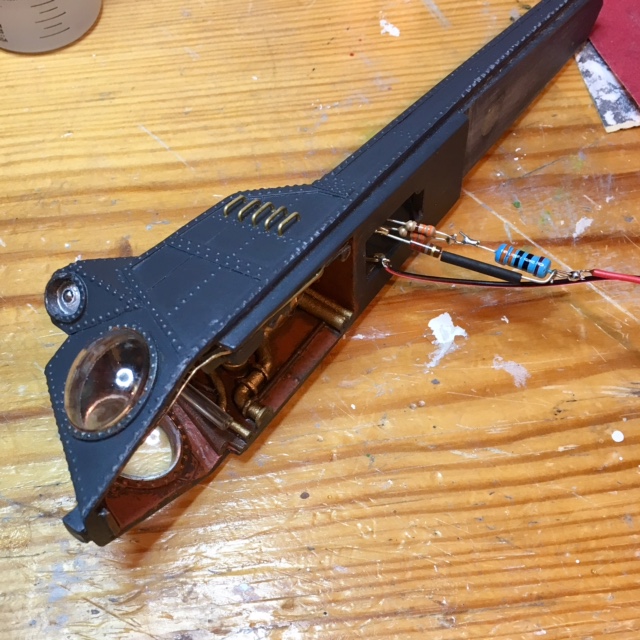
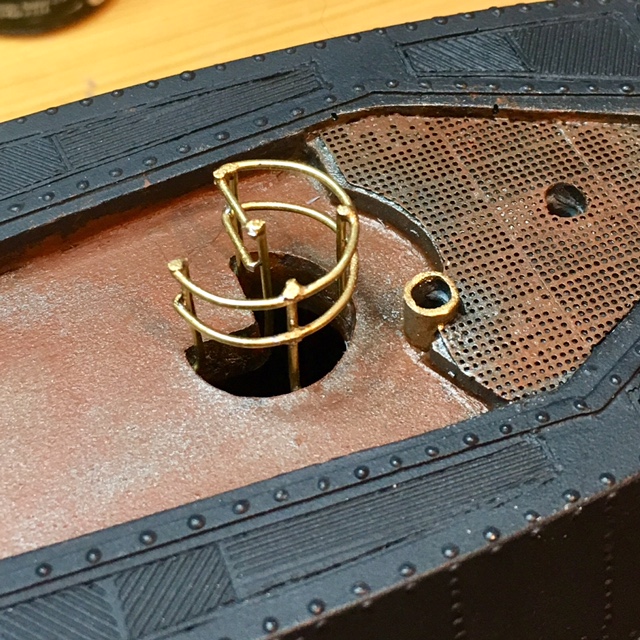
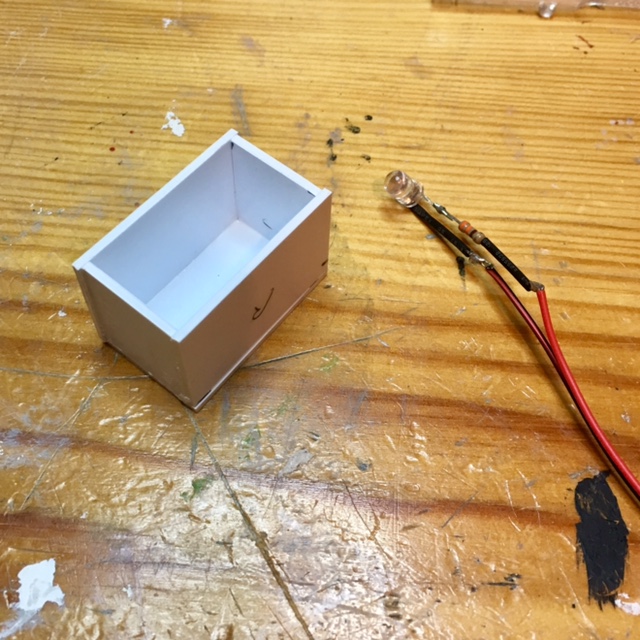
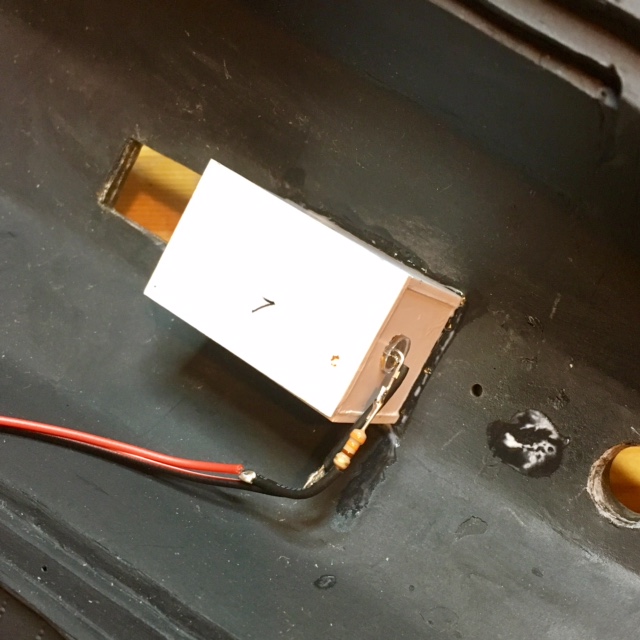
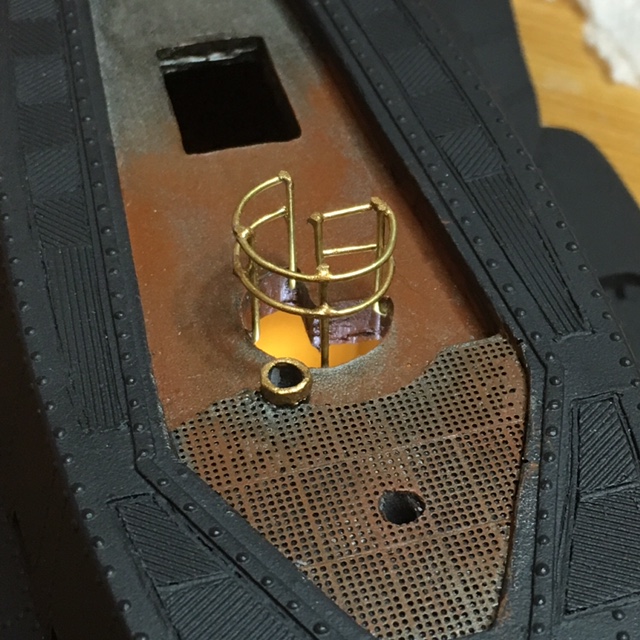
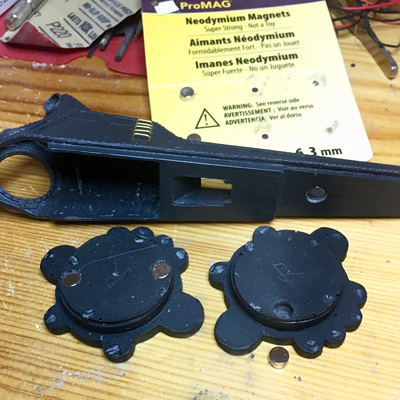
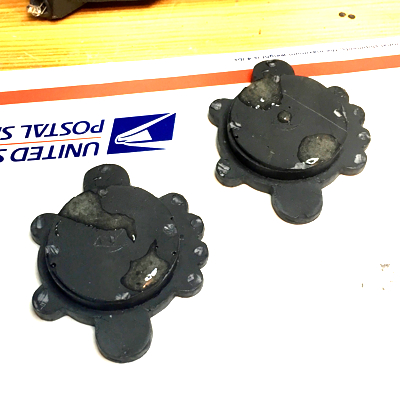
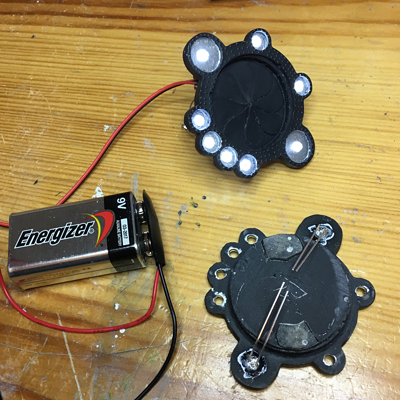
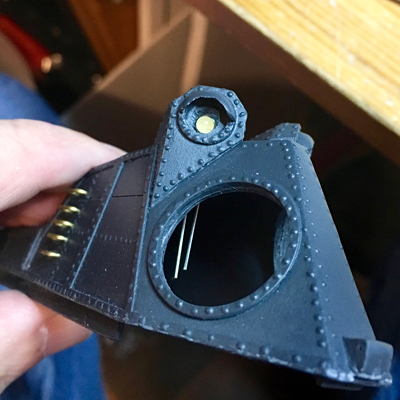
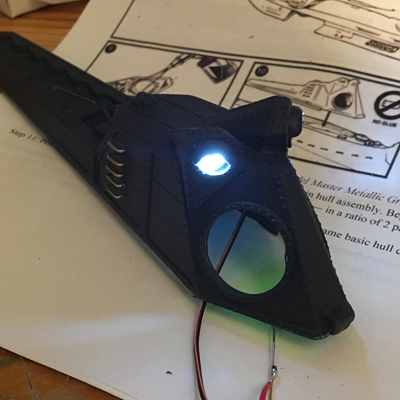
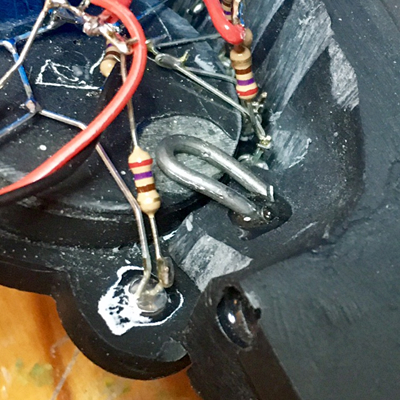
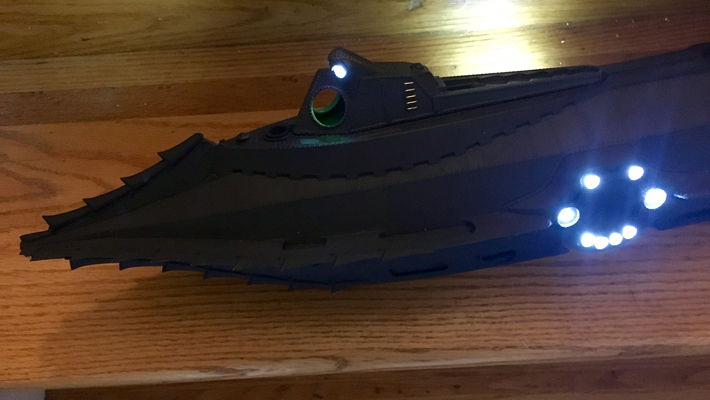
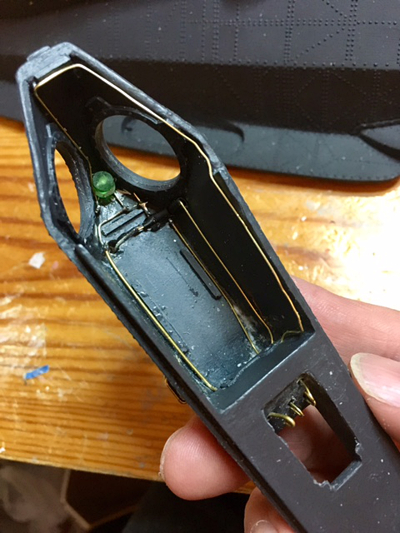
I'll be lighting it up with LEDs, and in fact just finished wiring up the lights in the wheelhouse last night, so I should be posting some work in progress pictures soon. This is going to be fun!
 
Last edited by a moderator:
So here's what she looked like when I unpacked the box. Lots of flash around a lot of the parts (not surprising for a resin kit) and right off the bat, she makes a good impression.


01.jpg


Look at that lovely rivet detail!


02.jpg


Some issues, though. The smallest parts are a bit rough. I'm going to have to replace at least one of these handwheels.


03.jpg


Even more alarming is this gap in the raker arch. This is with the wheelhouse as far forward as it will go, and there's nearly a 1/4" gap. I'll have to be very clever to fix this without it being detectable.There's also a bit of a gap between the wheelhouse and the fin behind, but that's a straight piece where it meets the wheelhouse, so it will be easier to fix.


04.jpg


The lower lobe of the tail had a lump on it that looked like layers delaminating. I shaved off the offending section, and I'll have to fill it and try to supply some of the missing rivet detail.


05.jpg


OK, that's enough whining about the defects, I'm sure I'll be able to sort them out. Next entry, I'll actually start working on the thing.
 
I've just subscribed to your build and look forward to seeing your progress. This is a model I've been wanting to build for a long time!
 
OK, on to the build. After cleaning up some of the parts, it was time to start working out the lighting. I'd like to have some parts to be removable for possible repairs, so the first thing I did was embed some small magnets in the backs of the salon windows. I also put one on the bottom of the wheelhouse, but I'm not sure yet how to make that removable with the raker arch connected to it.


10.jpg
11.jpg


I drilled a hole in the center of each light on the salon window frames, and painted the inside of the light silver as a reflector. Then I glued a small white LED into each hole. Soldered a resistor onto each, tied them all together, and voila! eight lights ringing the window. Initially they were was too bright (not making a flashlight here) so I added resistance to bring down the brightness to what you see here.


12.jpg
13.jpg


Then I carved out space behind them so there would be somewhere for the wires to go.
Next, I have to add metal bits for the magnets to grab.


06.jpg


On to the wheelhouse! First, I added bent brass wire for the ladder rungs. I realized after I installed these using the guide holes on the kit that the actual sub in the pictures I've seen of the 11' model has six rungs. As I said before, I'm not rivet-counting here, so I think I'll leave it as-is.


07.jpg


Next, I carved out the "alligator eyes" so I could put LEDs in them.


09.jpg


Testing the lights - the green interior light isn't bright enough, I'll have to tweak that.


14.jpg


I went back and forth on how to do the wiring. To keep from cluttering up the interior with visible resistors, I could run wires from all of the lights to a central circuit board where all the resistors lived, but then there would be a separate wire for each LED, plus a ground wire to each cluster. I decided to minimize the number of wires to run and try and cram the circuitry in where the lights are. For the salon windows, that's easy - it hides behind them. In the wheelhouse, it has to pretend to be part of the pipes and other equipment.


Here's the roof of the wheelhouse, with all its circuitry, and the green LED I ground down to make it fit more unobtrusively. I think between the distortion of the wheelhouse windows, the fact that it's up on the ceiling, the glare of the green LED right in with it, and painting it all the same color as the rest of the interior, you'll be unlikely to be able to recognize any of this when the thing is done. There's just an extra "pipe" running down each wall just behind the windows.


15.jpg


OK, we're all caught up - updates will be a bit slower from now on, as they'll be in real time.
 
I've epoxied loops of coat-hanger wire onto the upper and lower hulls to give the magnets something to stick to.


16.jpg


Now the window frames and their lights can be attached and detached easily, for repairs or to change the battery.


17.jpg


First lighting test with everything connected. Boy, those white LEDs are still very bright.


18.jpg
 
Even though that is a BAD engineering issue with the kit, the solution is easy. Aves Apoxie Sculpt... glue the part to the hull, then sculpt in the rest to the Conning tower.

Tracy
 
Even though that is a BAD engineering issue with the kit, the solution is easy. Aves Apoxie Sculpt... glue the part to the hull, then sculpt in the rest to the Conning tower.

Tracy

Yeah, that's pretty much what I was expecting to do. I've got milliput which is basically the same stuff.
 
Changed my mind about the wheelhouse electronics. I removed the resistors from the ceiling and ran brass wires to the rear stairwell, since that's going to be hidden anyway - I'll put the resistors there.


19.jpg


After carving out channels in the back of the side walls for the wires, I started painting the wheelhouse interior.


20.jpg


And I ended up ordering several 3d-printed parts from https://www.shapeways.com/shops/steamphoenix?section=Nautilus+B31&s=0 , and am anxiously awaiting their arrival: The ship's wheel/stand, the levers, a propellor, the speed screw, and the frames that go over the salon windows (since mine are rather distorted). I'm seriously considering also getting the rear fin with the working hatch. :)
 
If I may, the only similarity between milliput and Aves is that you nead two equal parts together. Milliput after mixing is very stiff to work with. Aves Apoxie Sculpt is so much more pliable, and sands like a dream.

Give it a try some day. I bet you'll never go back to milliput. ;-)

Tracy
 
If I may, the only similarity between milliput and Aves is that you nead two equal parts together. Milliput after mixing is very stiff to work with. Aves Apoxie Sculpt is so much more pliable, and sands like a dream.

Give it a try some day. I bet you'll never go back to milliput. ;-)

Tracy

Ah, I'll have to check it out. Thanks!
 
I'm pretty sure this is the kit I bought from Bob Martin about a year ago. Mine didn't have any problems with the raker arch, tho. I really enjoyed building it. I didn't do any electronics in it, but I did find that using correctly sized clear glass cabochons for the smaller windows/lights were a much better solution (for me anyways) than trying to cut apart "googly eyes" to use for them. It took ordering several sizes to get the correct sizes to fit. However since you are using lights, this method would probably not work for you, as the cabochons are little solid glass half domes.

I did use his video for the paint scheme. That was very helpful. I had never used any kind of actual metal paint/vinegar/rust method before. That took some trial and error to get right. I also built my own stand for it.

When I get home this weekend I'll try to get some pictures of it. Maybe it will give you some ideas.

I've always loved this ship. I wish I had the money for the 66" version.
 
I did find that using correctly sized clear glass cabochons for the smaller windows/lights were a much better solution (for me anyways) than trying to cut apart "googly eyes" to use for them. It took ordering several sizes to get the correct sizes to fit. However since you are using lights, this method would probably not work for you, as the cabochons are little solid glass half domes.

I did use his video for the paint scheme. That was very helpful. I had never used any kind of actual metal paint/vinegar/rust method before. That took some trial and error to get right.

Yeah, I was cutting up the googley eyes last night and determined that was an ugly method as well. Today I ordered some 7/16" acrylic hemispheres to use for the bigger lights. So far I haven't found 1/4" hemispheres for the smaller ones, but I have found 1/4" solid acrylic spheres. I might get those, grind them down to hemispheres, and make a divot in the back for clearance for the LED. My intention is to frost the interiors of the domes to diffuse the light a bit - the LEDs are very directional.

I haven't done that paint technique either - haven't decided yet exactly what direction to take, so I should have a look at that video.
 
Here are a couple of pictures of mine. For some reason my phone camera does not do justice to the paint scheme. No matter what lighting I use, it simply will not pick up the minute detail of the paint job. Trust me, it looks much better in person than it does in these pictures. That's kind of why I've never posted any pics of it here (stupid phone). I'm actually pretty proud of how it turned out. But mainly I just wanted to show you the stand I made for it. I like it much better than the two stand pieces that came with the kit. Also to see the pieces I used for the smaller floodlights. Phooey on those googly eyes, no matter how hard I tried I just couldn't get those things cut straight. If your lights are flush with the indentions of the model, perhaps the cabochons would work for you. I just searched "glass cabochons" on Amazon. Unfortunately, I don't remember exactly which sizes fit which, but I do remember that the alligator eyes were 1mm smaller than the smallest floodlights. I used a mixture of silver and pearl white for the paint behind them. Obviously, I used the plastic domes that came with the kit for the wheelhouse and the main two portholes.

Maybe it will give you some ideas.
IMG_0321 - Copy.JPG
IMG_0322 - Copy.JPG
 
Last edited:
That's lovely. I know what you mean about phone cams. They never show subtle differences in paint-either under-exposing or over-exposing. I've watched a few Nautilus builds on the tube and the rusty metal always comes out great, just like yours.:)
 
More updates from the weekend. I'm going to make the pictures just a little larger from now on:


After carefully cutting the wheelhouse windows to the right height, I carefully glued them in using Testors "Clear Parts Cement and Window-Maker". I couldn't keep from getting just a bit on the window frames, which dried shiny, so I painted over that with clear flat.


Then I hooked up the electronics to the wheelhouse lighting.


22.jpg


In the midst of all this I broke off (and lost) the pull handle on the ballast lever, so I fashioned a new one out of brass wire and super glued it in place.


23.jpg


Although it wouldn't be very visible through the front windows, you should see some kind of glimpse of the stairwell railing, so I drilled small holes around the stairwell and super glued vertical brass wires into them...


24.jpg


Then I bent the railings into shape and soldered them onto the uprights. I filed down the solder joints and painted them to match the wire.


25.jpg


Then I got the bright idea (no pun intended) that you should see some light from below through the stairwell, so I made a box out of styrene and put together an LED light for it...


26.jpg


I painted the inside of it tan to give it a warm color, and super glued it to the inside of the hull.


27.jpg


And there we go, light from below decks!


28.jpg
 
Last edited:
Watching this with great interest! I remember watching this movie many times as a kid, and it fascinated me. It was a large influnce on my decision to get into the Submarine Force in the Navy.

Even though my Navy career is over, and I took my last dive many years ago, I still love this movie, and this boat.

Bravo Zulu on your build! Carry on!
 
This thread is more than 5 years old.

Your message may be considered spam for the following reasons:

  1. This thread hasn't been active in some time. A new post in this thread might not contribute constructively to this discussion after so long.
If you wish to reply despite these issues, check the box below before replying.
Be aware that malicious compliance may result in more severe penalties.
Back
Top