You are using an out of date browser. It may not display this or other websites correctly.
You should upgrade or use an alternative browser.
You should upgrade or use an alternative browser.
Thorssoli's First Order Builds - Captain Phasma FINISHED on Page 21!
Re: Thorssoli's Episode VII Builds (Finished Phasma Helmet on Page 7)
They'll be cast separately so they can be attached to the chest armor. That way I can still use the same molds that I'm using for Phasma. I've already made one version of them, but I'm thinking I'd like to re-do it if I can find better reference images.
For now I'm concentrating on the shoulders. As a few folks have pointed out, the TIE Pilot shoulder plates are different than the standard stormtrooper. They do look to be the same shape as the snowtrooper. So I guess that gives me two reasons to make them. While I do have a pretty decent digital model to work with, I also figure that the upper shape is close enough to the standard trooper that I should try to keep it consistent. With that in mind, I decided to modify one of my larger stormtrooper shoulder plates instead of starting over and having the robots carve out a completely new shape.
Here's how I stretched out the fiberglass parts:
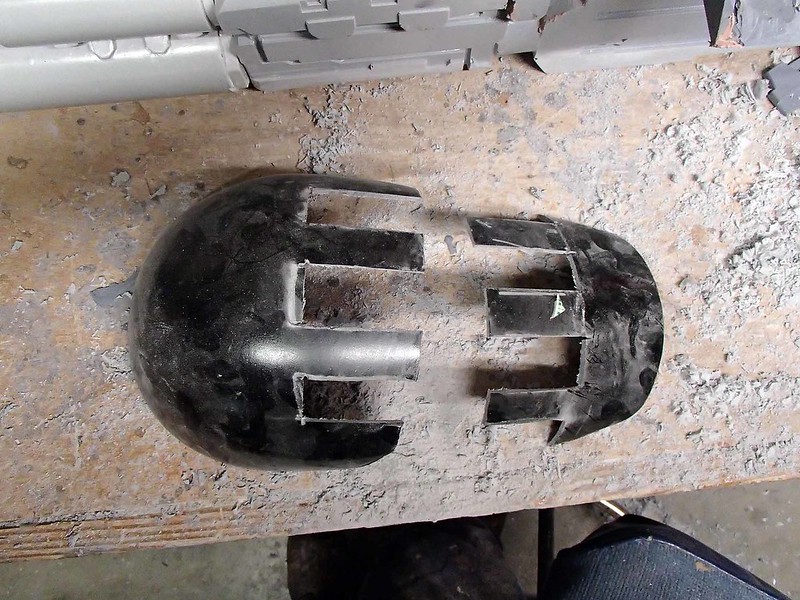
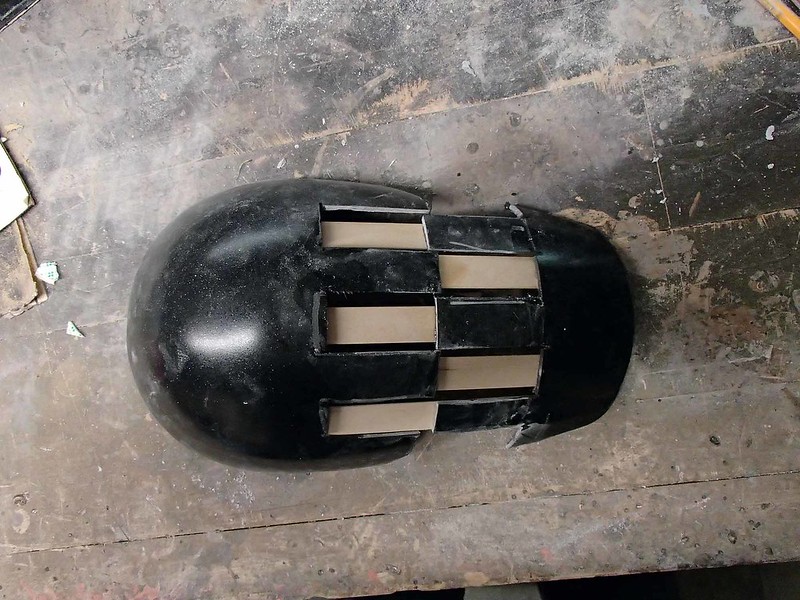
First, I cut the bottom off of the shoulder plate, making a zig-zag cut in the straight section:
Note that the vertical components of that zig-zag are all parallel. This will be important in order to keep everything aligned.
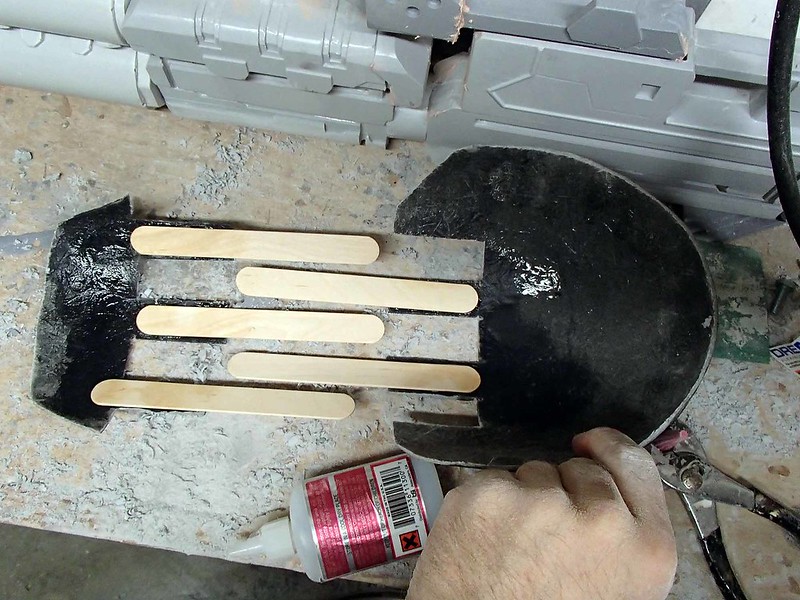
Since the pieces won't have much contact area to bond together, I added some tongue depressors to the inside:
Once I'd settled on how much length to add (a little under 2") I glued the tongue depressors in place:

Here's what it looks like from the outside:
Since the tongue depressors aren't all that stiff, I needed to bond the pieces together with something more structural. This is where Bondo-glass comes in. This is a fiberglass reinforced body filler that's stronger (and heavier) than normal bondo:
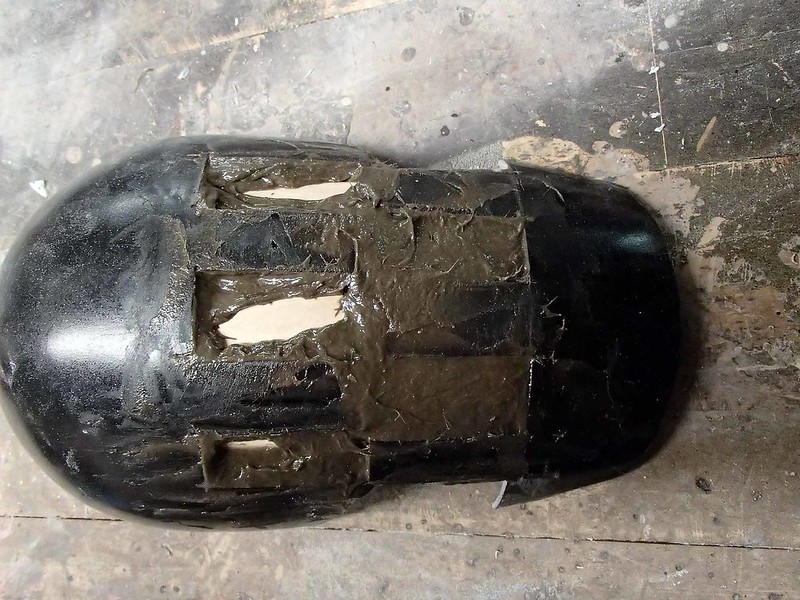
Since the shape of the edges will need to be changed, I also added a strip of masking tape and built up some more bondo glass on these edges:

After the filler had cured, the tape could be removed to show the new edge:
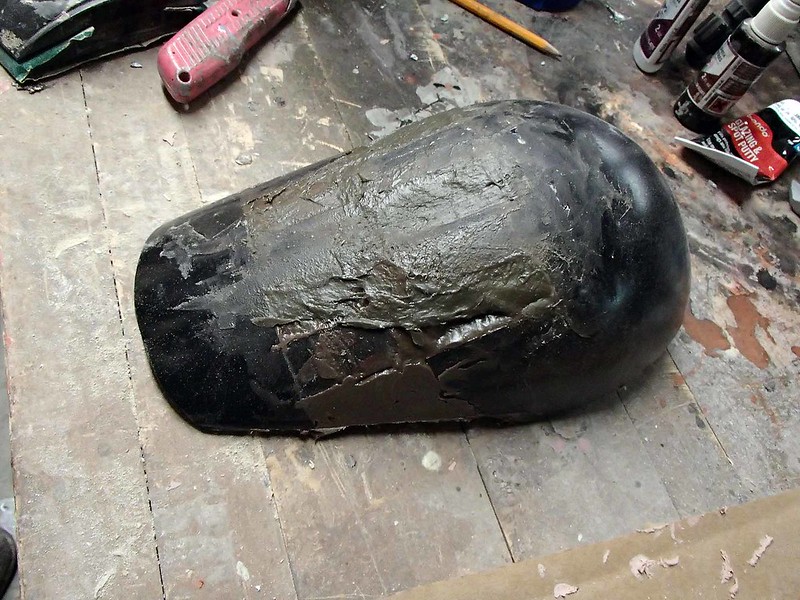
I should mention that once the bondo glass has cured, it becomes structural. At this point, the tongue depressors could have been plucked out and the inside could be ground clean if I was going to make this into a wearable piece. Since I'm going to be pulling a new mold off of the modified shoulder, I didn't bother pulling them out.
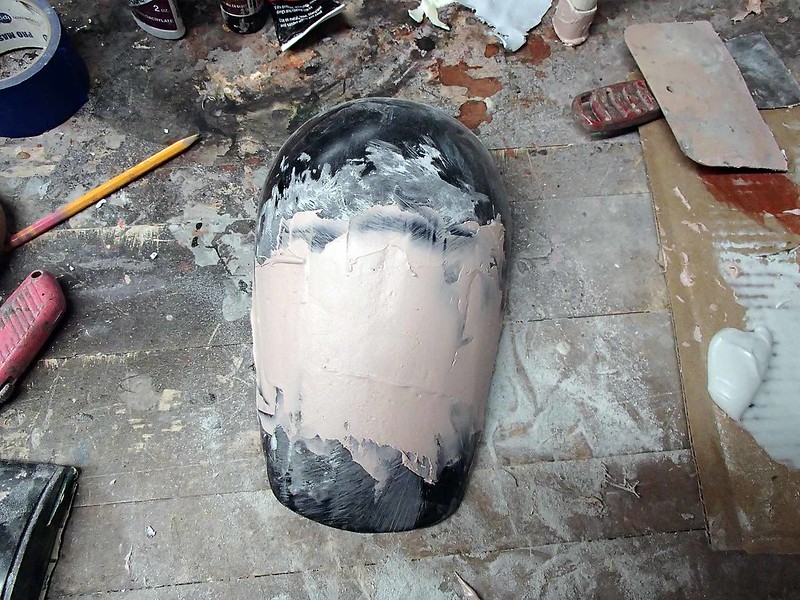
At this point everything was looking pretty ugly and the bondo glass is very tough to shape once it completely hardens, so I did some rough shaping with a longboard and some 36-grit sandpaper:
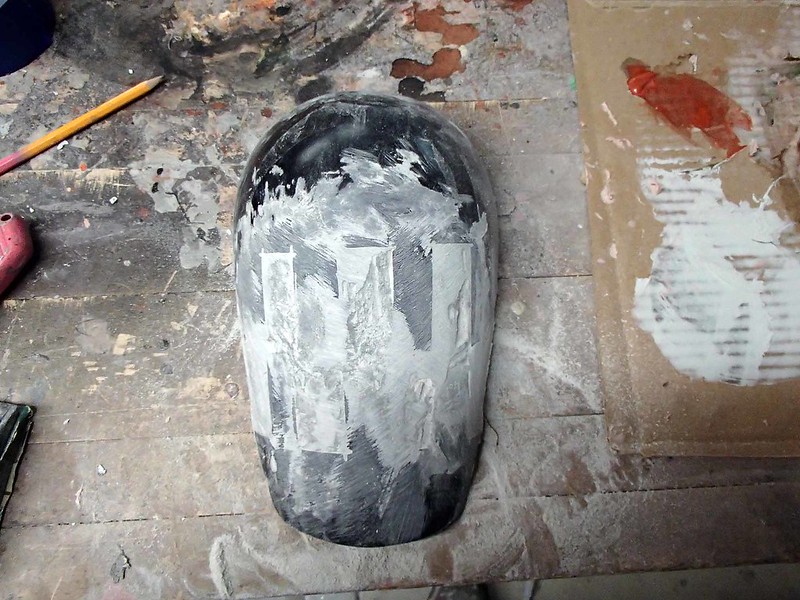
Then I skimmed over the modified area with some normal Bondo in order to start the smoothing process:
Once that firmed up, I did some rough shaping with a body rasp:
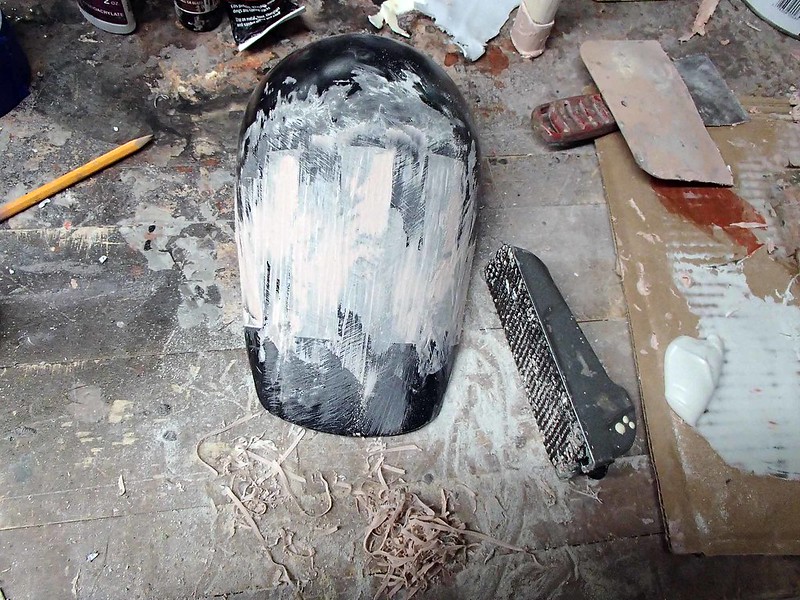
Then shaped it a bit more with a sanding block and some 80-grit paper:
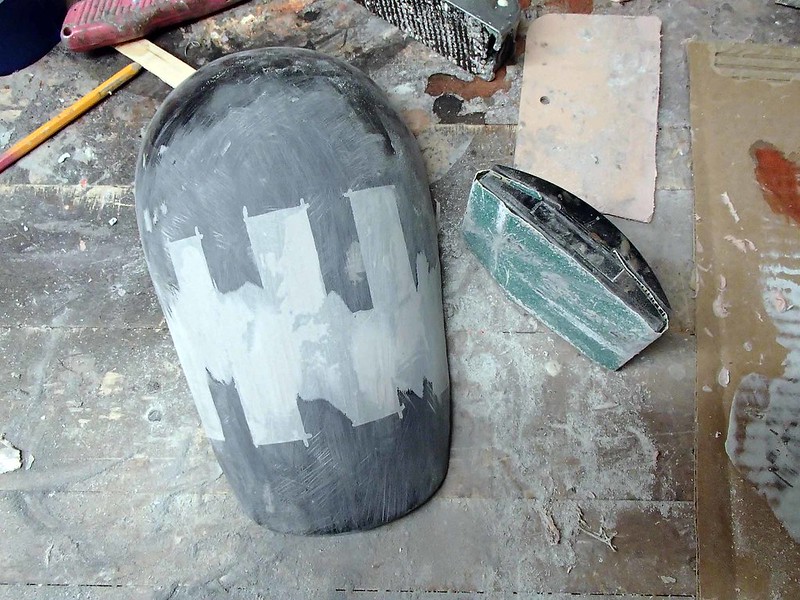
Today I'll smooth it out a bit more, trim the edges to get the profile correct, and shine it up for molding.
I've also made quite a bit of progress on the TIE Pilot helmet, but all of the pictures look the same: spot putty, sanding, putty, sanding, putty, sanding, etc.
Hopefully I'll have it all glossy by the end of today.
Thorssoli, one thing I've noticed on the FO Tie pilot is the straps or buckles located on the shoulders of the chest armor. Will these be featured on the armor you're constructing?
They'll be cast separately so they can be attached to the chest armor. That way I can still use the same molds that I'm using for Phasma. I've already made one version of them, but I'm thinking I'd like to re-do it if I can find better reference images.
For now I'm concentrating on the shoulders. As a few folks have pointed out, the TIE Pilot shoulder plates are different than the standard stormtrooper. They do look to be the same shape as the snowtrooper. So I guess that gives me two reasons to make them. While I do have a pretty decent digital model to work with, I also figure that the upper shape is close enough to the standard trooper that I should try to keep it consistent. With that in mind, I decided to modify one of my larger stormtrooper shoulder plates instead of starting over and having the robots carve out a completely new shape.
Here's how I stretched out the fiberglass parts:
First, I cut the bottom off of the shoulder plate, making a zig-zag cut in the straight section:
Note that the vertical components of that zig-zag are all parallel. This will be important in order to keep everything aligned.
Since the pieces won't have much contact area to bond together, I added some tongue depressors to the inside:
Once I'd settled on how much length to add (a little under 2") I glued the tongue depressors in place:
Here's what it looks like from the outside:
Since the tongue depressors aren't all that stiff, I needed to bond the pieces together with something more structural. This is where Bondo-glass comes in. This is a fiberglass reinforced body filler that's stronger (and heavier) than normal bondo:
Since the shape of the edges will need to be changed, I also added a strip of masking tape and built up some more bondo glass on these edges:
After the filler had cured, the tape could be removed to show the new edge:
I should mention that once the bondo glass has cured, it becomes structural. At this point, the tongue depressors could have been plucked out and the inside could be ground clean if I was going to make this into a wearable piece. Since I'm going to be pulling a new mold off of the modified shoulder, I didn't bother pulling them out.
At this point everything was looking pretty ugly and the bondo glass is very tough to shape once it completely hardens, so I did some rough shaping with a longboard and some 36-grit sandpaper:
Then I skimmed over the modified area with some normal Bondo in order to start the smoothing process:
Once that firmed up, I did some rough shaping with a body rasp:
Then shaped it a bit more with a sanding block and some 80-grit paper:
Today I'll smooth it out a bit more, trim the edges to get the profile correct, and shine it up for molding.
I've also made quite a bit of progress on the TIE Pilot helmet, but all of the pictures look the same: spot putty, sanding, putty, sanding, putty, sanding, etc.
Hopefully I'll have it all glossy by the end of today.
Last edited:
Re: Thorssoli's Episode VII Builds (Finished Phasma Helmet on Page 7)
Looks great! Glad to see the shoulder armor is being worked on. Another part of the Snowtrooper as well so no waste!
Looks great! Glad to see the shoulder armor is being worked on. Another part of the Snowtrooper as well so no waste!
Soarerjzz30
New Member
Re: Thorssoli's Episode VII Builds (Finished Phasma Helmet on Page 7)
Awesome! Love the attention to detail! Looking forward to this!
Awesome! Love the attention to detail! Looking forward to this!
They'll be cast separately so they can be attached to the chest armor. That way I can still use the same molds that I'm using for Phasma. I've already made one version of them, but I'm thinking I'd like to re-do it if I can find better reference images.
For now I'm concentrating on the shoulders. As a few folks have pointed out, the TIE Pilot shoulder plates are different than the standard stormtrooper. They do look to be the same shape as the snowtrooper. So I guess that gives me two reasons to make them. While I do have a pretty decent digital model to work with, I also figure that the upper shape is close enough to the standard trooper that I should try to keep it consistent. With that in mind, I decided to modify one of my larger stormtrooper shoulder plates instead of starting over and having the robots carve out a completely new shape.
Here's how I stretched out the fiberglass parts:
First, I cut the bottom off of the shoulder plate, making a zig-zag cut in the straight section:
https://farm2.staticflickr.com/1702/24664323766_d7630a0225_c.jpg
Note that the vertical components of that zig-zag are all parallel. This will be important in order to keep everything aligned.
Since the pieces won't have much contact area to bond together, I added some tongue depressors to the inside:
https://farm2.staticflickr.com/1626/24063701103_8107cda5dd_c.jpg
Once I'd settled on how much length to add (a little under 2") I glued the tongue depressors in place:
https://farm2.staticflickr.com/1637/24572762592_8dbcfae39a_c.jpg
Here's what it looks like from the outside:
https://farm2.staticflickr.com/1632/24395018430_f376702b13_c.jpg
Since the tongue depressors aren't all that stiff, I needed to bond the pieces together with something more structural. This is where Bondo-glass comes in. This is a fiberglass reinforced body filler that's stronger (and heavier) than normal bondo:
https://farm2.staticflickr.com/1453/24063696683_04e205678d_c.jpg
Since the shape of the edges will need to be changed, I also added a strip of masking tape and built up some more bondo glass on these edges:
https://farm2.staticflickr.com/1665/24062362924_7ae8928e54_c.jpg
After the filler had cured, the tape could be removed to show the new edge:
https://farm2.staticflickr.com/1550/24690529495_9cd92e3500_c.jpg
I should mention that once the bondo glass has cured, it becomes structural. At this point, the tongue depressors could have been plucked out and the inside could be ground clean if I was going to make this into a wearable piece. Since I'm going to be pulling a new mold off of the modified shoulder, I didn't bother pulling them out.
At this point everything was looking pretty ugly and the bondo glass is very tough to shape once it completely hardens, so I did some rough shaping with a longboard and some 36-grit sandpaper:
https://farm2.staticflickr.com/1534/24597012211_ea5fdbba9e_c.jpg
Then I skimmed over the modified area with some normal Bondo in order to start the smoothing process:
https://farm2.staticflickr.com/1614/24572754942_457b119707_c.jpg
Once that firmed up, I did some rough shaping with a body rasp:
https://farm2.staticflickr.com/1663/24572754372_a250a8c5aa_c.jpg
Then shaped it a bit more with a sanding block and some 80-grit paper:
https://farm2.staticflickr.com/1650/24395009420_55bce561d4_c.jpg
Today I'll smooth it out a bit more, trim the edges to get the profile correct, and shine it up for molding.
I've also made quite a bit of progress on the TIE Pilot helmet, but all of the pictures look the same: spot putty, sanding, putty, sanding, putty, sanding, etc.
Hopefully I'll have it all glossy by the end of today.
Re: Thorssoli's Episode VII Builds (Finished Phasma Helmet on Page 7)
Is Bondo glass something you mixed up, or one of their actual products?
Is Bondo glass something you mixed up, or one of their actual products?
Re: Thorssoli's Episode VII Builds (Finished Phasma Helmet on Page 7)
It's one of their actual products. You can get some here: LINK
Soon.
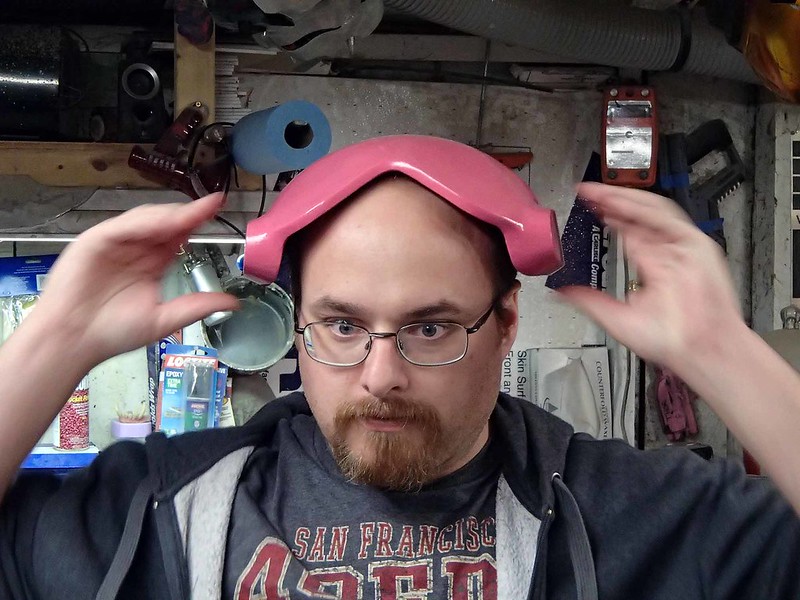
Here's my friend Matt (who's 5'10" tall) modelling the altered prototype:
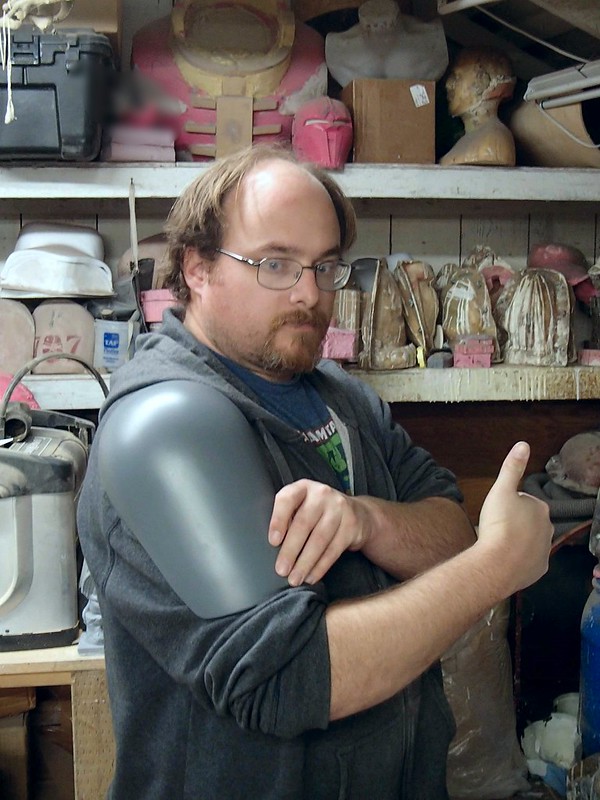
Looking at it, I think I need to tweak the bottom edge a little bit. But it's almost ready to mold.
Matt's going to be making up the vinyl decals for the little First Order logo on the shoulder pads. Right now we're waiting on the new vinyl shipment to come in.
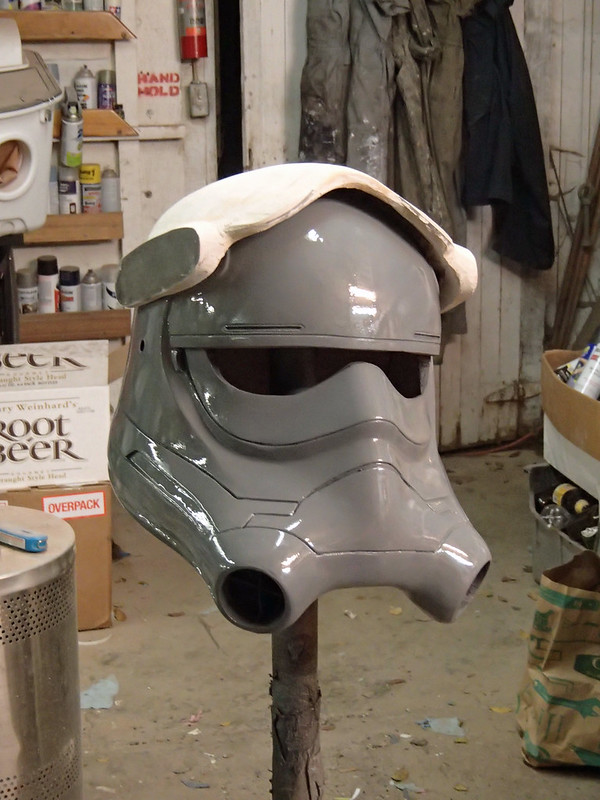
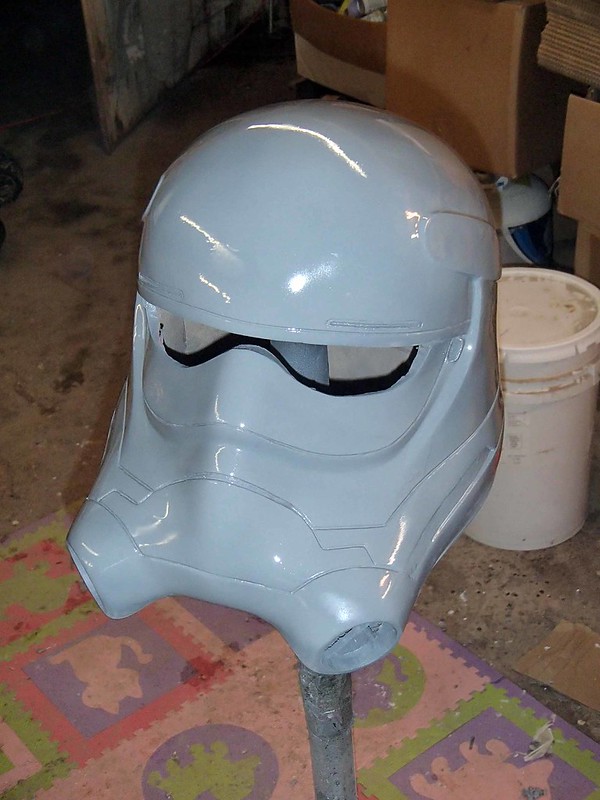
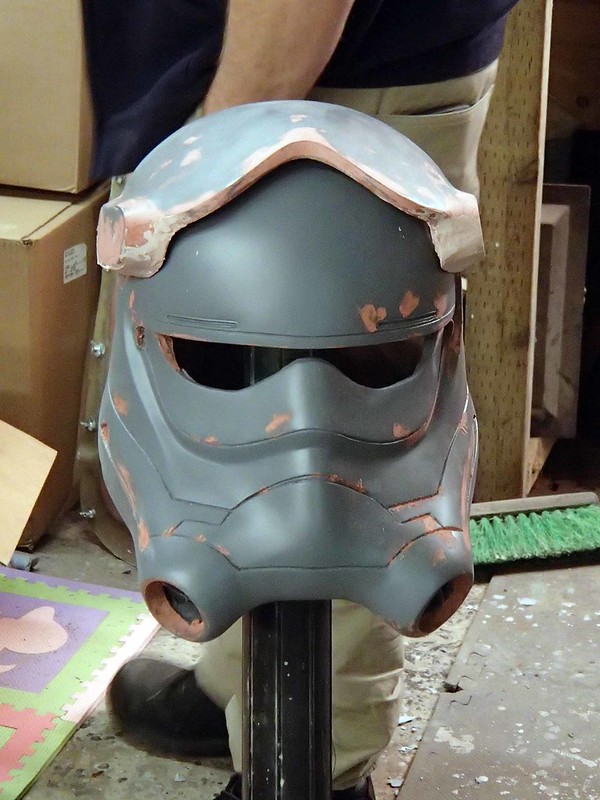
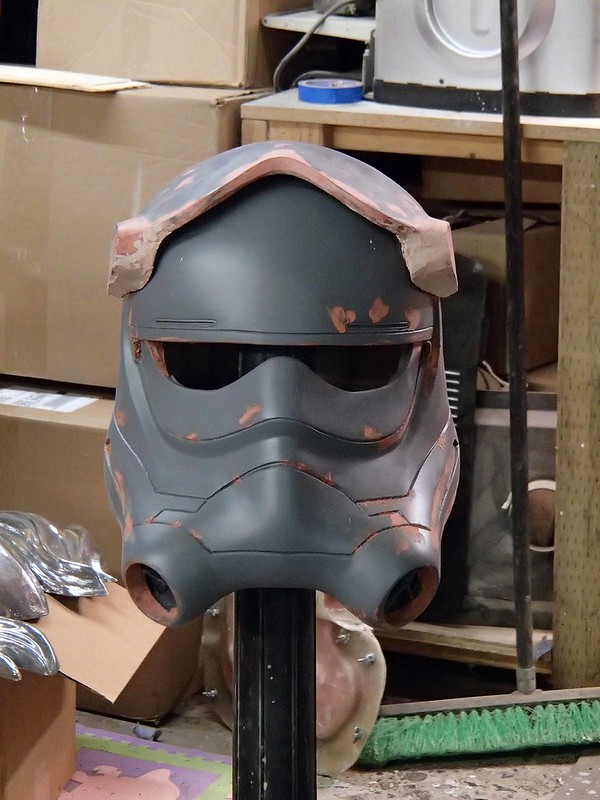
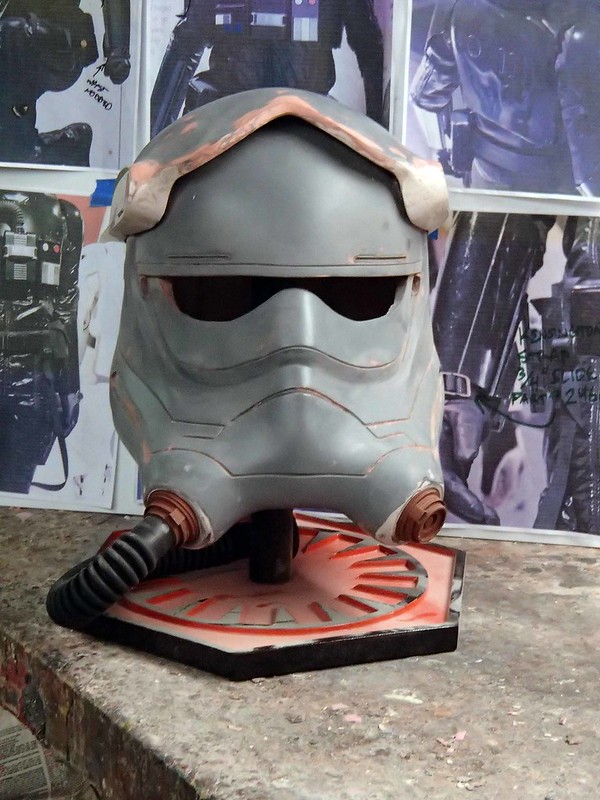
In other news, the helmet is so very close to being done:
The HUD/Visor/lid attachment is not far behind:
I've also got a friend of mine sewing up the belt pouches and yesterday a big box of these things showed up:
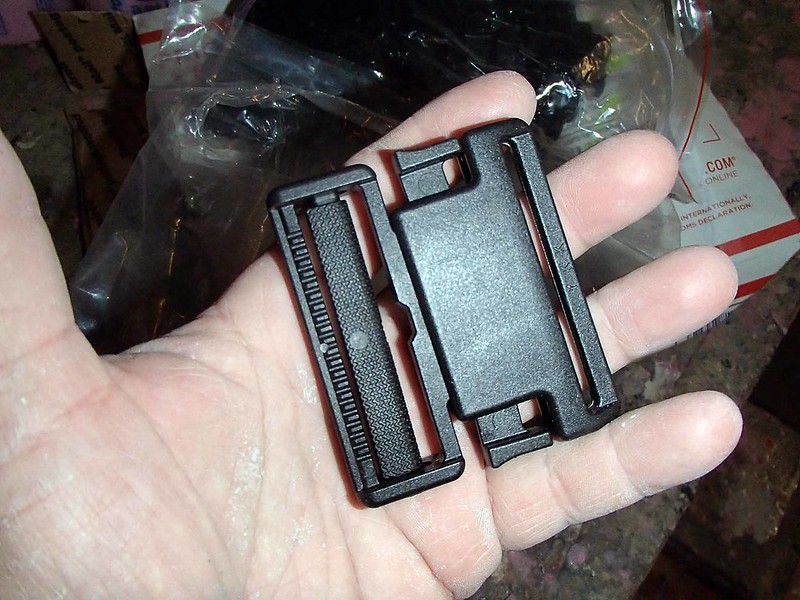
Hooray for plastic buckles.
I've also made some progress smoothing out the codpiece and ankle pieces for the standard trooper. For some reason I keep neglecting to take any photos of those parts.
In any case, more to come. Stay tuned...
Is Bondo glass something you mixed up, or one of their actual products?
It's one of their actual products. You can get some here: LINK
Smart way to alter the shoulder armor! Can't wait to see it all come together!")
Soon.
Here's my friend Matt (who's 5'10" tall) modelling the altered prototype:
Looking at it, I think I need to tweak the bottom edge a little bit. But it's almost ready to mold.
Matt's going to be making up the vinyl decals for the little First Order logo on the shoulder pads. Right now we're waiting on the new vinyl shipment to come in.
In other news, the helmet is so very close to being done:
The HUD/Visor/lid attachment is not far behind:
I've also got a friend of mine sewing up the belt pouches and yesterday a big box of these things showed up:
Hooray for plastic buckles.
I've also made some progress smoothing out the codpiece and ankle pieces for the standard trooper. For some reason I keep neglecting to take any photos of those parts.
In any case, more to come. Stay tuned...
Re: Thorssoli's Episode VII Builds (Finished Phasma Helmet on Page 7)
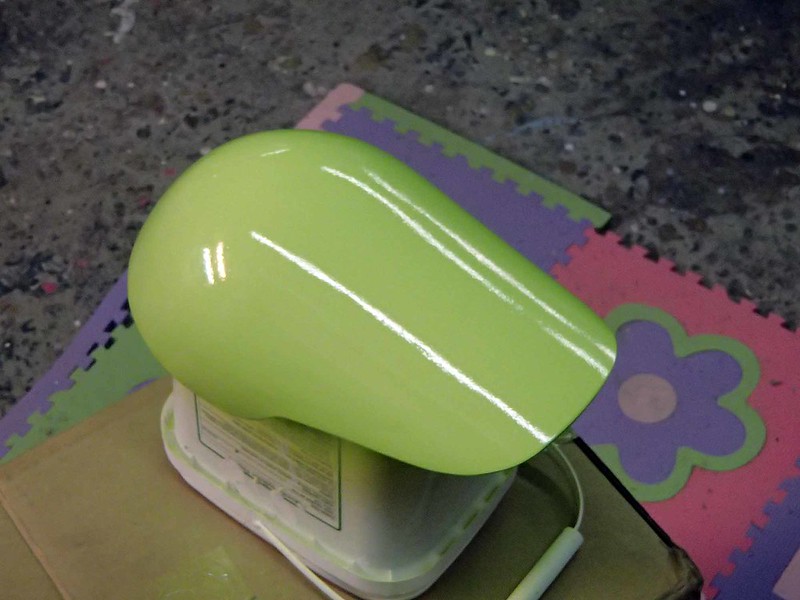
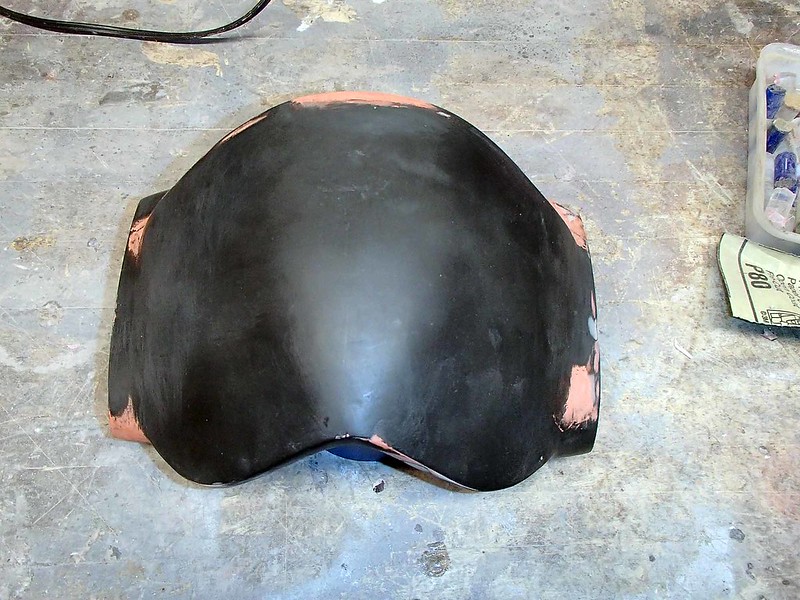
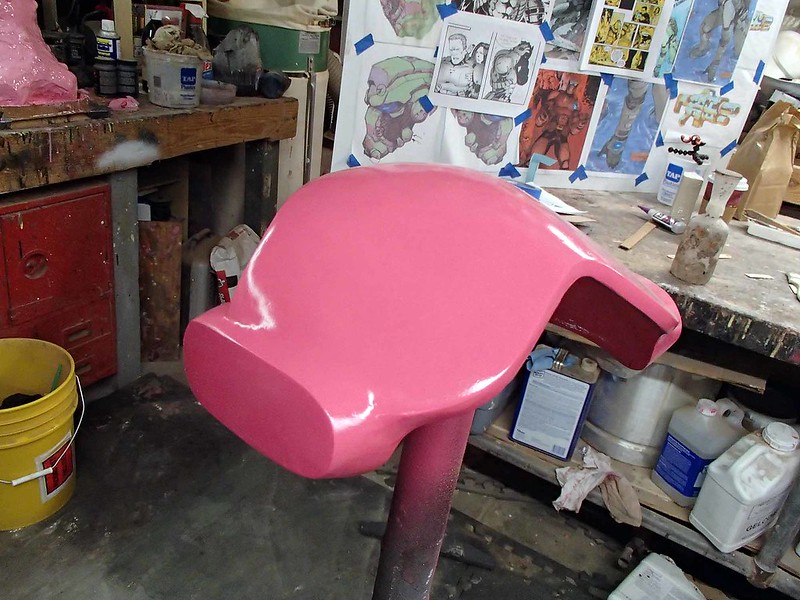
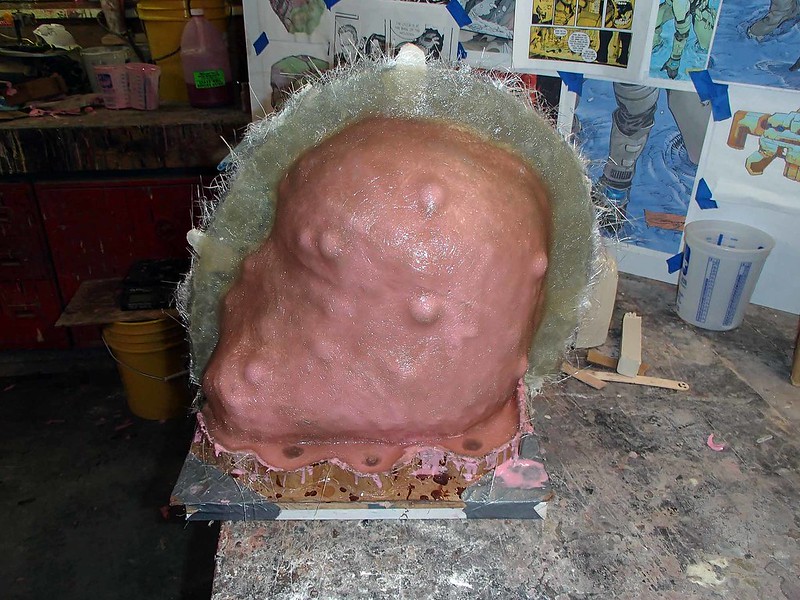
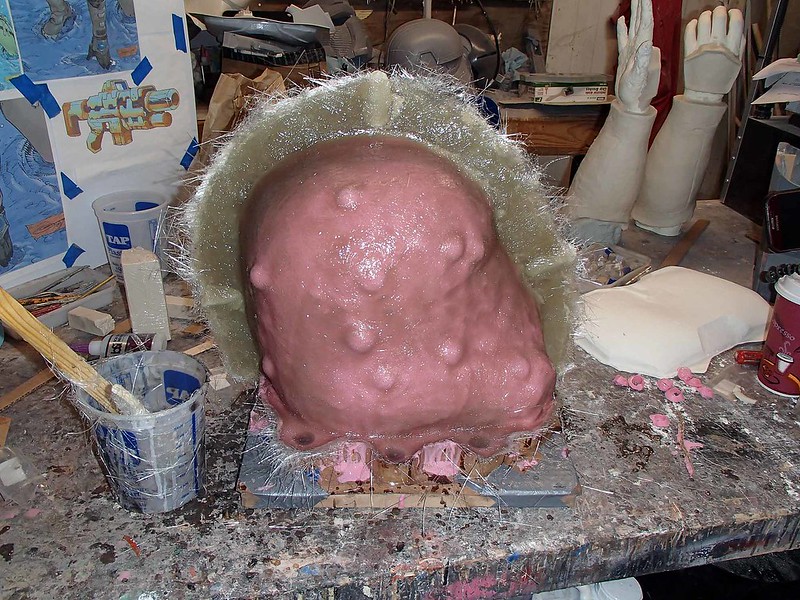
Finally finished shaping the shoulder armor:
After sanding the glosscoat nice and smooth, I waxed it up and then hot glued some cardboard around the edges:
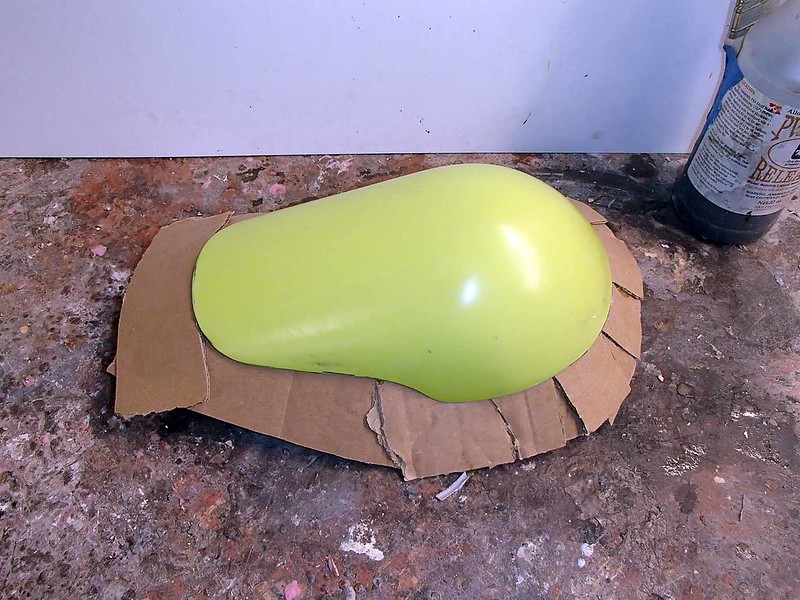
Then built up a border with some clay:
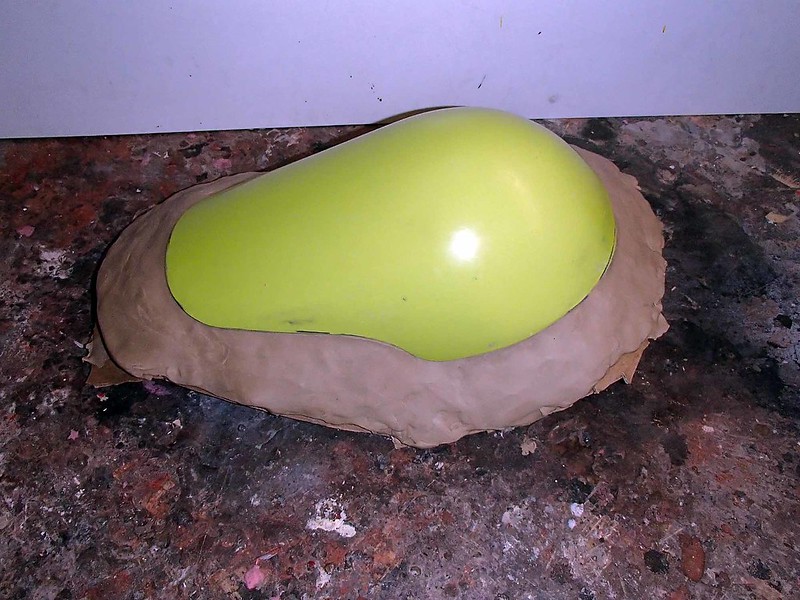
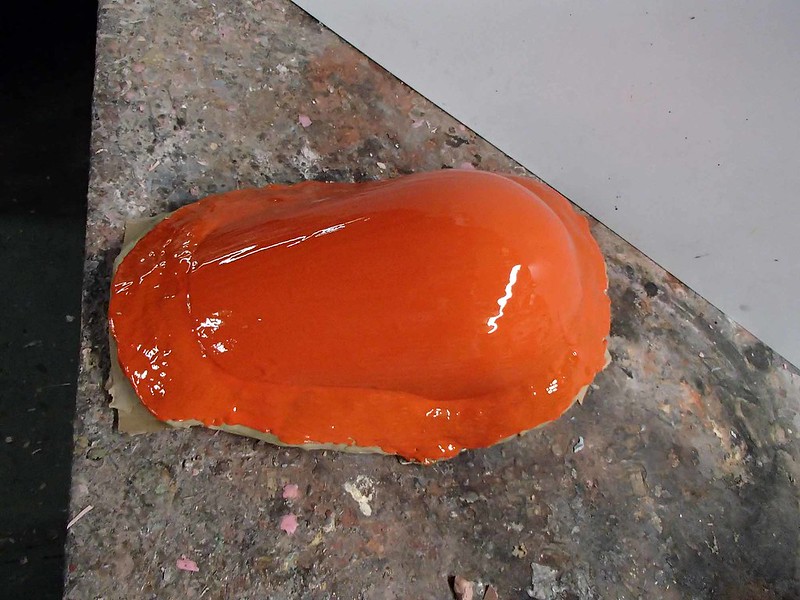
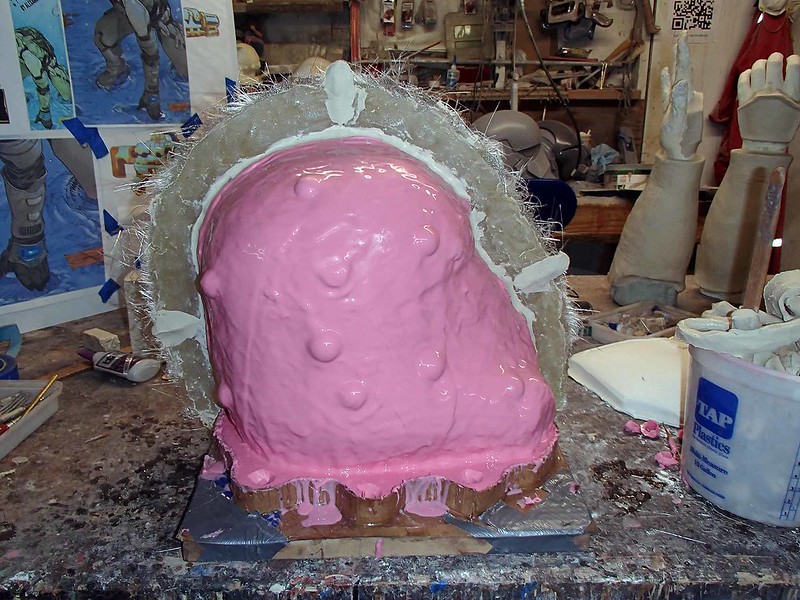
After laying on a couple of coats of PVA release agent, the gelcoat was applied:
Today I'll lay up the fiberglass mold and, if all goes well, I may even get the first copy of the part.
In other news, my friend Matt did some more work on the ends of the visor/HUD/lid thingamajig so now it fits properly:
It still needs a bit more filling and sanding before it's ready to mold, but it's getting close:
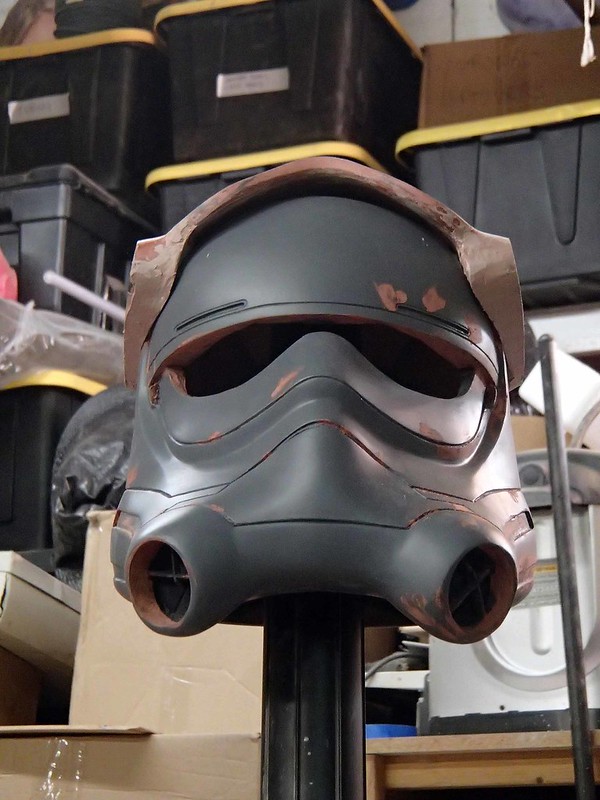
Here's the "money shot" to match the angle that most of saw when we were introduced to these guys for the first time:
So that's coming along nicely.
My latest shipment of silicone has arrived, so the moldmaking will begin just as soon as I'm satisfied with the shape of this helmet.
Stay tuned...
Finally finished shaping the shoulder armor:
After sanding the glosscoat nice and smooth, I waxed it up and then hot glued some cardboard around the edges:
Then built up a border with some clay:
After laying on a couple of coats of PVA release agent, the gelcoat was applied:
Today I'll lay up the fiberglass mold and, if all goes well, I may even get the first copy of the part.
In other news, my friend Matt did some more work on the ends of the visor/HUD/lid thingamajig so now it fits properly:
It still needs a bit more filling and sanding before it's ready to mold, but it's getting close:
Here's the "money shot" to match the angle that most of saw when we were introduced to these guys for the first time:
So that's coming along nicely.
My latest shipment of silicone has arrived, so the moldmaking will begin just as soon as I'm satisfied with the shape of this helmet.
Stay tuned...
BobasDent1138
Well-Known Member
Re: Thorssoli's Episode VII Builds (Finished Phasma Helmet on Page 7)
Amazing!!
Sent from my SAMSUNG-SM-N910A using Tapatalk
Amazing!!
Sent from my SAMSUNG-SM-N910A using Tapatalk
Rein
New Member
Re: Thorssoli's Episode VII Builds
I know I'm WAY late to this party but I was wondering: are you able/willing to give out the .stl files for those waist armor blocks? Your work is ridiculously incredible by the way. Reading through this thread has been a heck of a ride.
3D printed blocks for the waist armor:
https://farm1.staticflickr.com/644/23064366981_eddec45c16_c.jpg
I know I'm WAY late to this party but I was wondering: are you able/willing to give out the .stl files for those waist armor blocks? Your work is ridiculously incredible by the way. Reading through this thread has been a heck of a ride.
Re: Thorssoli's Episode VII Builds (Finished Phasma Helmet on Page 7)
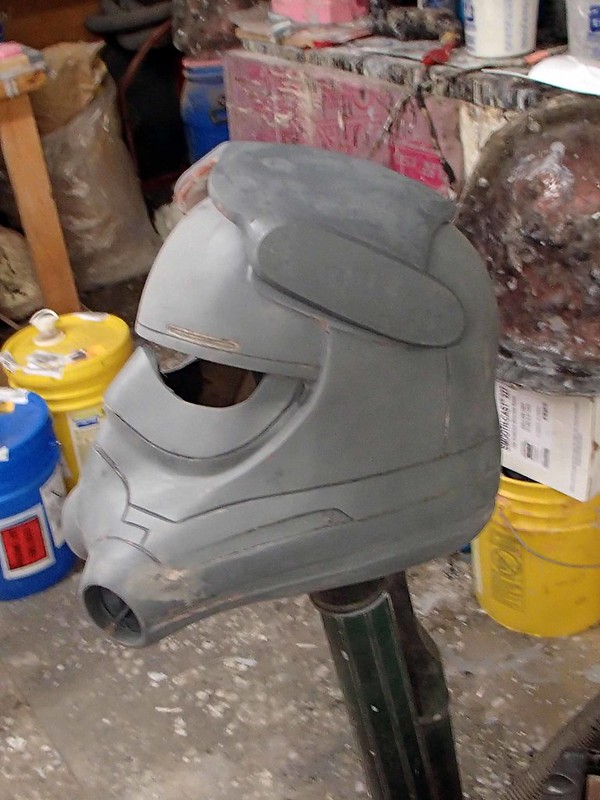
Made a bit more progress on the TIE Pilot helmet:
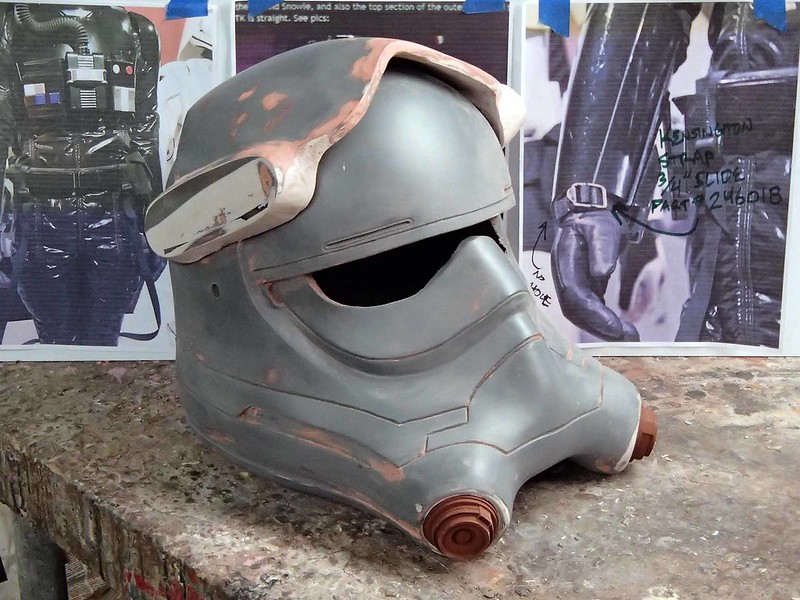
Here it is from another angle:
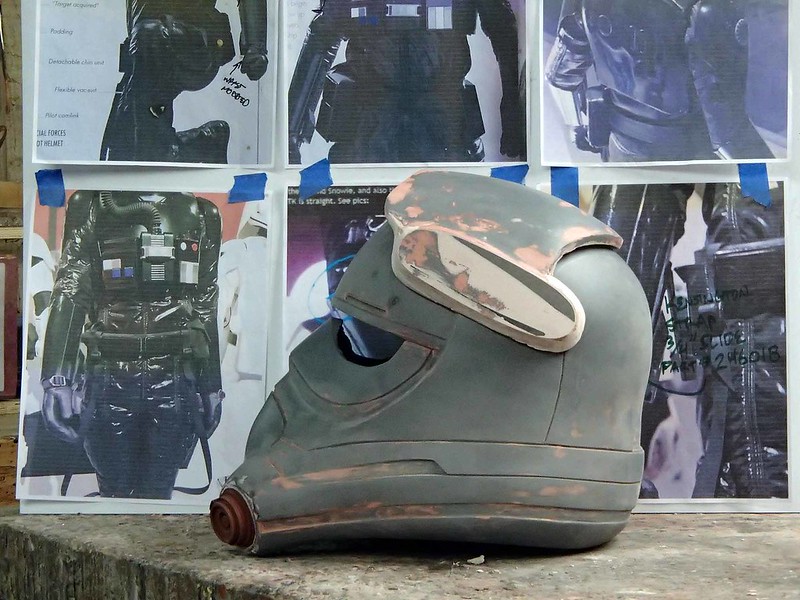
This thing is going to look pretty good on display:
But then again, it looked pretty good when I test fit it with the parts I had on hand:
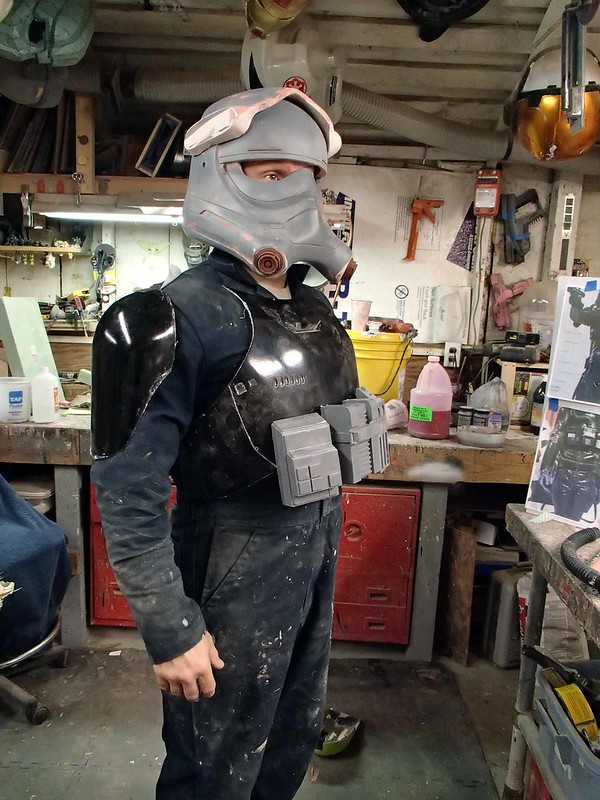
I'm only 5'7 and around 175 pounds, so I had my friend Matt (5'10" tall and heavier than me) try it on:
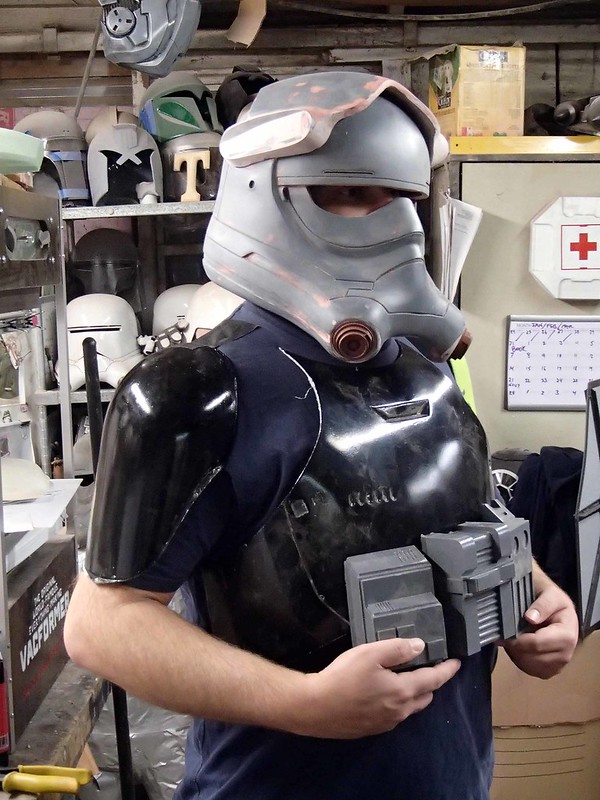
Here he is from a wider angle:
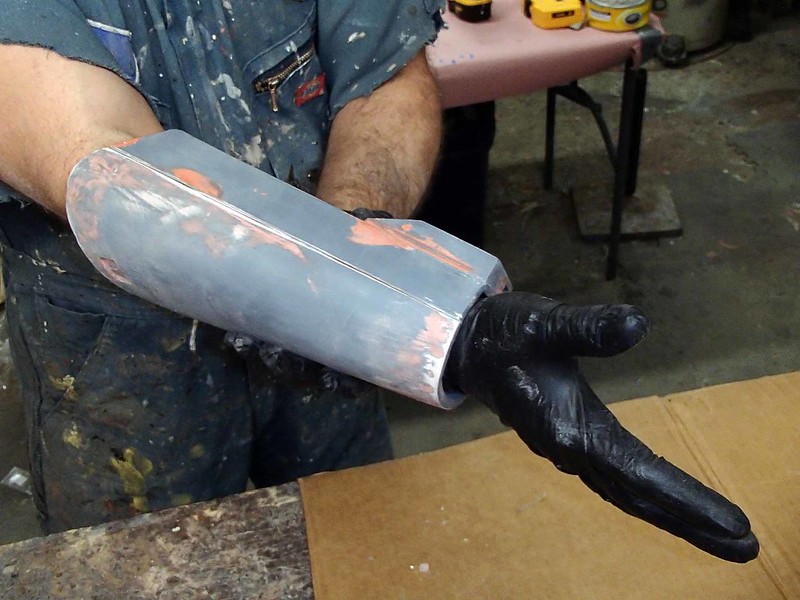
Now I just need to trim a back piece to make it wearable and hurry up and get the gauntlets molded. Then it'll really start to look like something.
Not too bad.
Made a bit more progress on the TIE Pilot helmet:
Here it is from another angle:
This thing is going to look pretty good on display:
But then again, it looked pretty good when I test fit it with the parts I had on hand:
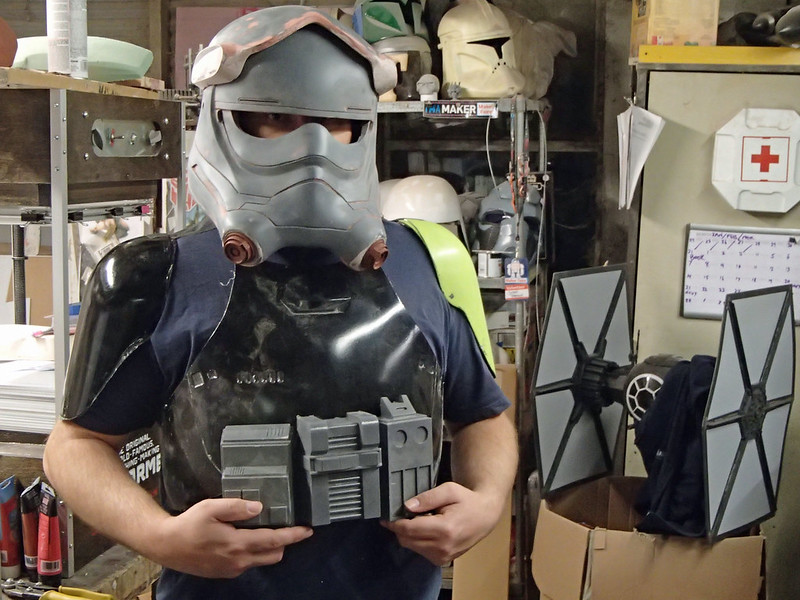
I'm only 5'7 and around 175 pounds, so I had my friend Matt (5'10" tall and heavier than me) try it on:
Here he is from a wider angle:
Now I just need to trim a back piece to make it wearable and hurry up and get the gauntlets molded. Then it'll really start to look like something.
Not too bad.
Sandtracker
Active Member
Re: Thorssoli's Episode VII Builds (Finished Phasma Helmet on Page 7)
Payment sent!
Payment sent!
Re: Thorssoli's Episode VII Builds (TIE Pilot Test Fitting Page 11)
Progress continues.
Here's the TIE helmet prototype in black primer:

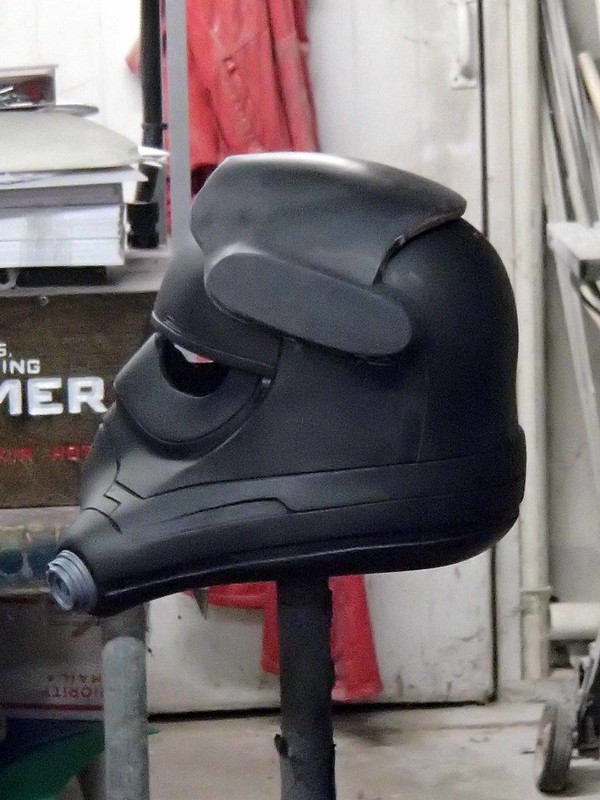
As usual, the whole thing got a glossy coat of paint before it was time to mold it:
Yesterday I started the print coat:
I thickened it up around the bottom too, so now it looks like so:
Today I'll be building up more thickness. Hopefully I'll have the mothermold done tomorrow. With any luck I'll have the first casting out of the mold tomorrow as well. Failing that, it'll be the first thing I do on Friday morning.
The HUD/visor/lid/thingy is close behind. It still needs a tiny bit more smoothing:
It will be in gloss paint today.
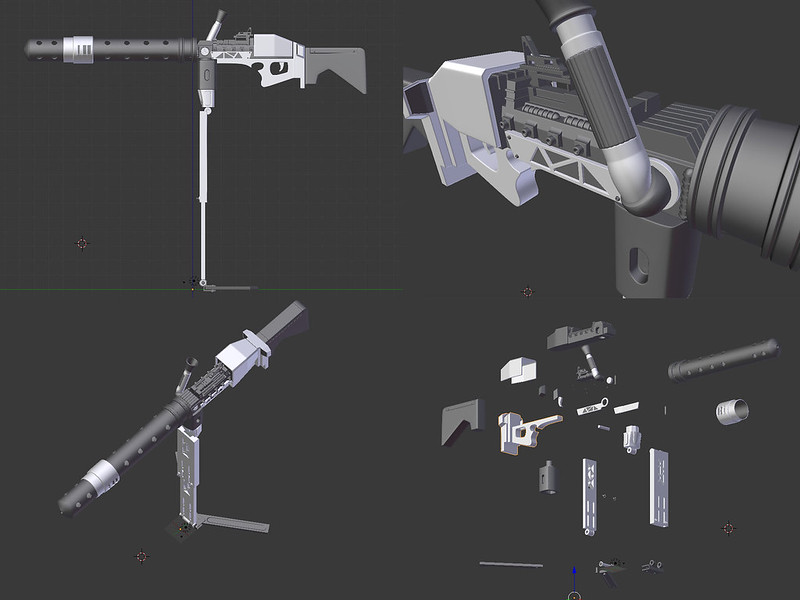
In other news, I had a friend of mine water jet some aluminum bits to attach to the pistols:
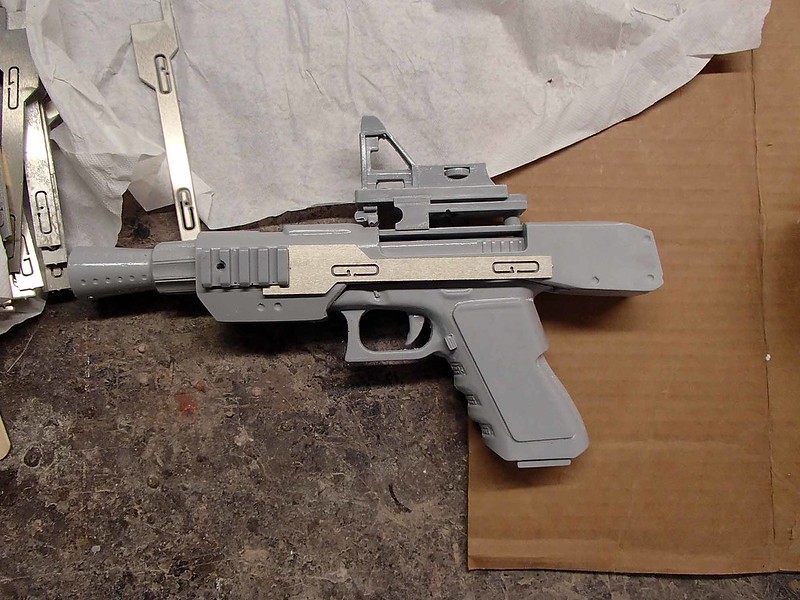
That way I'll be able to slot them into the holster bracket without chewing up the paint job. Nifty!
More to come. Stay tuned...
Progress continues.
Here's the TIE helmet prototype in black primer:
As usual, the whole thing got a glossy coat of paint before it was time to mold it:
Yesterday I started the print coat:
I thickened it up around the bottom too, so now it looks like so:
Today I'll be building up more thickness. Hopefully I'll have the mothermold done tomorrow. With any luck I'll have the first casting out of the mold tomorrow as well. Failing that, it'll be the first thing I do on Friday morning.
The HUD/visor/lid/thingy is close behind. It still needs a tiny bit more smoothing:
It will be in gloss paint today.
In other news, I had a friend of mine water jet some aluminum bits to attach to the pistols:
That way I'll be able to slot them into the holster bracket without chewing up the paint job. Nifty!
More to come. Stay tuned...
Re: Thorssoli's Episode VII Builds (TIE Pilot Test Fitting Page 11)
Amazing work on the TFA tie pilot helmet, I've been following this threat for a while now and just had to compliment you on this!
i would love to get one of your helmets of you're going to sell them.
BTW, i'm from Holland so my apologies if there are any flaws in my engish
Amazing work on the TFA tie pilot helmet, I've been following this threat for a while now and just had to compliment you on this!
i would love to get one of your helmets of you're going to sell them.
BTW, i'm from Holland so my apologies if there are any flaws in my engish
Re: Thorssoli's Episode VII Builds (TIE Pilot Test Fitting Page 11)
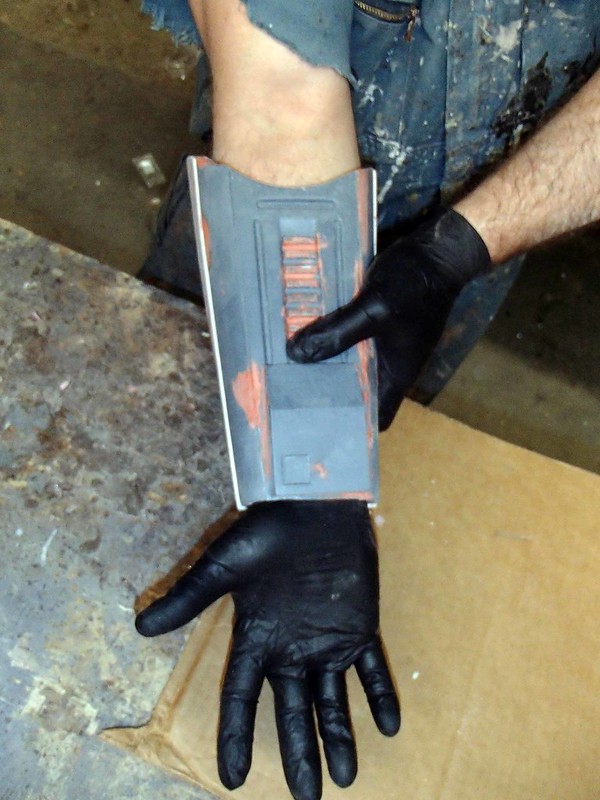
Small progress on the gauntlets. As a few people have pointed out, they're decidedly not the same as the standard stormtrooper gauntlets. I saved the details that I needed and made some largely new prototypes. Here's how they look right now:
My friend Matt made a bit of progress on the HUD/Visor/Lid/Thingy (that's what I've decided to call it):
I've also boxed and molded the aerators:
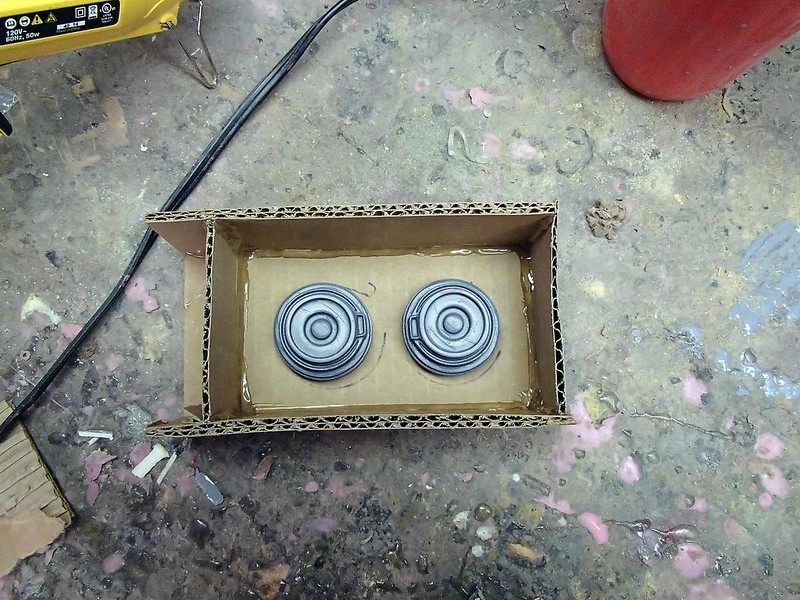
The mold has been poured, but I've been busy with the helmet mold, so I haven't had time to pull them and pour a casting.
On that subject...
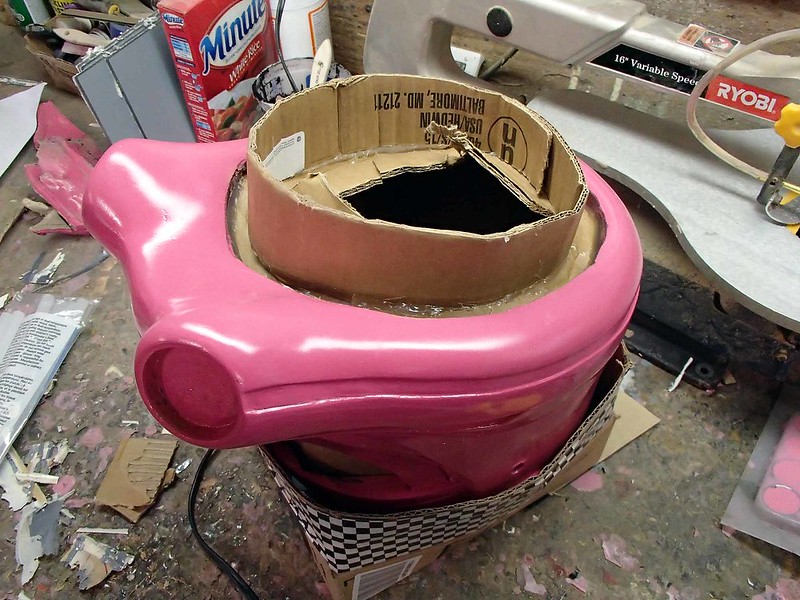
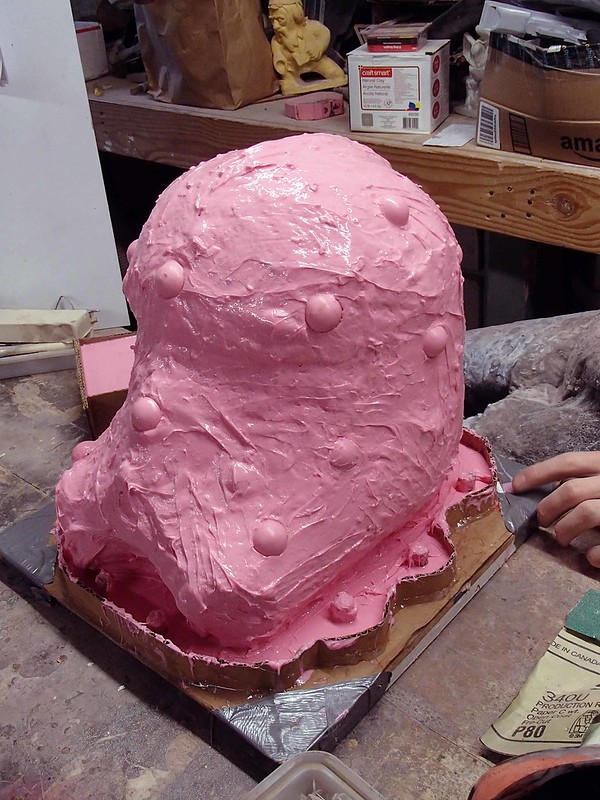
Alright, let's back up a bit. I'm molding the TIE Pilot helmet in much the same way as the flametrooper helmet. I started by backfilling the eye hole with some cardboard:

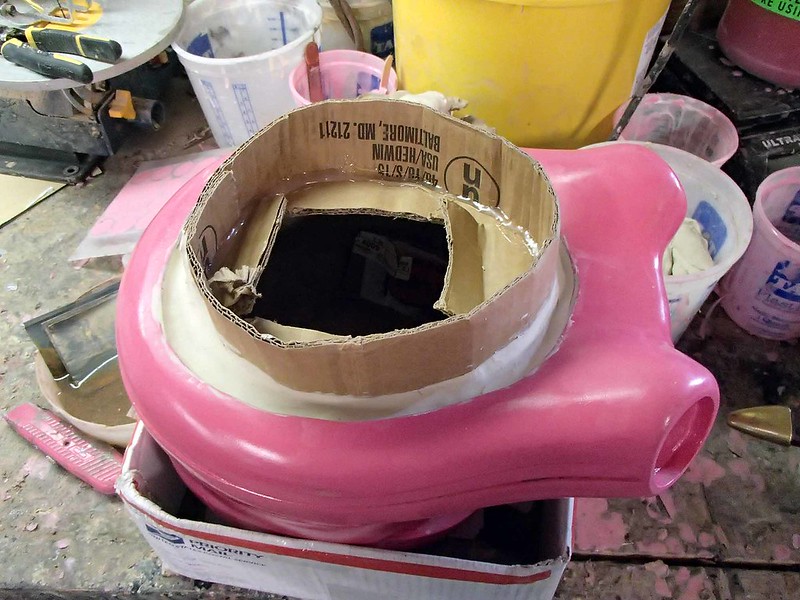
I used some clay to fill in the gap around the cardboard in the eye hole and smooth everything over. Then I inverted the whole thing and capped off the bottom:
I used more clay to shape what will become the "drip lip" on the inside of the helmet mold:
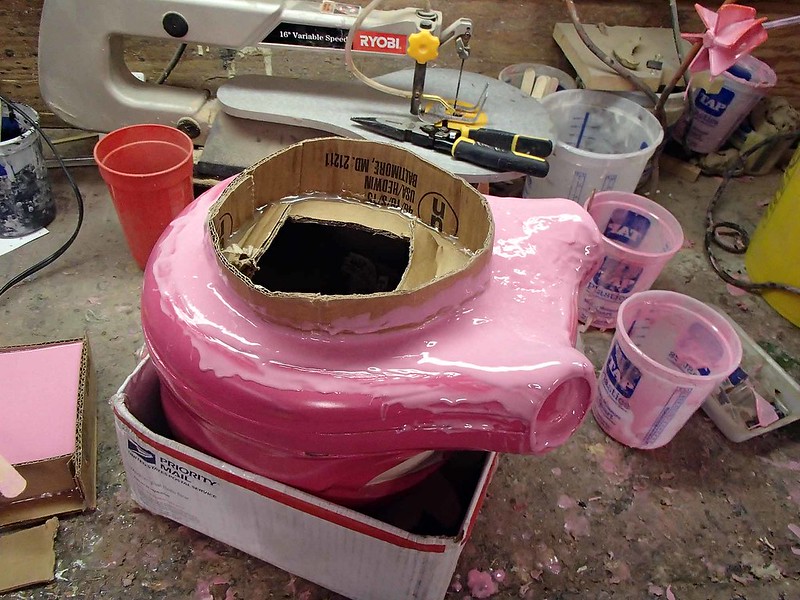
Then I mixed up the first batch of silicone and used it to fill in the lip and cover the underside of the "tusk" area since these will be impossible to get to with the helmet upright on the bench:
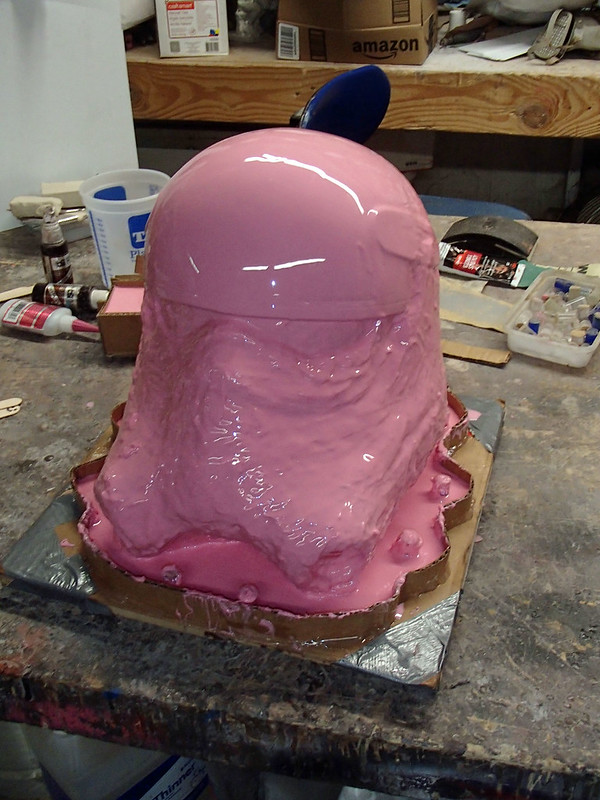
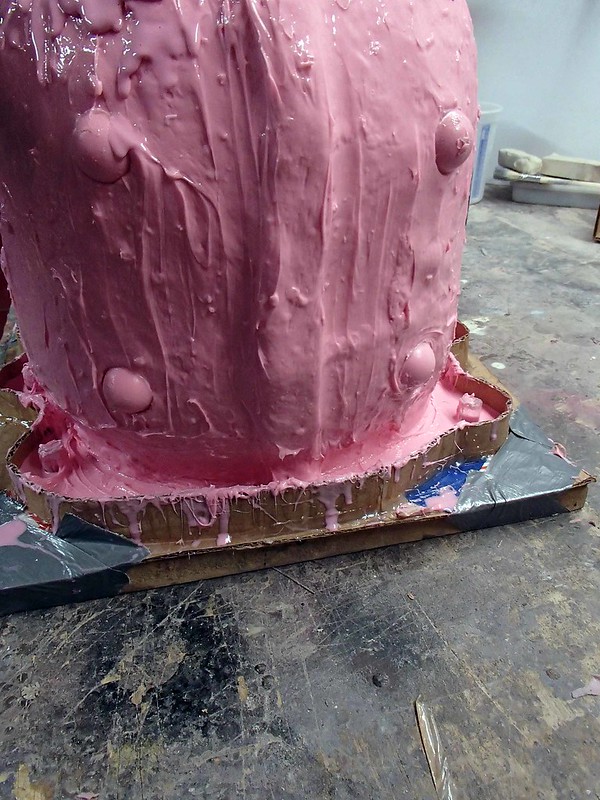
Once that had cured, I flipped the whole thing over and mounted it to a scrap of cardboard, built a wall to contain all of the drips that will flow off of the part, added registration pegs, and poured on the print coat:
I spent some time babysitting that coat, making sure that there were no bubbles forming under the eyebrow ridge, inside the aerator holes, in the right ear hole, or any of the other undercuts and overhangs. Later on I mixed another batch of silicone with some thixotropic additive and used it to pack in under the jawline area in order to make sure no bubbles would form there either:
Then I left it alone overnight.
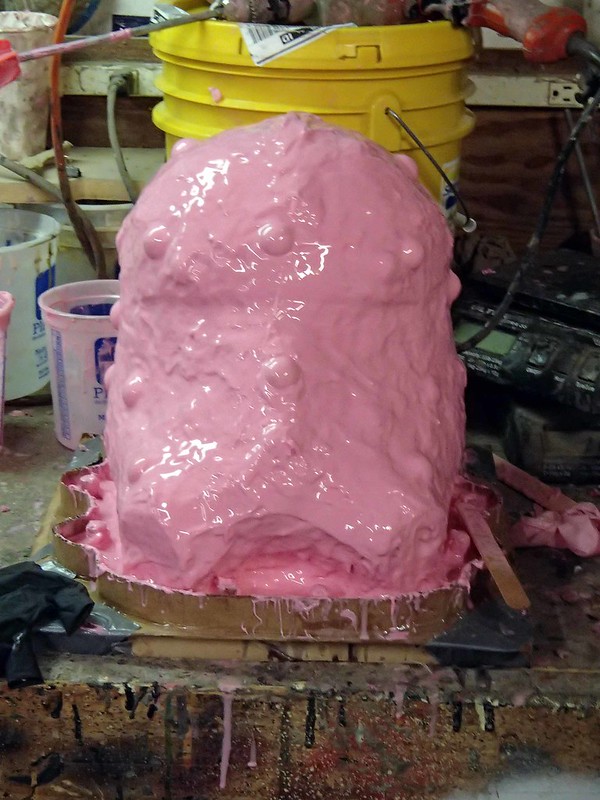
The day before yesterday I went back and added some more thickened silicone as well as some molded registration keys:
Since the rubber jacket is going to need a relief cut in order to demold the parts, I made a thick "mohawk" ridge of silicone up the backside:
Then, to smooth the mold out and make it easier to seat it in the mother mold, I poured on one more layer of silicone without any thickening:
Yesterday I plucked out the pegs around the base of the helmet and built a clay parting wall down the centerline:
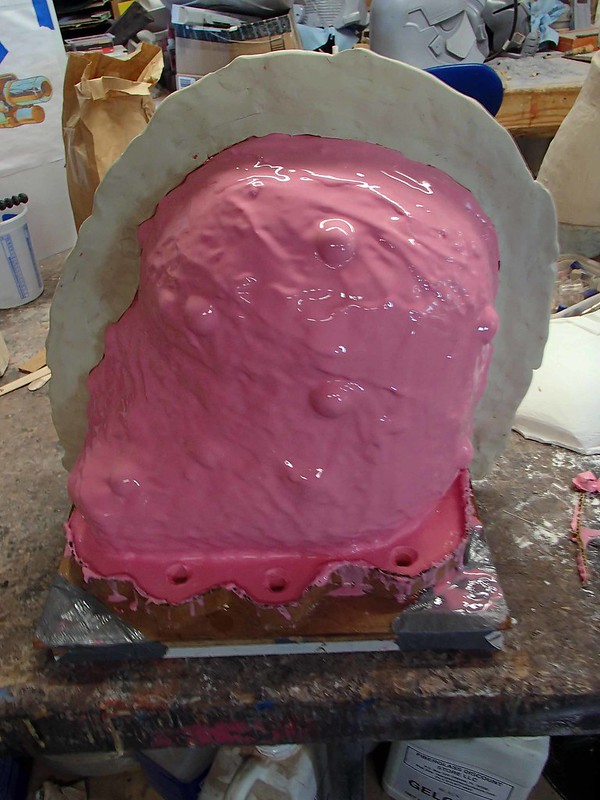
Then I laid up the first half of the fiberglass mothermold:
After that cured, I removed the clay parting wall and added some clay tabs that will allow me to pry the two halves of the mothermold apart later:
Then I laid up the second half of the fiberglass mothermold:
Then I went downtown and watched an early screening of the new Deadpool movie. After that, it was pretty late and I decided to leave the mold alone overnight again. I will pull the first casting today.
Stay tuned for the exciting conclusion...
Small progress on the gauntlets. As a few people have pointed out, they're decidedly not the same as the standard stormtrooper gauntlets. I saved the details that I needed and made some largely new prototypes. Here's how they look right now:
My friend Matt made a bit of progress on the HUD/Visor/Lid/Thingy (that's what I've decided to call it):
I've also boxed and molded the aerators:
The mold has been poured, but I've been busy with the helmet mold, so I haven't had time to pull them and pour a casting.
On that subject...
@thorssoli do you need to work the print coat into the overhangs? Like at the eyebrow.
Alright, let's back up a bit. I'm molding the TIE Pilot helmet in much the same way as the flametrooper helmet. I started by backfilling the eye hole with some cardboard:
I used some clay to fill in the gap around the cardboard in the eye hole and smooth everything over. Then I inverted the whole thing and capped off the bottom:
I used more clay to shape what will become the "drip lip" on the inside of the helmet mold:
Then I mixed up the first batch of silicone and used it to fill in the lip and cover the underside of the "tusk" area since these will be impossible to get to with the helmet upright on the bench:
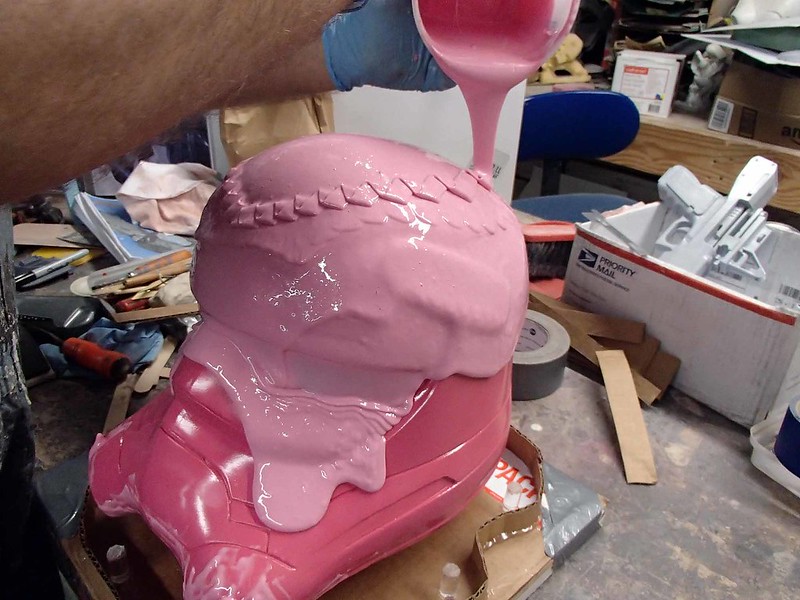
Once that had cured, I flipped the whole thing over and mounted it to a scrap of cardboard, built a wall to contain all of the drips that will flow off of the part, added registration pegs, and poured on the print coat:
I spent some time babysitting that coat, making sure that there were no bubbles forming under the eyebrow ridge, inside the aerator holes, in the right ear hole, or any of the other undercuts and overhangs. Later on I mixed another batch of silicone with some thixotropic additive and used it to pack in under the jawline area in order to make sure no bubbles would form there either:
Then I left it alone overnight.
The day before yesterday I went back and added some more thickened silicone as well as some molded registration keys:
Since the rubber jacket is going to need a relief cut in order to demold the parts, I made a thick "mohawk" ridge of silicone up the backside:
Then, to smooth the mold out and make it easier to seat it in the mother mold, I poured on one more layer of silicone without any thickening:
Yesterday I plucked out the pegs around the base of the helmet and built a clay parting wall down the centerline:
Then I laid up the first half of the fiberglass mothermold:
After that cured, I removed the clay parting wall and added some clay tabs that will allow me to pry the two halves of the mothermold apart later:
Then I laid up the second half of the fiberglass mothermold:
Then I went downtown and watched an early screening of the new Deadpool movie. After that, it was pretty late and I decided to leave the mold alone overnight again. I will pull the first casting today.
Stay tuned for the exciting conclusion...
Similar threads
- Replies
- 11
- Views
- 823
- Replies
- 2
- Views
- 597